 My RISC-V finally running in university
My RISC-V finally running in university, thank you to all team members 2025-05-06 01:18:48
My RISC-V finally running in university, thank you to all team members
 2023 Achievements
Quantr Foundation Achievements 2023 RISC-V Simulator RISC-V is an open and free instruction set architecture (ISA) that supports various types of computing devices, from embedded systems to supercomputers. RISC-V has many advantages over proprietary ISAs, such as lower cost, flexibility, and innovation. However, RISC-V also faces some challenges, such as the lack of standardization, compatibility, […] 2024-01-29 17:24:21
Quantr Foundation Achievements 2023
RISC-V Simulator
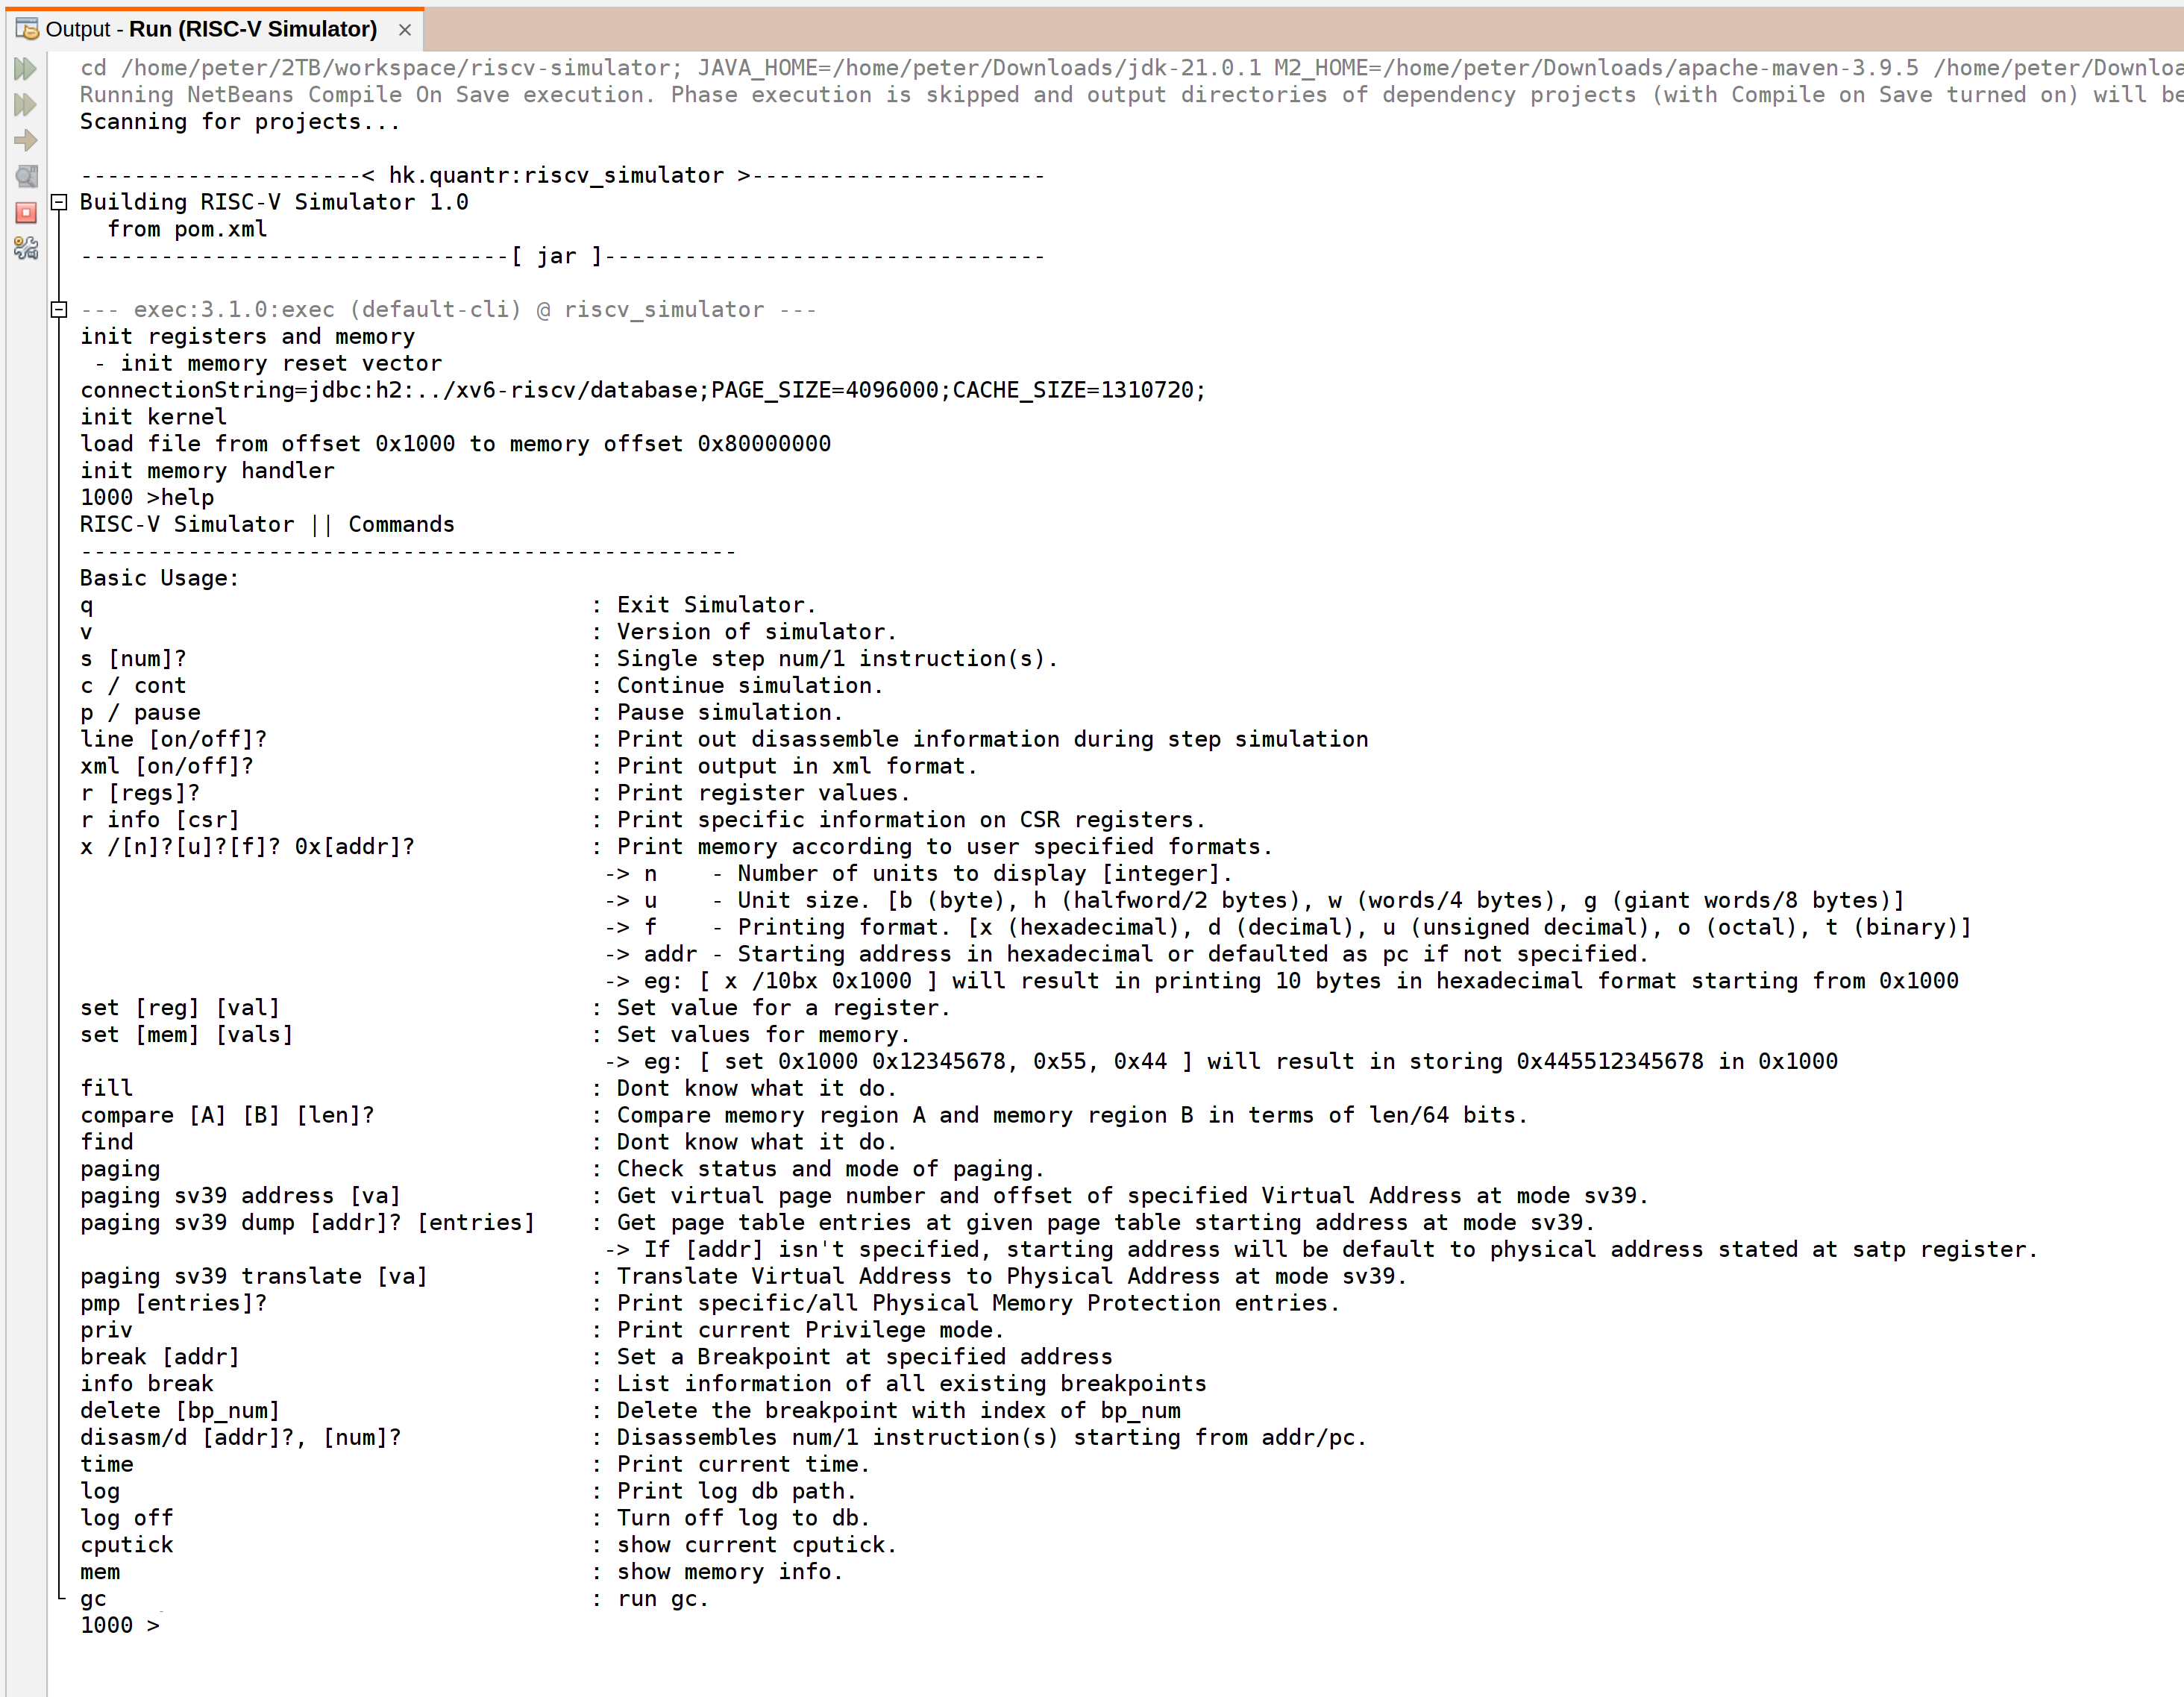
RISC-V is an open and free instruction set architecture (ISA) that supports various types of computing devices, from embedded systems to supercomputers. RISC-V has many advantages over proprietary ISAs, such as lower cost, flexibility, and innovation. However, RISC-V also faces some challenges, such as the lack of standardization, compatibility, and optimization.
To address these challenges, Quantr Foundation, a non-profit organization dedicated to promoting RISC-V education and development, has created a RISC-V simulator that can help developers and learners to design, test, and debug RISC-V based systems. The Quantr RISC-V simulator is a Java-based tool that can run RISC-V assembly programs and display the execution on different microarchitectures, such as single-cycle and pipelined. The simulator also supports the V extension, which adds vector-based SIMD capabilities to RISC-V, enabling faster and more efficient processing of tasks like media, graphics, and machine learning.
The Quantr RISC-V simulator is not only a useful tool for RISC-V enthusiasts, but also a platform for innovation and collaboration. The simulator is open-source and allows users to add custom fields, transform, merge, trim, and encrypt sections of the executable file format, and optimize the performance and security of the system. The simulator also integrates with other RISC-V projects, such as the QtRVSim, a graphical user interface for the simulator, and the Quantr RISC-V executable file format (.QR), a new format specially designed for RISC-V assembled files.
The Quantr RISC-V simulator is a valuable contribution to the RISC-V community, as it demonstrates the potential and possibilities of RISC-V as a universal ISA for the future of computing. By providing a user-friendly and powerful simulator, Quantr Foundation hopes to inspire more people to join the RISC-V movement and create a more diverse and inclusive computing ecosystem.
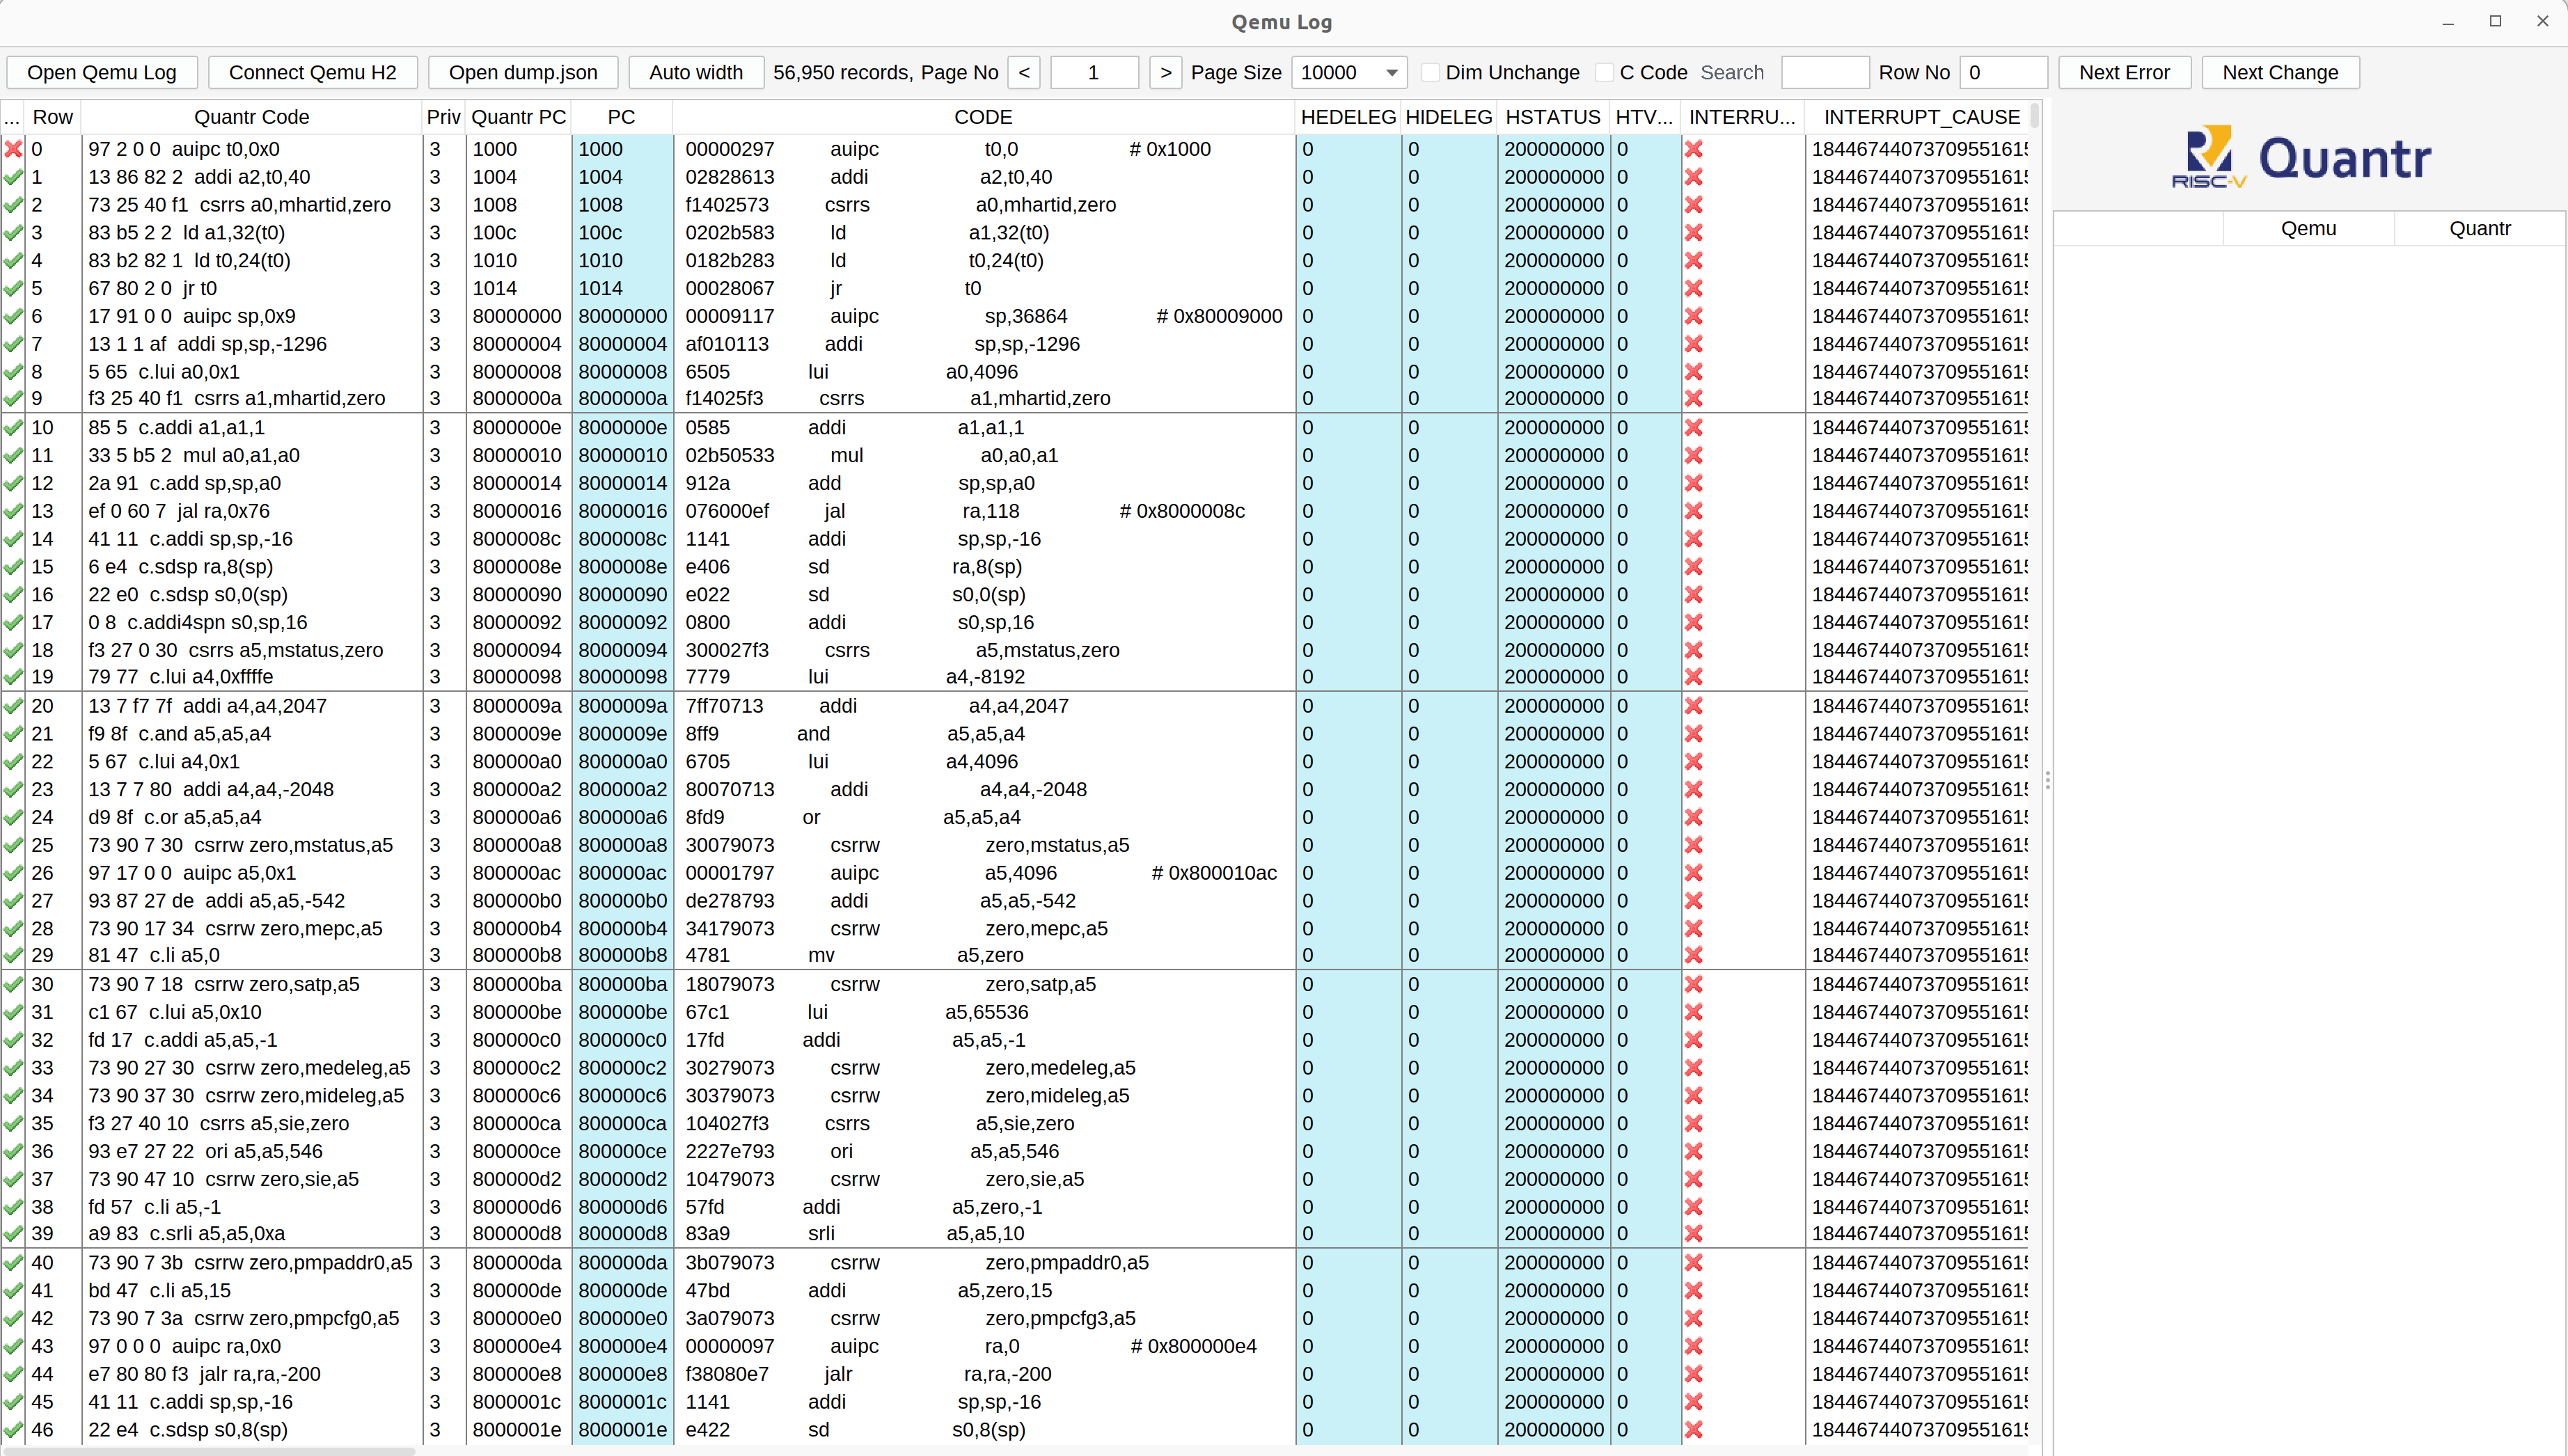
QEMU Log Panel
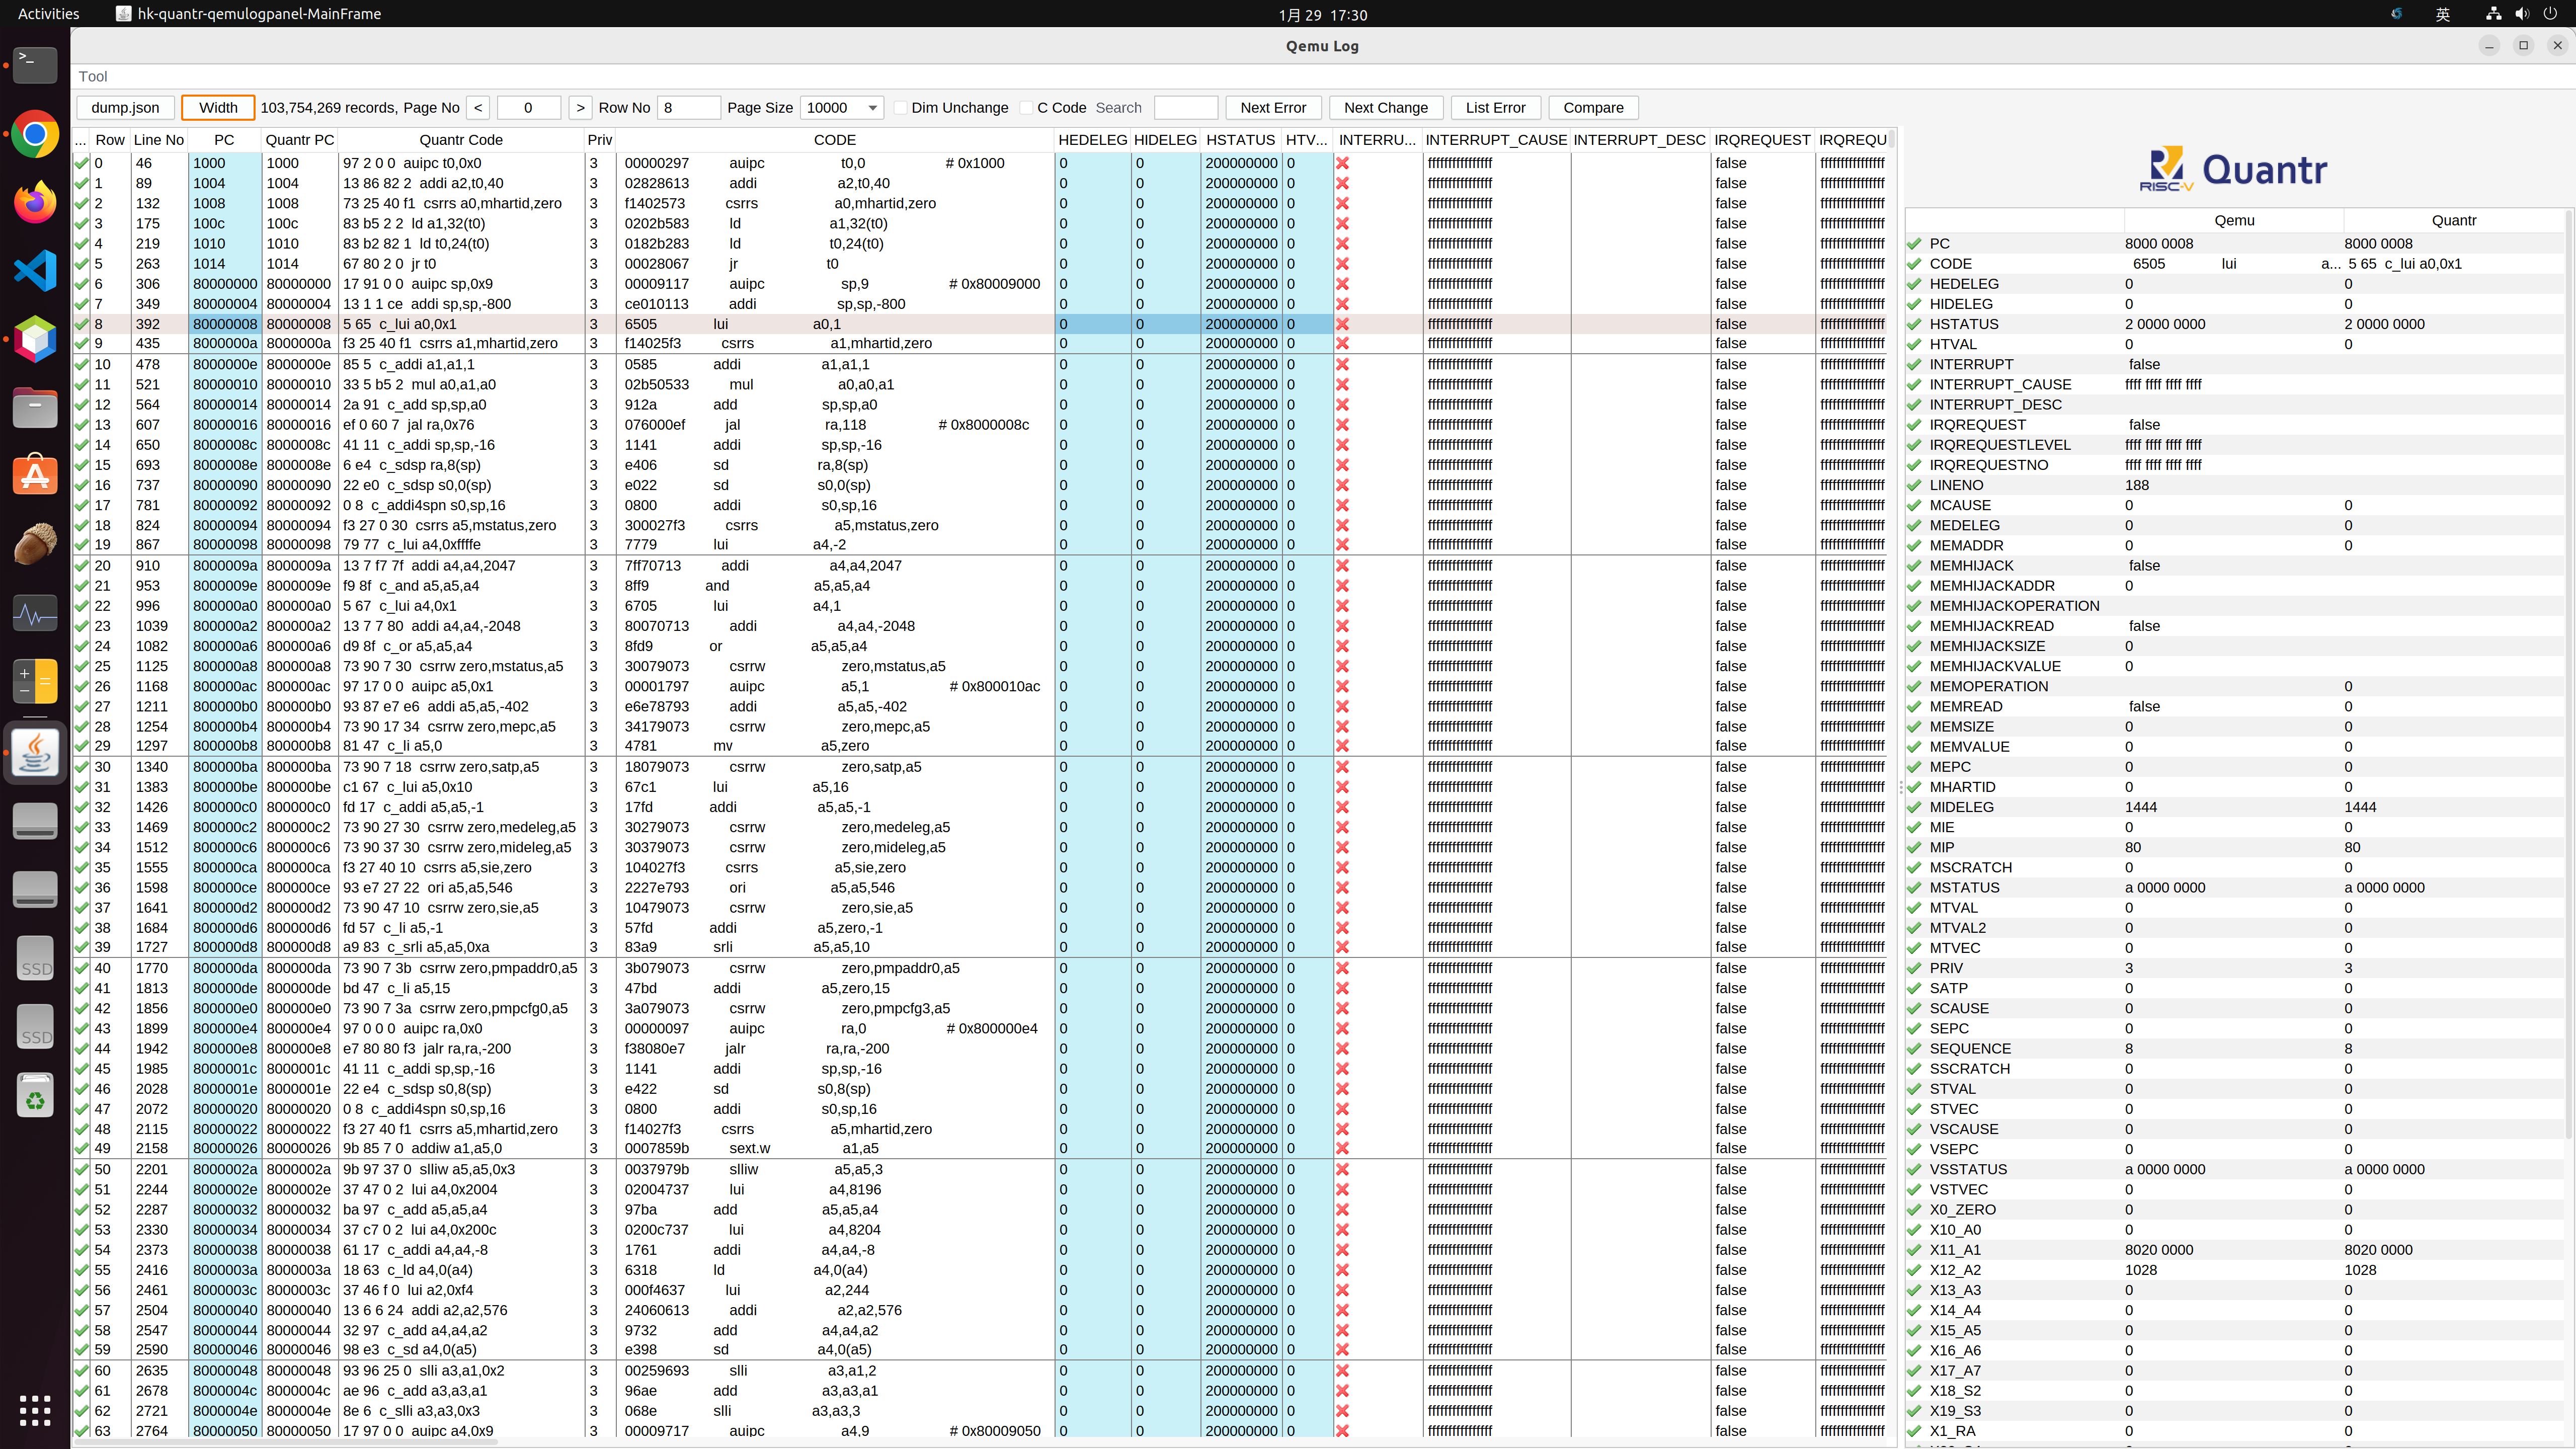
QEMU is a popular open-source emulator that can run various operating systems and architectures on a single host machine. QEMU is widely used for CPU development, as it allows developers to test their code on different platforms without the need for physical hardware. However, QEMU also generates a large amount of log data, which can be difficult to analyze and debug.
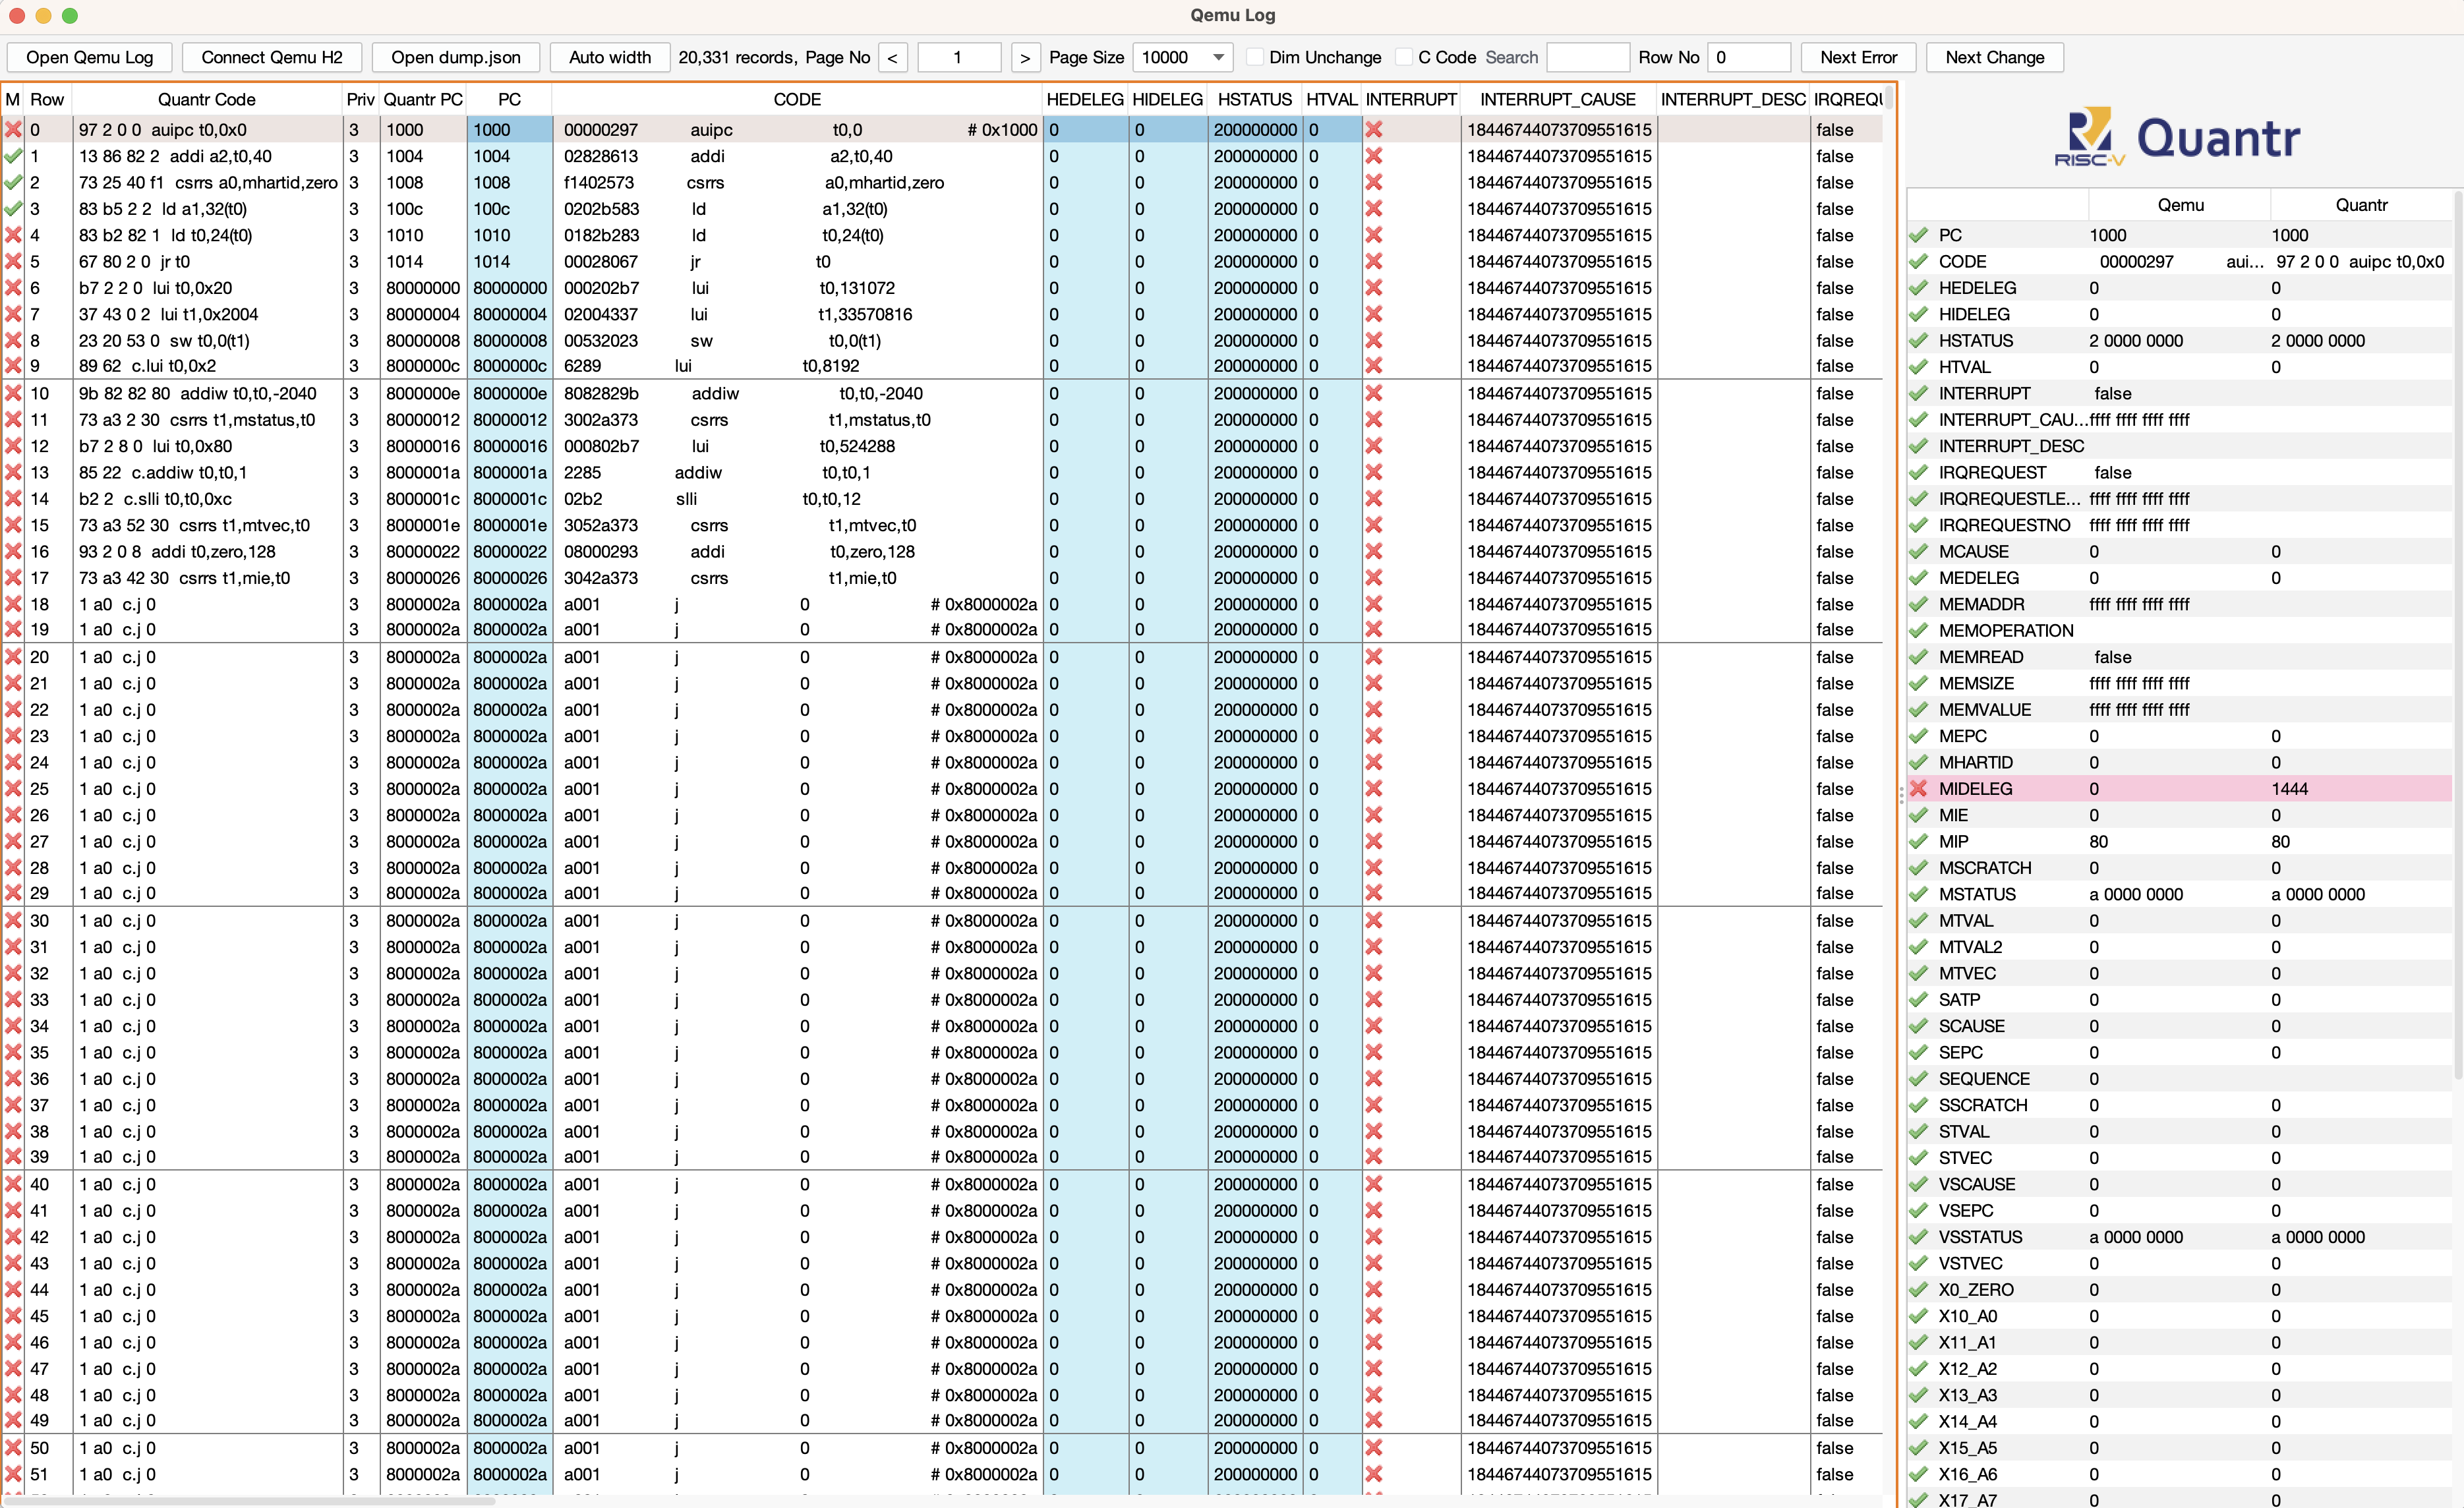
To solve this problem, Quantr Foundation, a non-profit organization that promotes RISC-V education and development, has created a QEMU log panel, a software tool that can help developers and learners to analyze the log generated by QEMU. The QEMU log panel is a Java-based tool that can convert the QEMU log into an H2 database, which can be queried and manipulated using SQL commands. The QEMU log panel also provides a graphical user interface (GUI) that can display the log data in a table format, and allow users to compare the log data from different sources, such as xv6-riscv, a simple Unix-like operating system for RISC-V, and Quantr's own RISC-V simulator.
The QEMU log panel is not only a useful tool for QEMU users, but also a platform for learning and innovation. The QEMU log panel is open-source and allows users to customize and extend its functionality, such as adding new fields, transforming, merging, trimming, and encrypting sections of the executable file format, and optimizing the performance and security of the system. The QEMU log panel also integrates with other RISC-V projects, such as the Quantr RISC-V executable file format (.QR), a new format specially designed for RISC-V assembled files, and the Quantr RISC-V simulator, a Java-based tool that can run RISC-V assembly programs and display the execution on different microarchitectures.
The QEMU log panel is a valuable contribution to the QEMU and RISC-V communities, as it demonstrates the power and potential of QEMU as a versatile emulator for CPU development. By providing a user-friendly and powerful log analyzer, Quantr Foundation hopes to inspire more people to join the QEMU and RISC-V movements and create a more diverse and inclusive computing ecosystem.
Quantr Logic - Circuit simulator
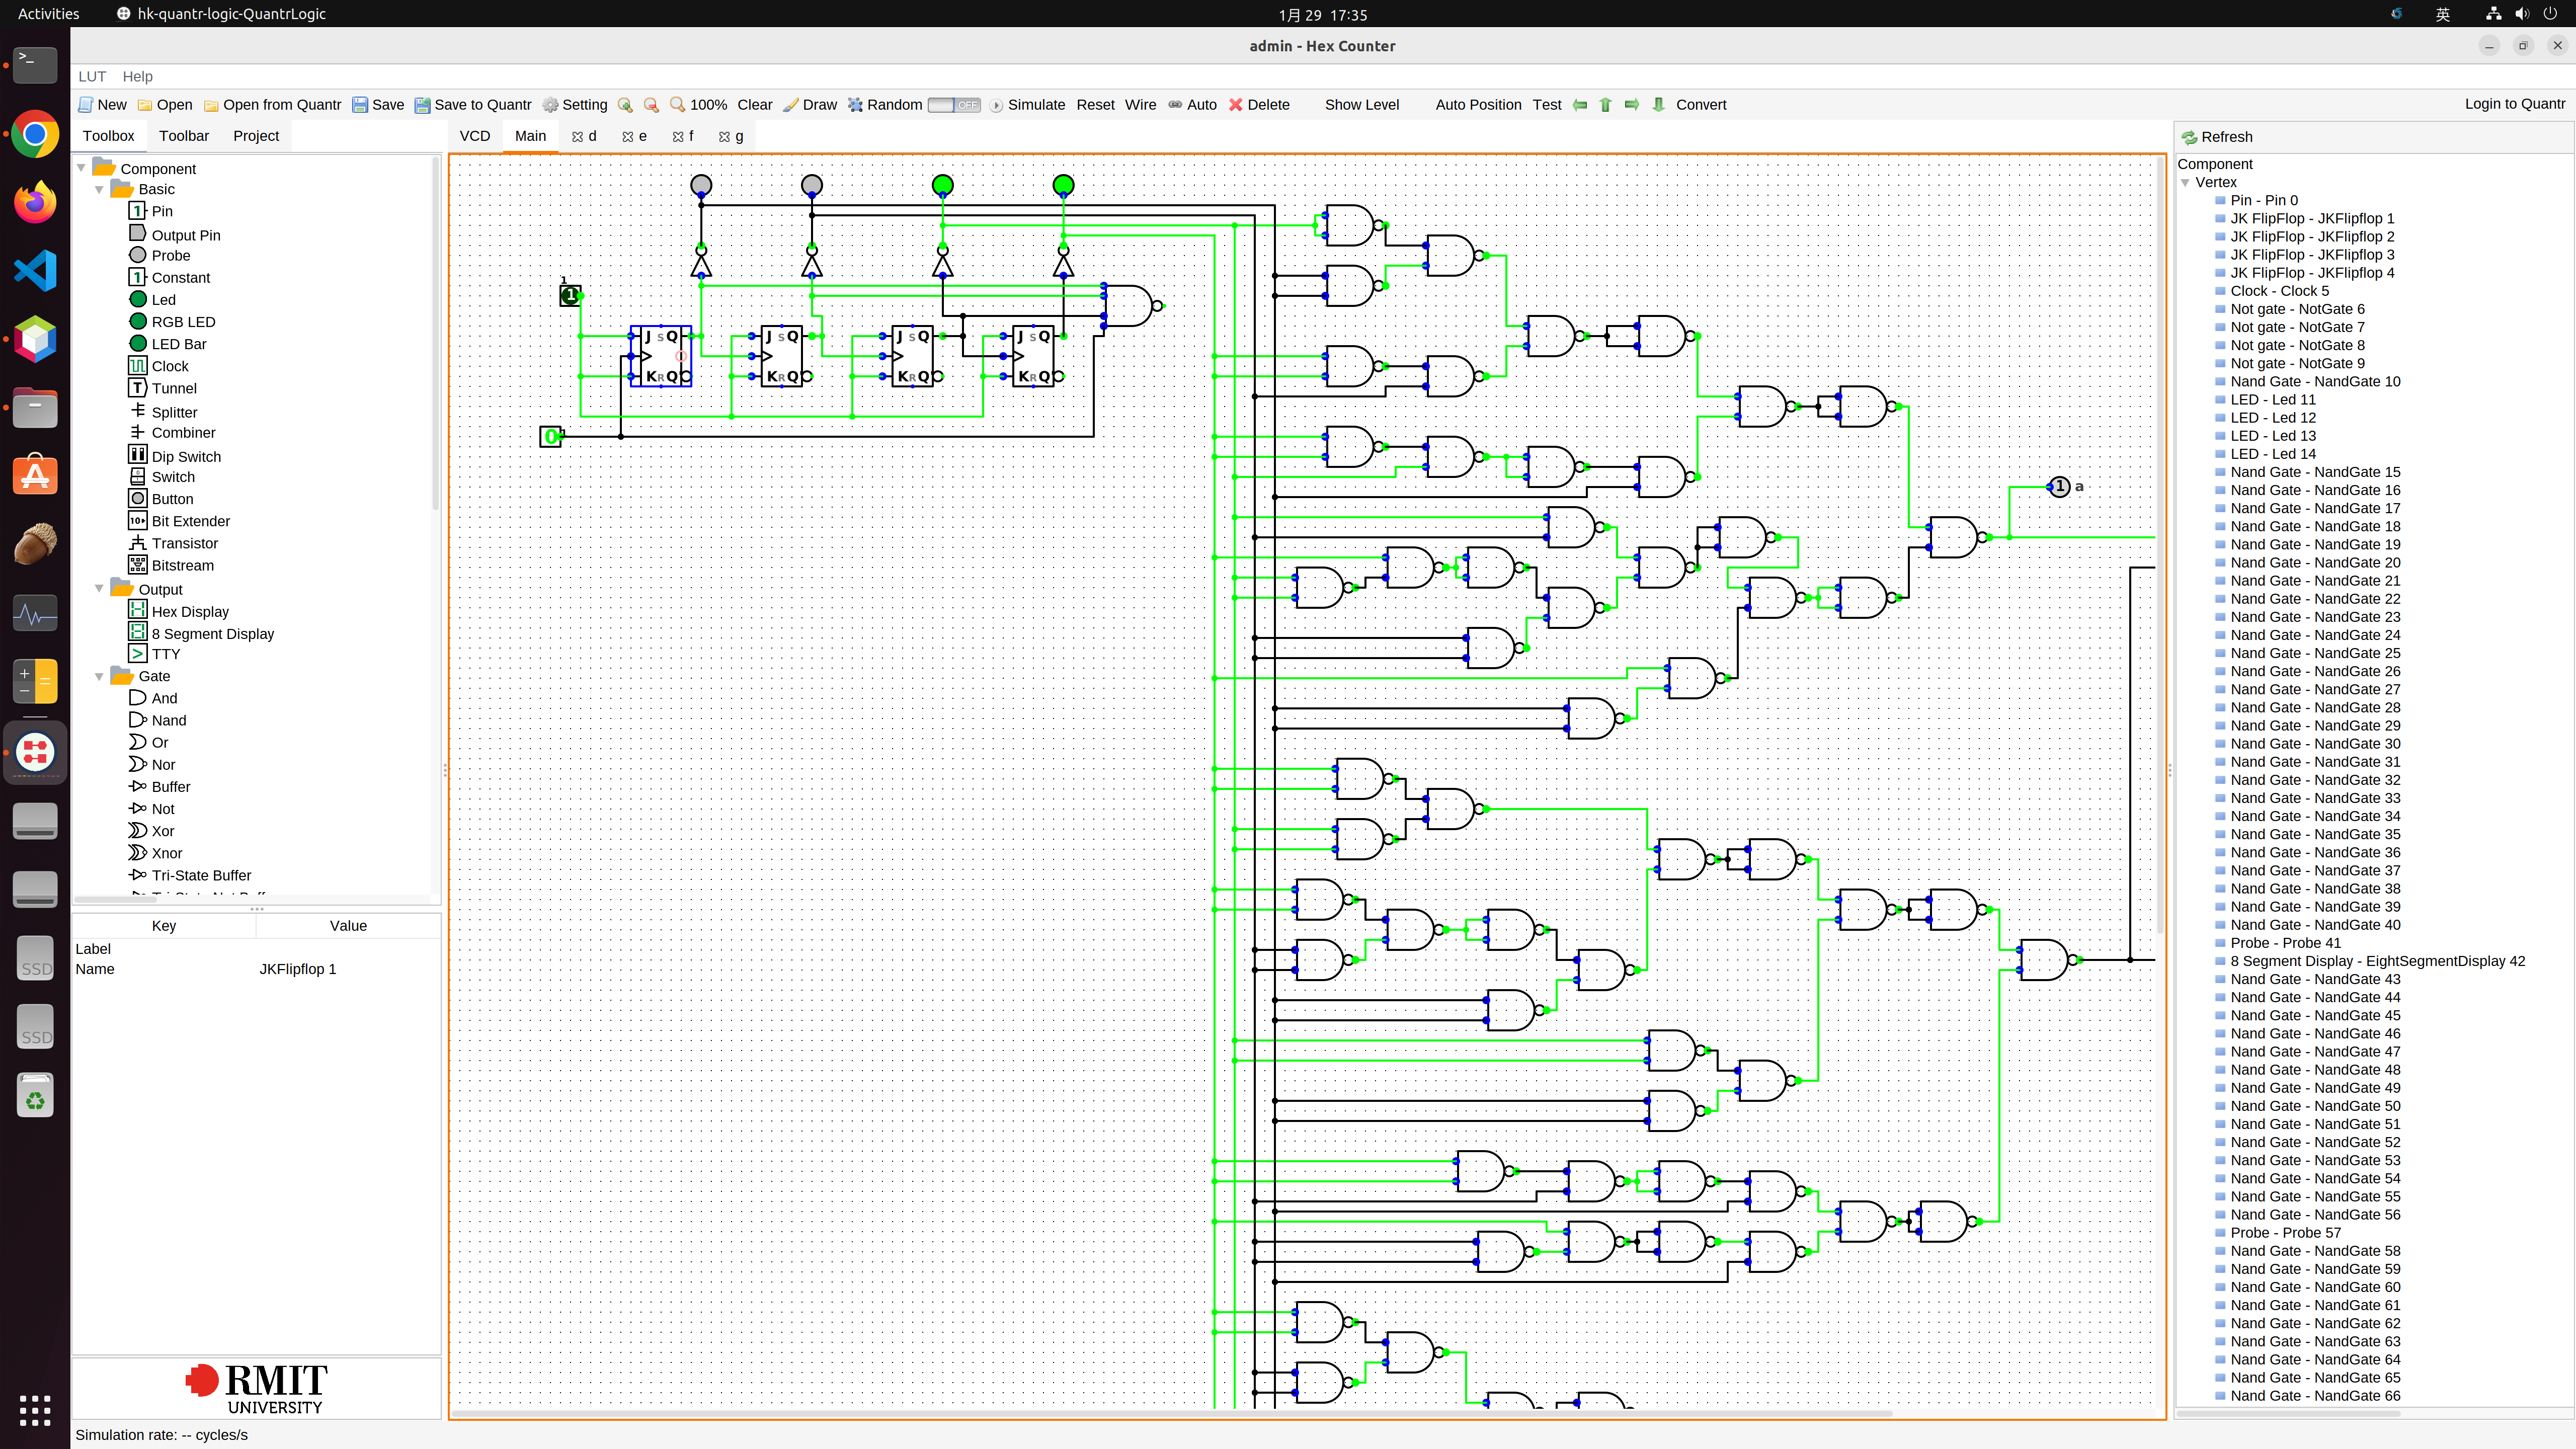
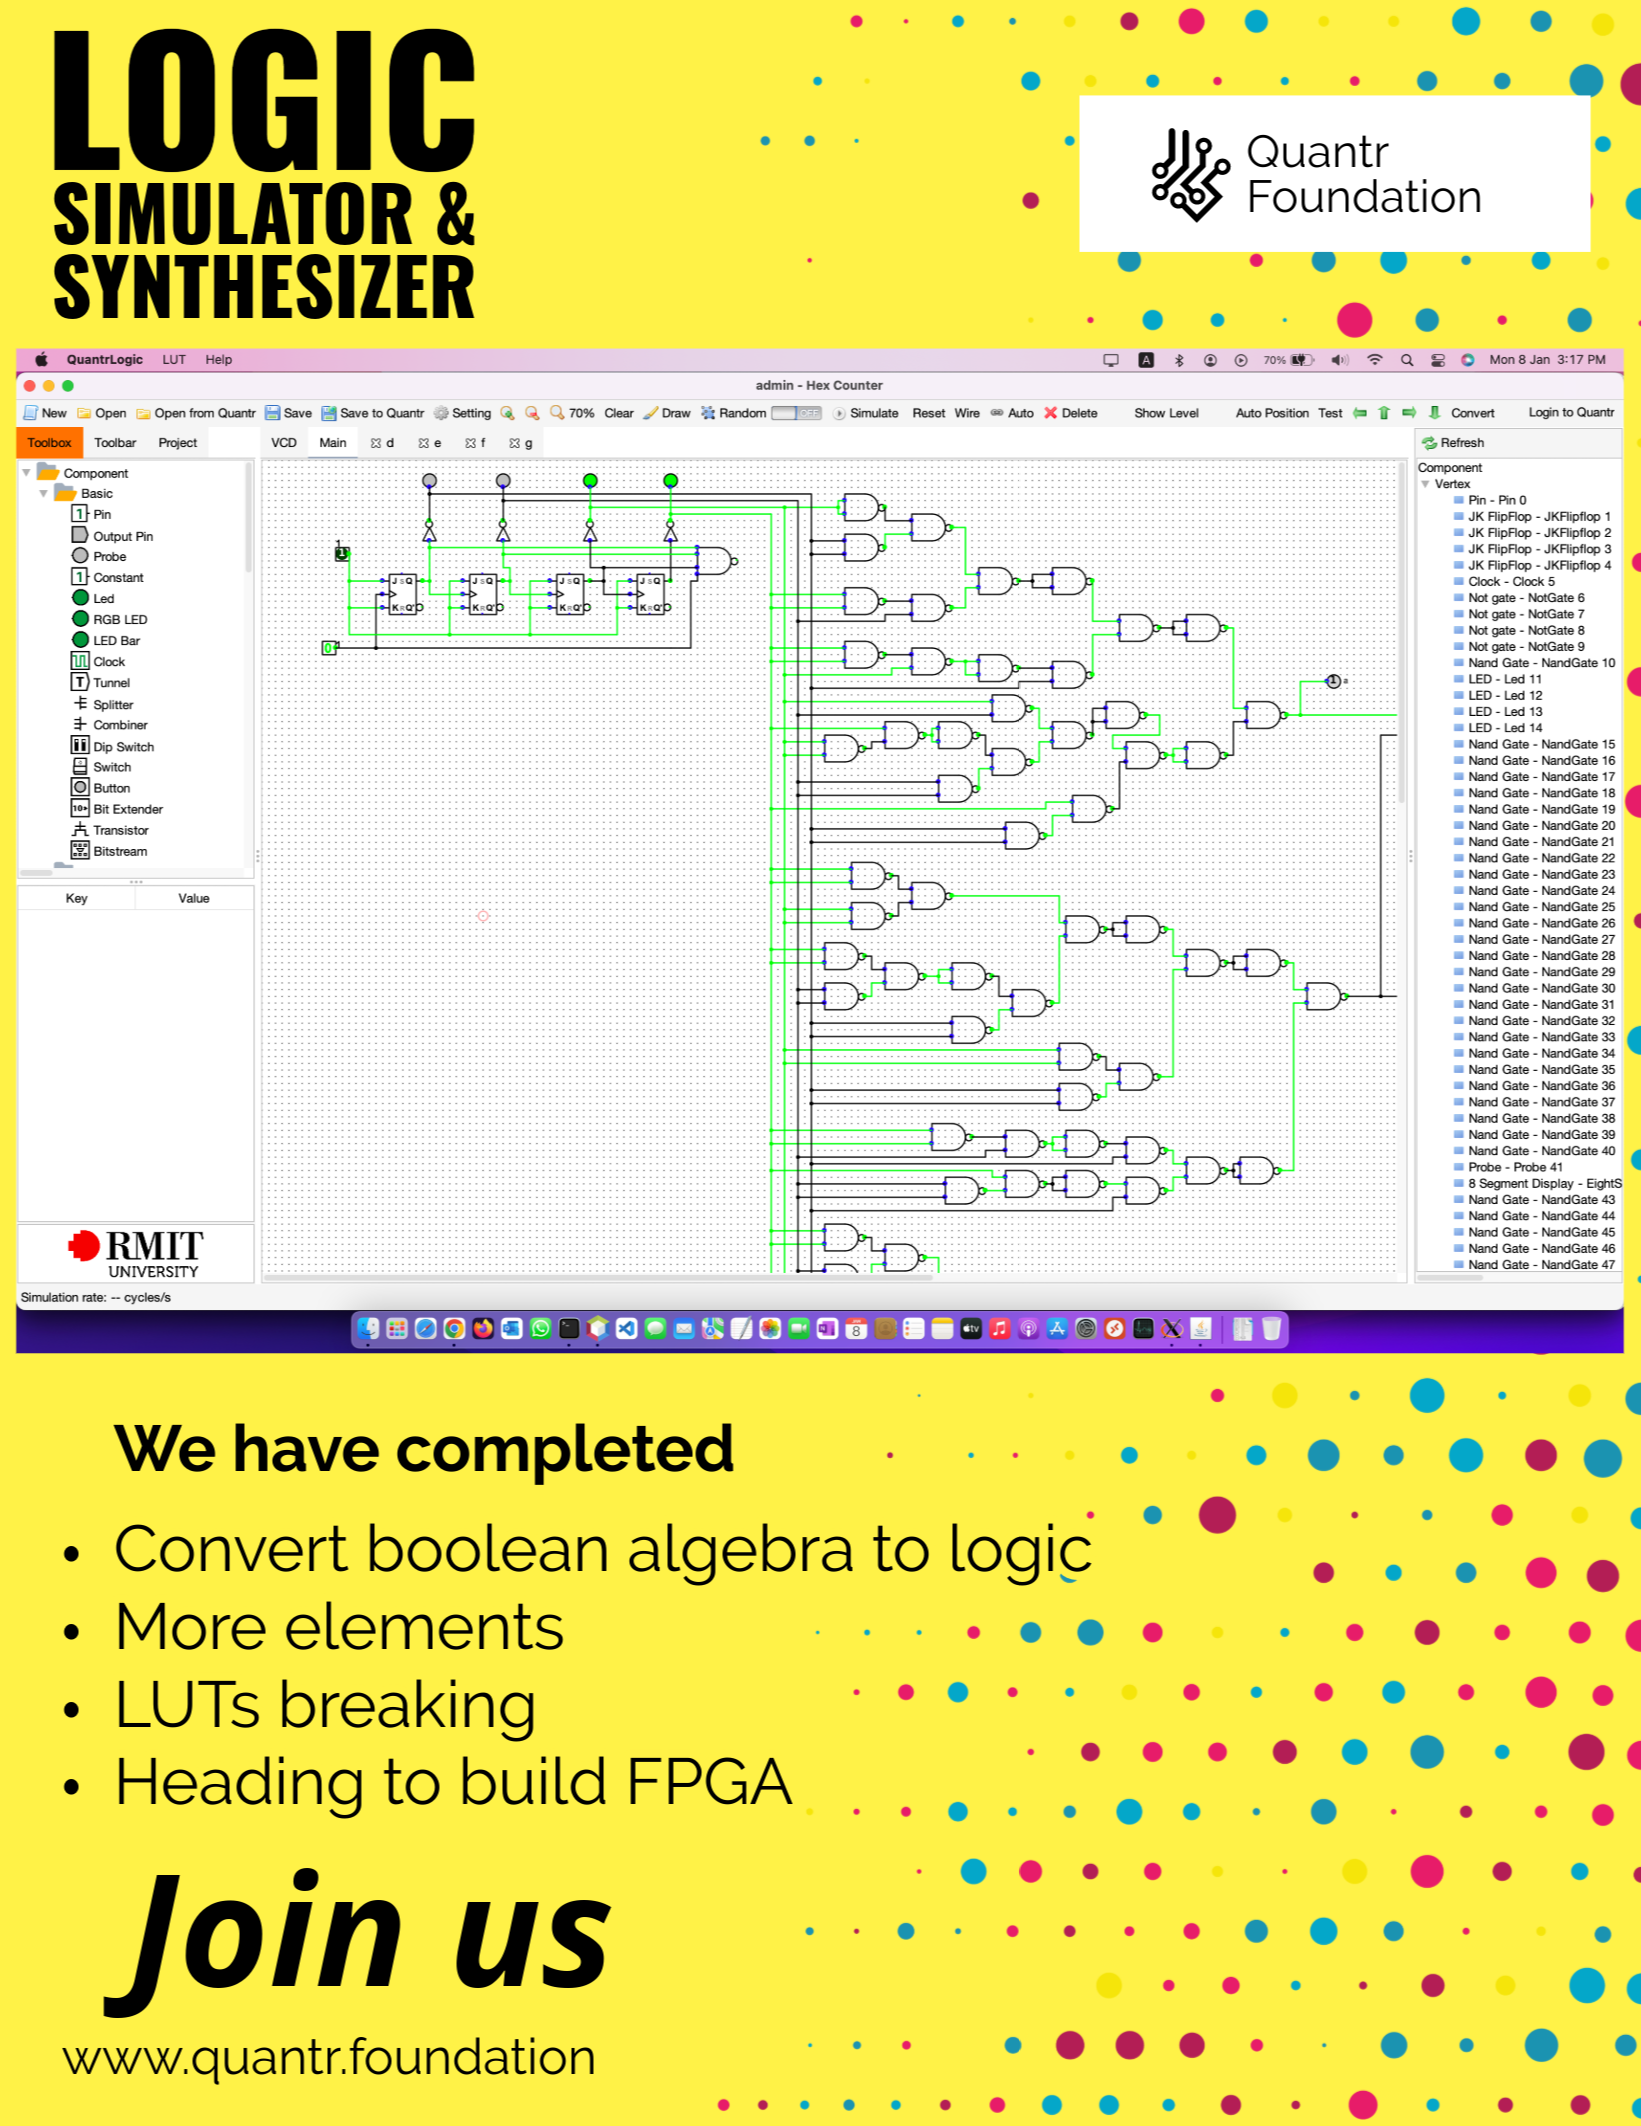
Quantr Logic is a circuit simulator that can help developers and learners to design, test, and debug digital logic circuits. Quantr Logic is a web-based tool that can run on any browser and device, without the need for installation or registration. Quantr Logic is developed by Quantr Foundation, a non-profit organization dedicated to promoting RISC-V education and development.
Quantr Logic allows users to create and edit circuits using a drag-and-drop interface, and provides a variety of components, such as gates, flip-flops, multiplexers, decoders, and registers. Quantr Logic also supports the creation of custom components, which can be reused and shared with other users. Quantr Logic can simulate the circuits in real-time, and display the values of the inputs, outputs, and internal signals. Quantr Logic also provides a waveform viewer, which can show the changes of the signals over time, and a truth table generator, which can show the logical relations between the inputs and outputs.
Quantr Logic is not only a useful tool for circuit design, but also a platform for learning and innovation. Quantr Logic is open-source and allows users to contribute to its development and improvement. Quantr Logic also integrates with other RISC-V projects, such as the Quantr RISC-V executable file format (.QR), a new format specially designed for RISC-V assembled files, and the Quantr RISC-V simulator, a Java-based tool that can run RISC-V assembly programs and display the execution on different microarchitectures.
Quantr Logic is a valuable contribution to the circuit design and RISC-V communities, as it demonstrates the power and potential of digital logic circuits as the building blocks of computing systems. By providing a user-friendly and powerful circuit simulator, Quantr Foundation hopes to inspire more people to join the circuit design and RISC-V movements and create a more diverse and inclusive computing ecosystem.
What we do in 2024

The Hong Kong CPU Project is an open source project initiated by Hong Kong people to design and manufacture a central processing unit (CPU) based on the RISC-V architecture. RISC-V is a free and open instruction set architecture (ISA) suitable for various types of computing devices, from embedded systems to supercomputers. RISC-V has many advantages over other proprietary ISAs, such as low cost, flexibility and innovation. The Hong Kong people’s CPU project hopes to use the advantages of RISC-V to create a CPU suitable for Hong Kong people and at the same time promote the development of computer technology in Hong Kong.
Hong Kong's CPU project covers all stages of CPU design, simulation, verification, compilation, testing and manufacturing. The plan uses a variety of open source tools and platforms, such as QEMU, CPU-Z, Computer and Communication Products Recycling Program, etc. The plan also cooperates with other RISC-V projects, such as Quantr Foundation's RISC-V simulator, RISC-V executable file format (.QR), QtRVSim, etc. The result of the project is a CPU called HKCPU, which uses the 32-bit RISC-V ISA and supports V extensions, the vectorized SIMD function, which can speed up and improve the efficiency of processing tasks such as media, imaging and machine learning.
The Hong Kong people's CPU project is a valuable contribution, showing the creativity and ability of Hong Kong people to the world. By providing a user-friendly and powerful CPU, Hong Kong’s CPU Project hopes to inspire more Hong Kong people to participate in the RISC-V movement, while creating a more diverse and inclusive ecosystem for Hong Kong’s computer technology.
香港人嘅cpu計劃是一個由香港人發起嘅開源計劃,目的係為咗設計同製造一個基於RISC-V架構嘅中央處理器(CPU)。RISC-V係一個自由同開放嘅指令集架構(ISA),適用於各種類型嘅計算設備,由嵌入式系統到超級電腦。RISC-V相比其他專有嘅ISA,有好多優勢,例如低成本、靈活性同創新性。香港人嘅cpu計劃希望利用RISC-V嘅優勢,打造一個適合香港人嘅CPU,同時推動香港嘅計算機科技發展。
香港人嘅cpu計劃涵蓋咗CPU嘅設計、模擬、驗證、編譯、測試同製造等各個階段。計劃採用咗多種開源嘅工具同平台,例如QEMU、CPU-Z、電腦及通訊產品回收計劃等。計劃亦同其他RISC-V嘅項目有合作,例如Quantr Foundation嘅RISC-V模擬器、RISC-V執行檔格式(.QR)、QtRVSim等。計劃嘅成果係一個名為HKCPU嘅CPU,佢採用咗32位元嘅RISC-V ISA,支援V擴展,即向量化SIMD功能,可以加快同提高處理媒體、圖像同機器學習等任務嘅效率。
香港人嘅cpu計劃係一個有價值嘅貢獻,向世界展示咗香港人嘅創意同能力。通過提供一個用戶友好同強大嘅CPU,香港人嘅cpu計劃希望激勵更多香港人參與RISC-V嘅運動,同時為香港嘅計算機科技創造一個更多元同包容嘅生態系統。
All our swing projects use this class to serialize settings into XML, back and forth. It is quite convenient but if we create an annotation for this, it would be even better because we can automate the load/save code. Here is the proposal: This save the variable x into xml call <classname-x> @savepublic int x; […] 2024-01-03 16:47:23
All our swing projects use this class to serialize settings into XML, back and forth. It is quite convenient but if we create an annotation for this, it would be even better because we can automate the load/save code. Here is the proposal:
This save the variable x into xml call <classname-x>
@save
public int x;
This save the variable into xml call <my_x>
@save(name=my_x)
public int x;
The xml by default call "setting.xml", unless specify
@save(name=my_x, file=mySetting.xml)
public int x;
package hk.quantr.qemulogpanel;

import java.io.File;
import java.io.FileInputStream;
import java.io.FileOutputStream;

import org.apache.commons.io.IOUtils;

import com.thoughtworks.xstream.XStream;
import java.io.FileNotFoundException;

public class Setting {

	private static Setting setting = null;
	public static File file = new File("setting.xml");
	public int x;
	public int y;
	public int width;
	public int height;
	public int dividerLocation;

	public String compareDialog_from;
	public String compareDialog_to;
	public String compareDialog_limit;
	public String compareDialog_qemu;
	public String compareDialog_quantr;

	public Setting() {
		width = 800;
		height = 600;
	}

	public static Setting getInstance() {
		if (setting == null) {
			setting = load();
		}
		return setting;
	}

	public void save() {
		XStream xstream = new XStream();
		xstream.alias("Setting", Setting.class);
		String xml = xstream.toXML(this);
		try {
			IOUtils.write(xml, new FileOutputStream(file));
		} catch (Exception e) {
			e.printStackTrace();
		}
	}

	public static Setting load() {
		try {
			XStream xstream = new XStream();
			xstream.allowTypes(new Class[]{Setting.class});
			xstream.alias("Setting", Setting.class);
			Setting s = (Setting) xstream.fromXML(new FileInputStream(file));
			return s;
		} catch (FileNotFoundException ex) {
			ex.printStackTrace();
			file.delete();
			setting = new Setting();
			setting.save();
			return setting;
		}
	}

}
 Converting Logic Circuit into Look-Up Tables (LUT)
After doing much online research and reading many reference books, our team has figured out a way to convert logic circuits into look-up tables (LUT). Overview To convert a logic circuit into LUTs, first we should convert them to 2-input logic gates. The decomposition could only be done with two or fewer input logic gates. […] 2023-12-26 19:06:17
After doing much online research and reading many reference books, our team has figured out a way to convert logic circuits into look-up tables (LUT).
Overview
To convert a logic circuit into LUTs, first we should convert them to 2-input logic gates. The decomposition could only be done with two or fewer input logic gates. After that, we have to convert the diagram to a reduced ordered binary decision diagram (ROBDD). Thus, breaking down the logic circuit into the desired number of inputs in the LUT.
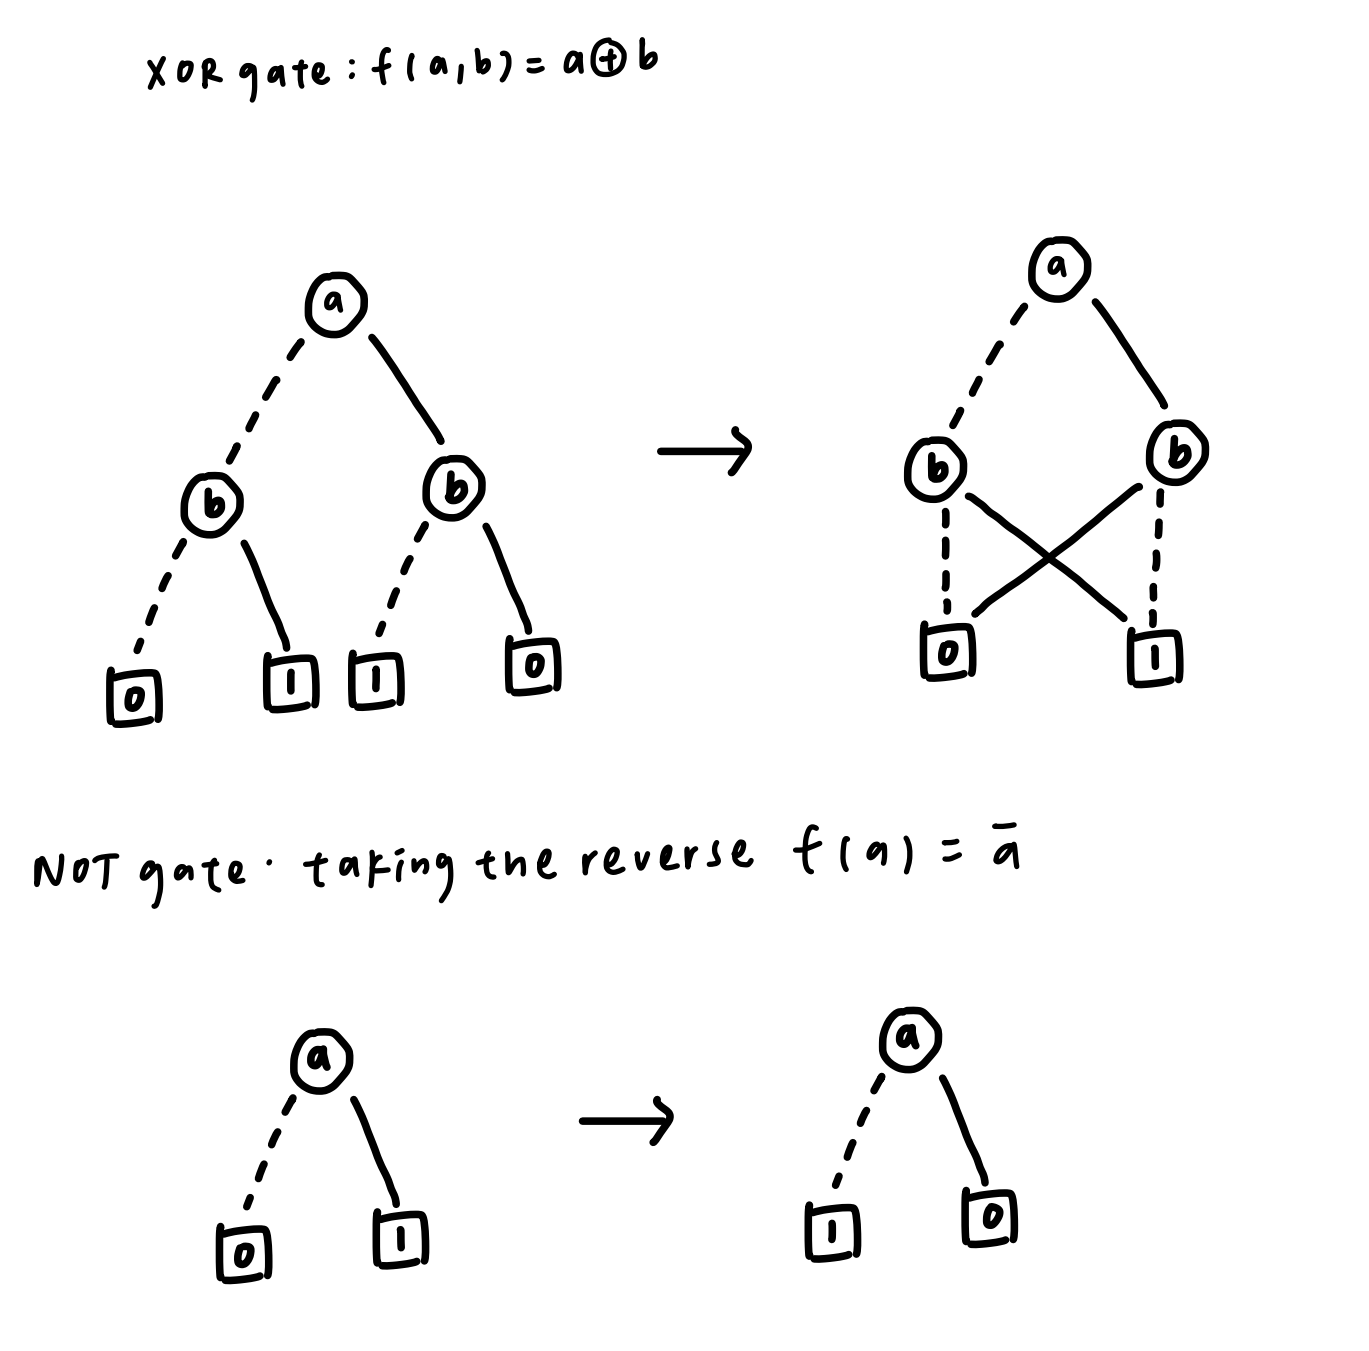
For converting the boolean algebra into a binary decision diagram (BDD), there are certain formulas for converting different logic gates. We could compose the boolean algebra with AND gates, OR gates, XOR gates, and NOT gate. They are listed below:
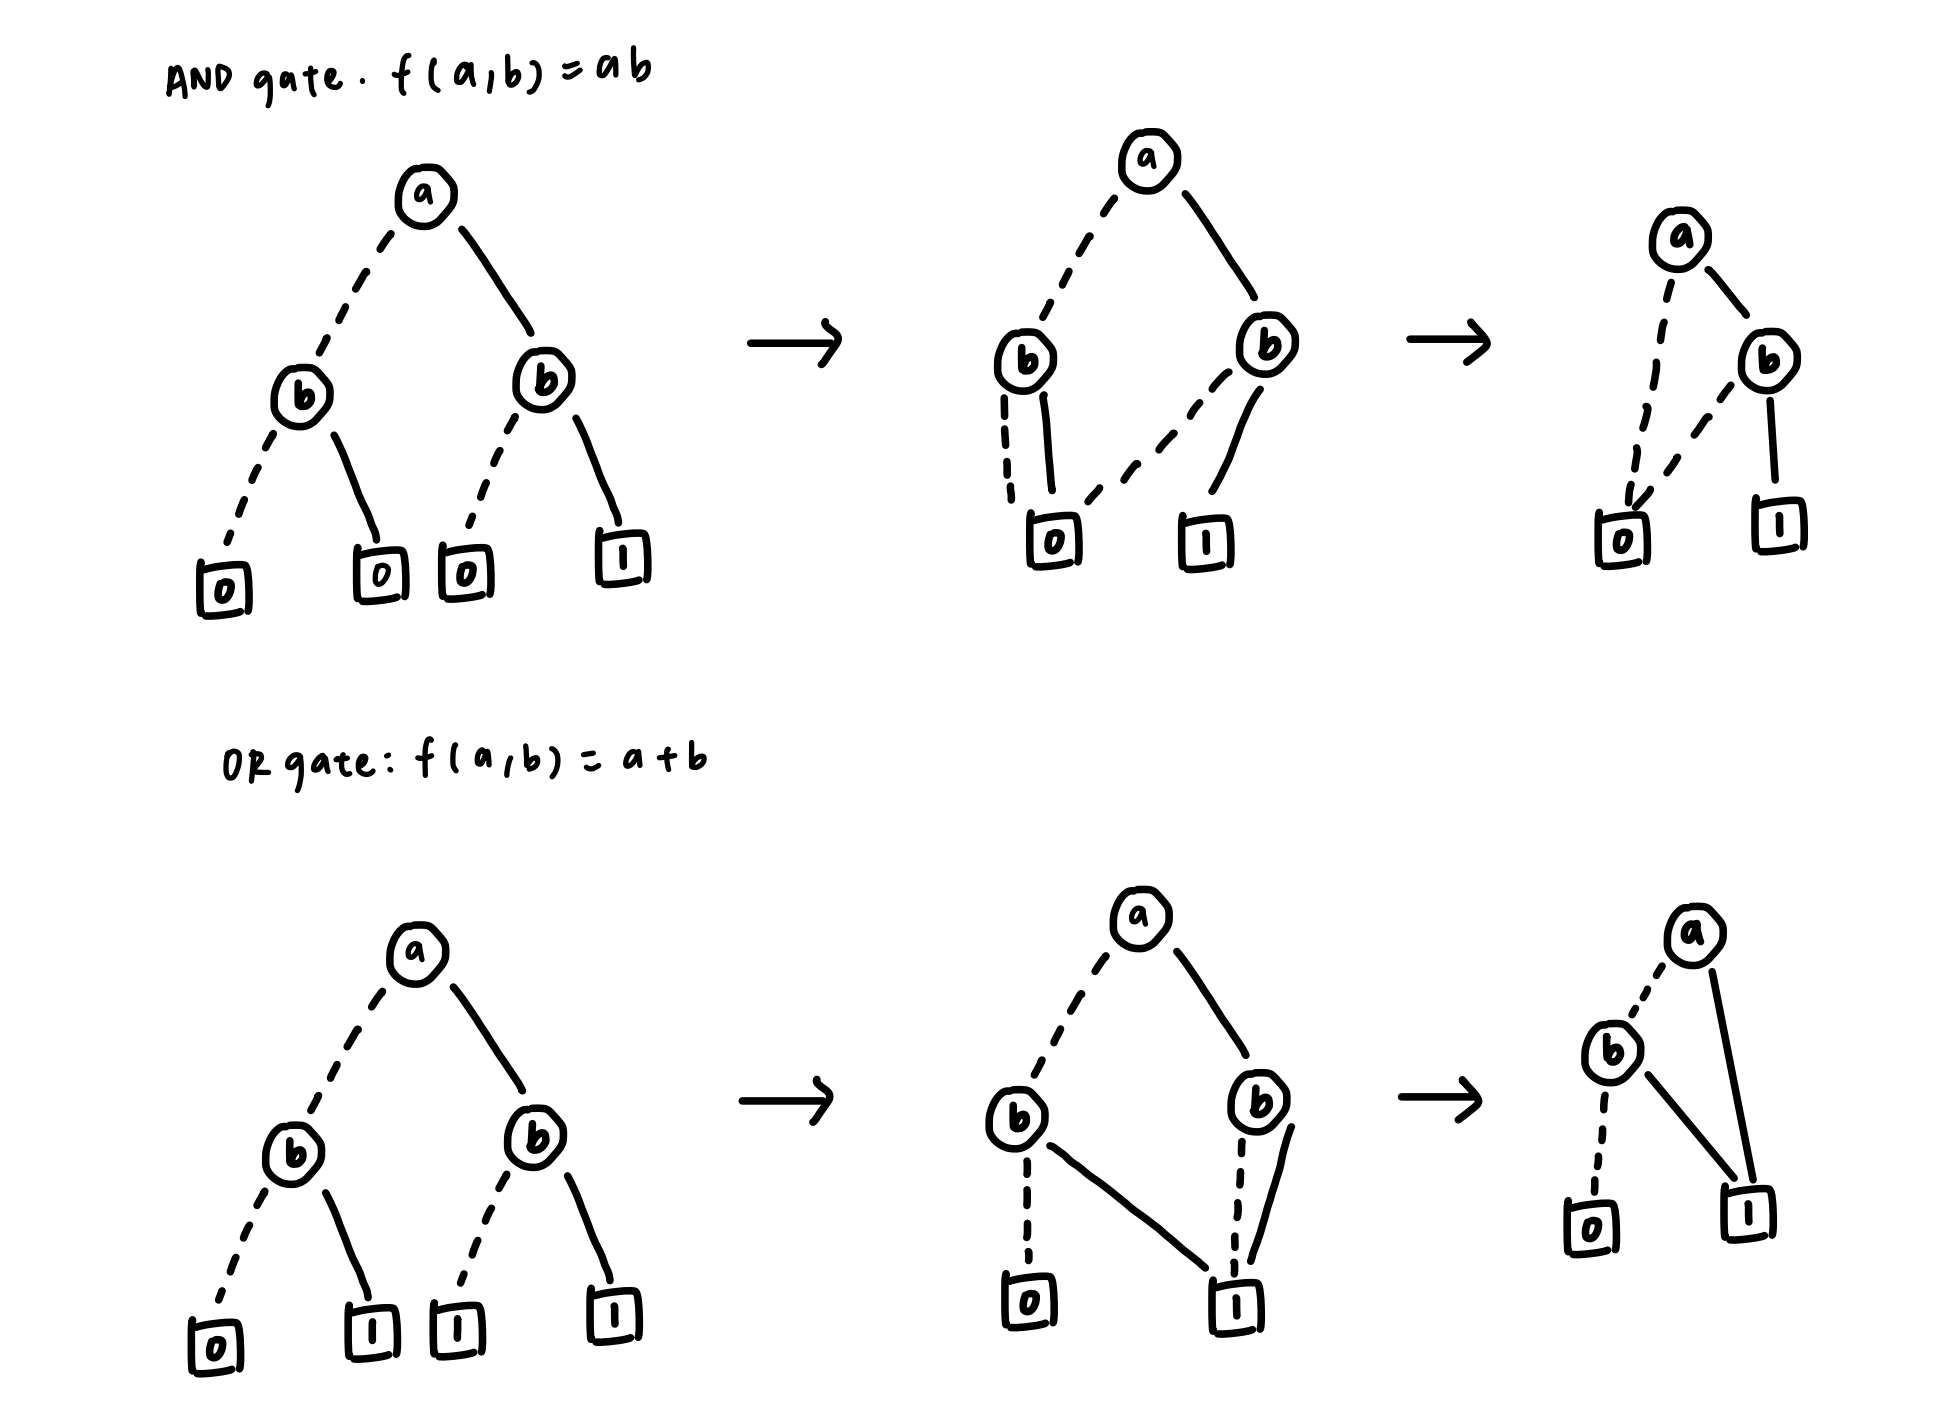
Fig 1. Convert boolean algebra (or , and) to BDD and BDD to ROBDD
Fig 2. Convert boolean algebra (xor, not) to BDD and BDD to ROBDD
To illustrate how to do the decomposition, here is a simple example:
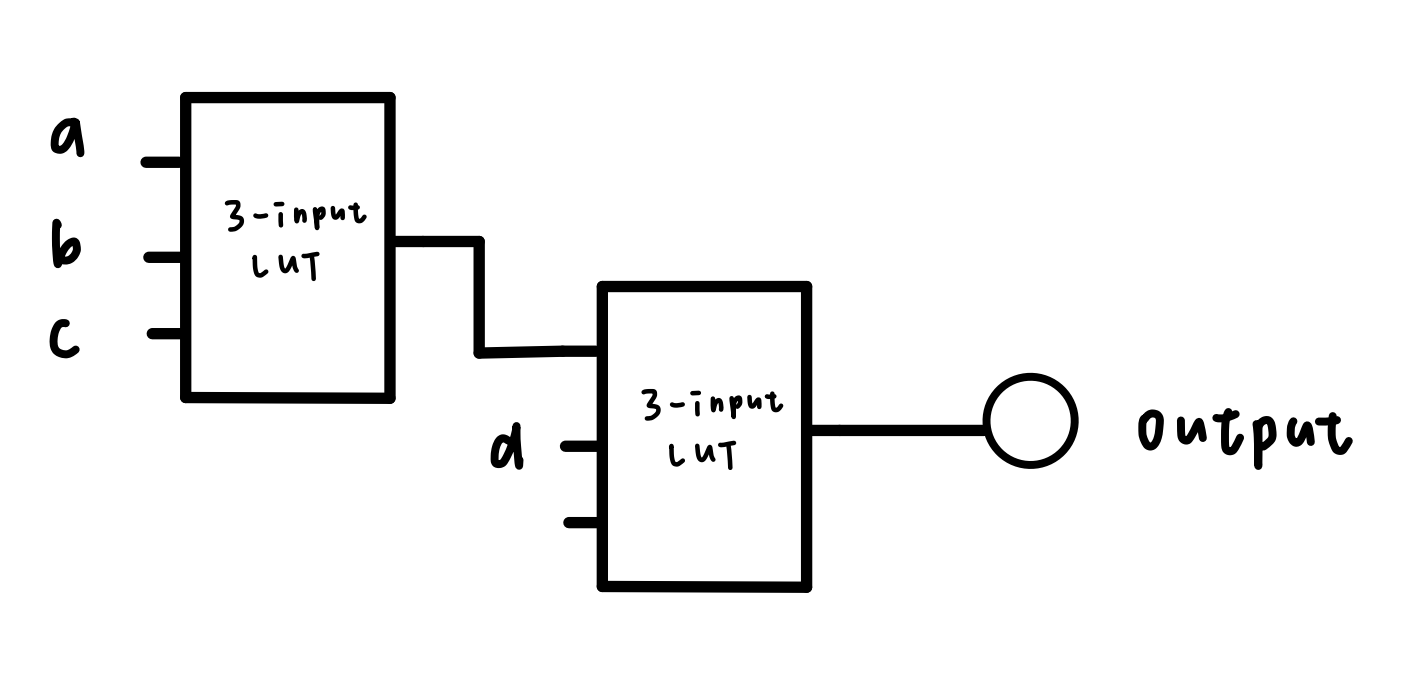
Convert the boolean algebra below into a 3-input LUT circuit.f(a, b, c, d) = (a+b)•cdThe logic circuit of the above boolean algebra looks like this:
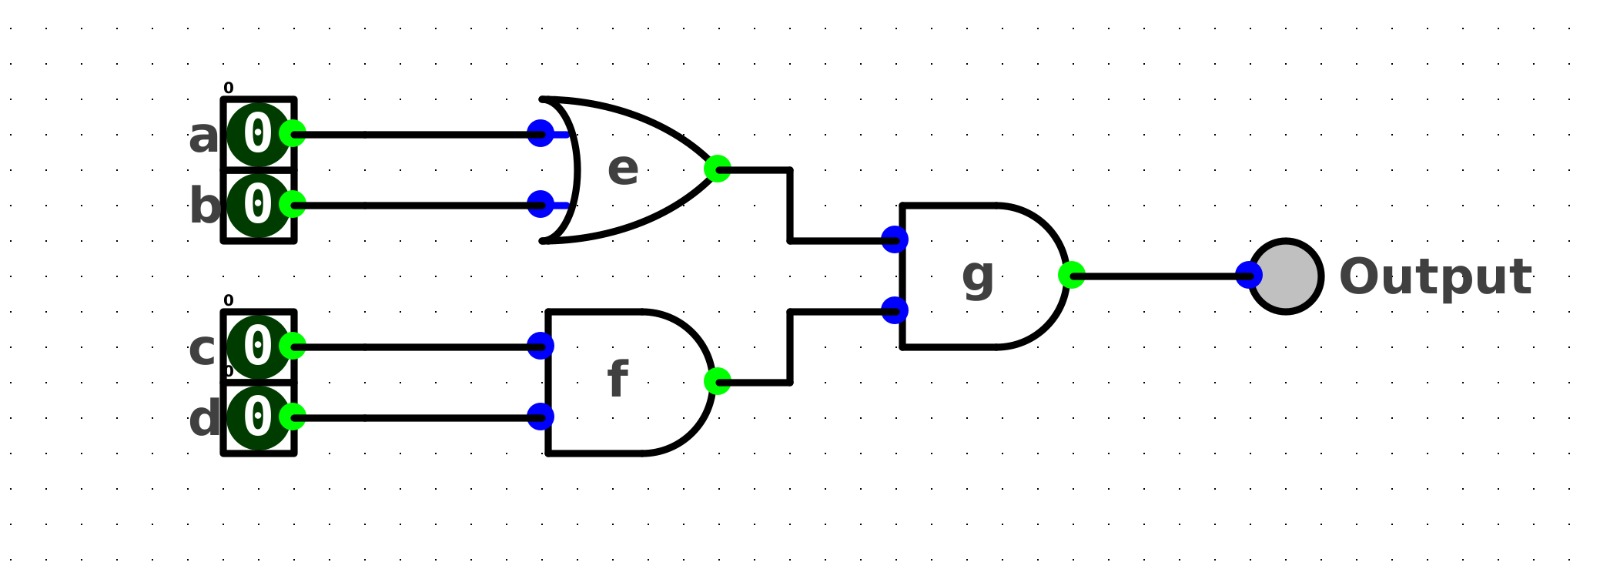
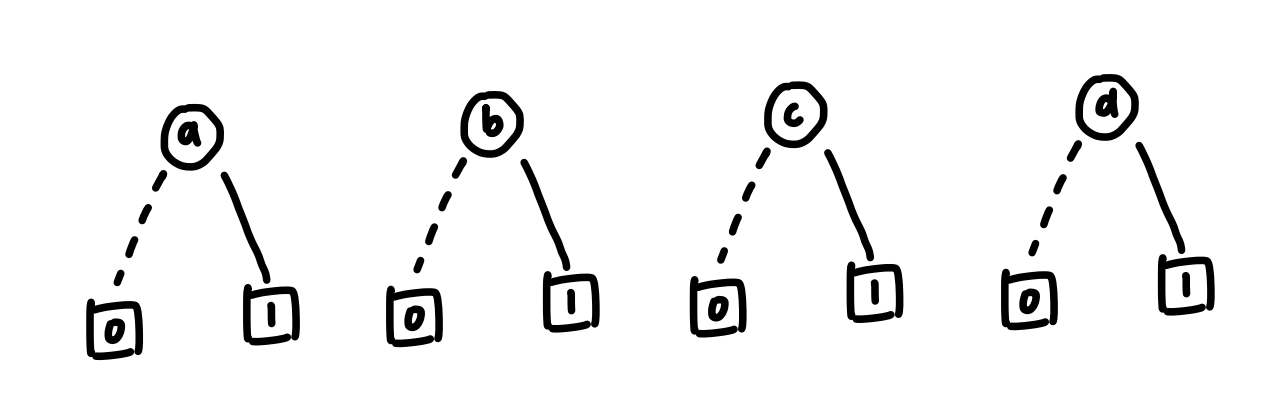
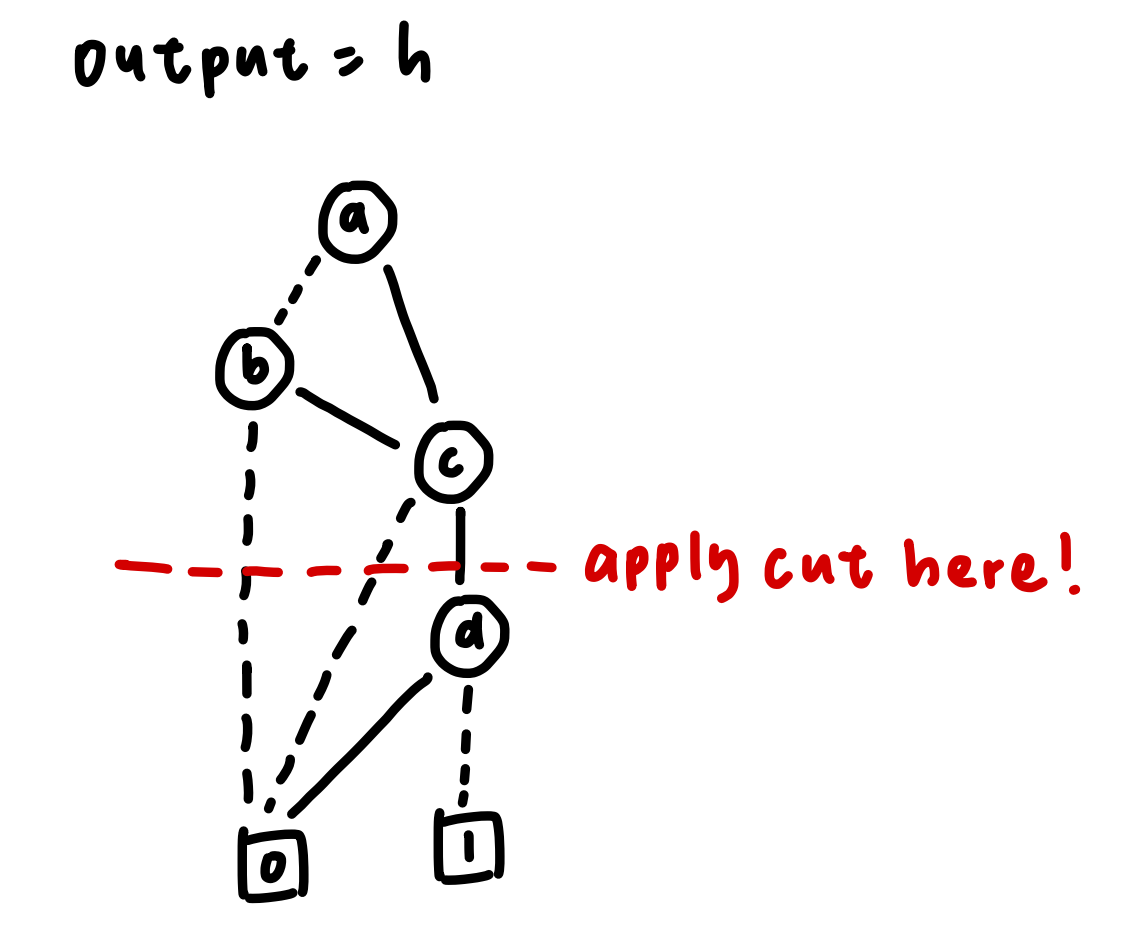
First, we have to convert every single input into a binary decision diagram (BDD). Then we convert the whole circuit into a Reduced-Ordered-Binary-Decision Diagram (ROBDD).

After that, we can do the cut according to our desired number of inputs in the LUT. In this case, we are trying to break down the logic circuit into a 3-input LUT, so we could apply the cut after node c.
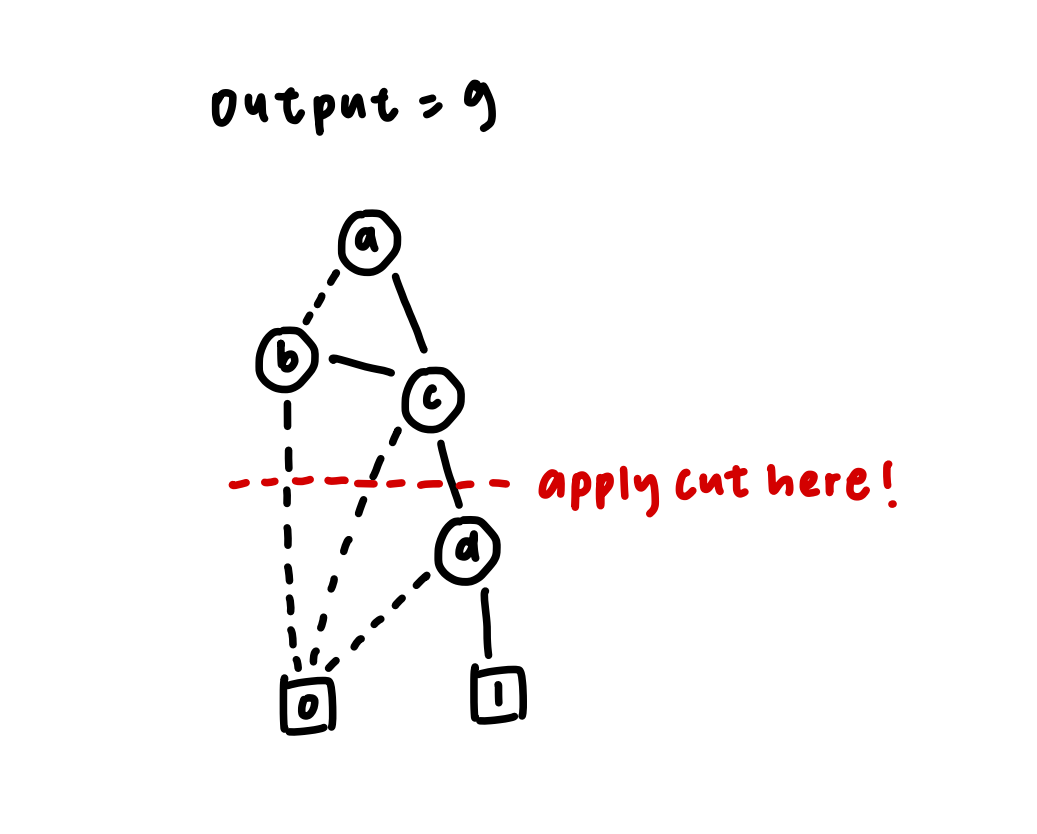
After that, we could create a 3-input look-up table (LUT) containing the possible signals of node a, node b and node c in the LUT.
| a | b | c | output |
|---|---|---|---|
| 0 | 0 | 0 | 0 |
| 0 | 0 | 1 | 0 |
| 0 | 1 | 0 | 0 |
| 0 | 1 | 1 | 1 |
| 1 | 0 | 0 | 0 |
| 1 | 0 | 1 | 1 |
| 1 | 1 | 0 | 0 |
| 1 | 1 | 1 | 1 |
As you can see, only [011, 101, 111] has an output of 1, which gives the signal to node d. Now, we could create another look-up table for the final output.
| output | d | null input (don't cares) | final output |
|---|---|---|---|
| 0 | 0 | x | 0 |
| 0 | 1 | x | 0 |
| 1 | 0 | x | 0 |
| 1 | 1 | x | 1 |
Finally, the logic circuit with LUT would look like:

To have a deeper understanding of the topic, here is another example:
Convert the boolean algebra below into a 3-input LUT circuit.f(a, b, c, d) = (a+b)cd'The logic circuit of the above boolean algebra looks like this:
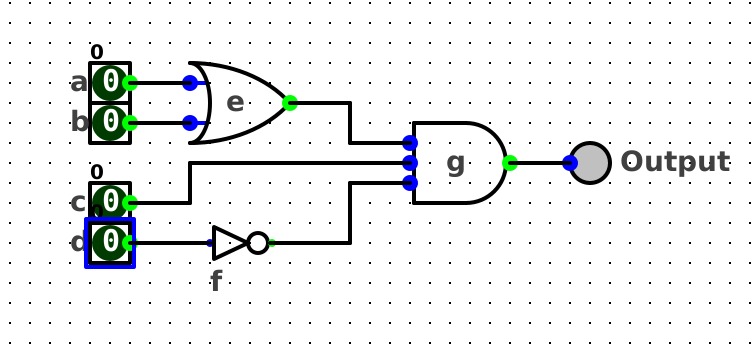
As you can see, the above logic circuit has a 3-input AND gate; we could not do the decomposition with a logic gate with a number of inputs greater than 2. Therefore, we have to convert the logic circuit with every component having a number of inputs less than 2 before doing the decomposition.
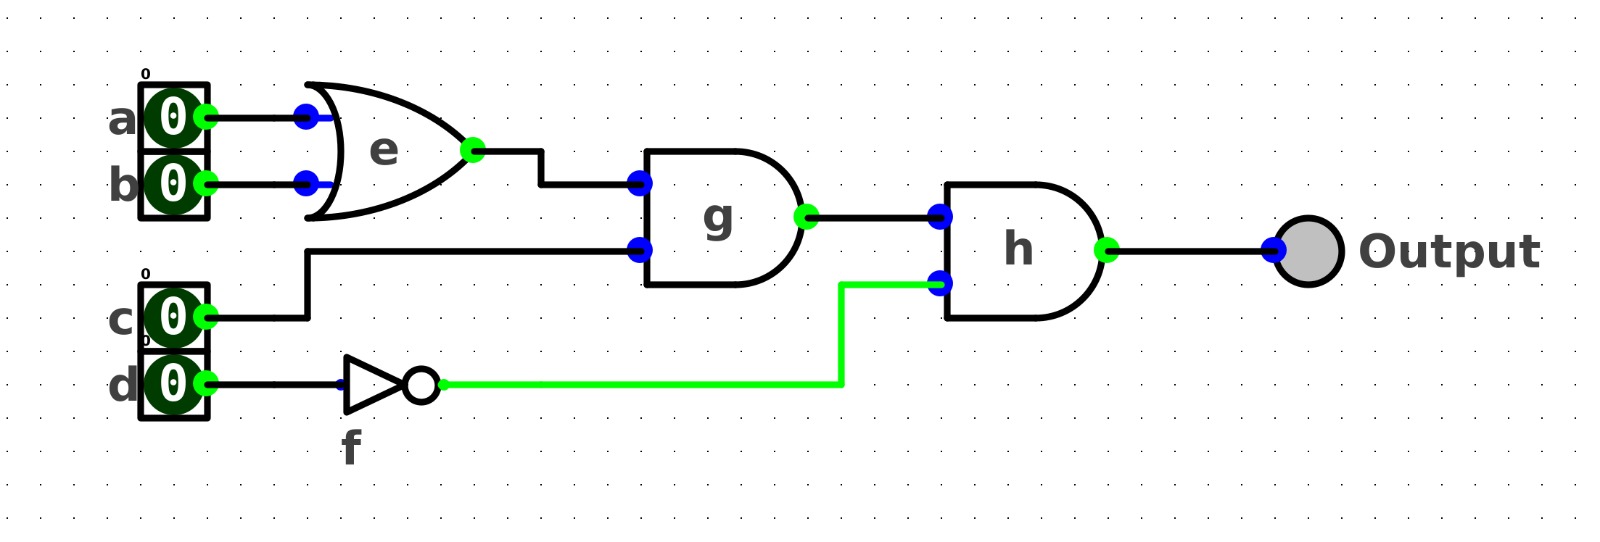
The logic circuit after conversion is shown below:
Now, we convert every input into a binary decision diagram (BDD)and convert the whole circuit into a Reduced-Ordered-Binary-Decision Diagram (ROBDD).
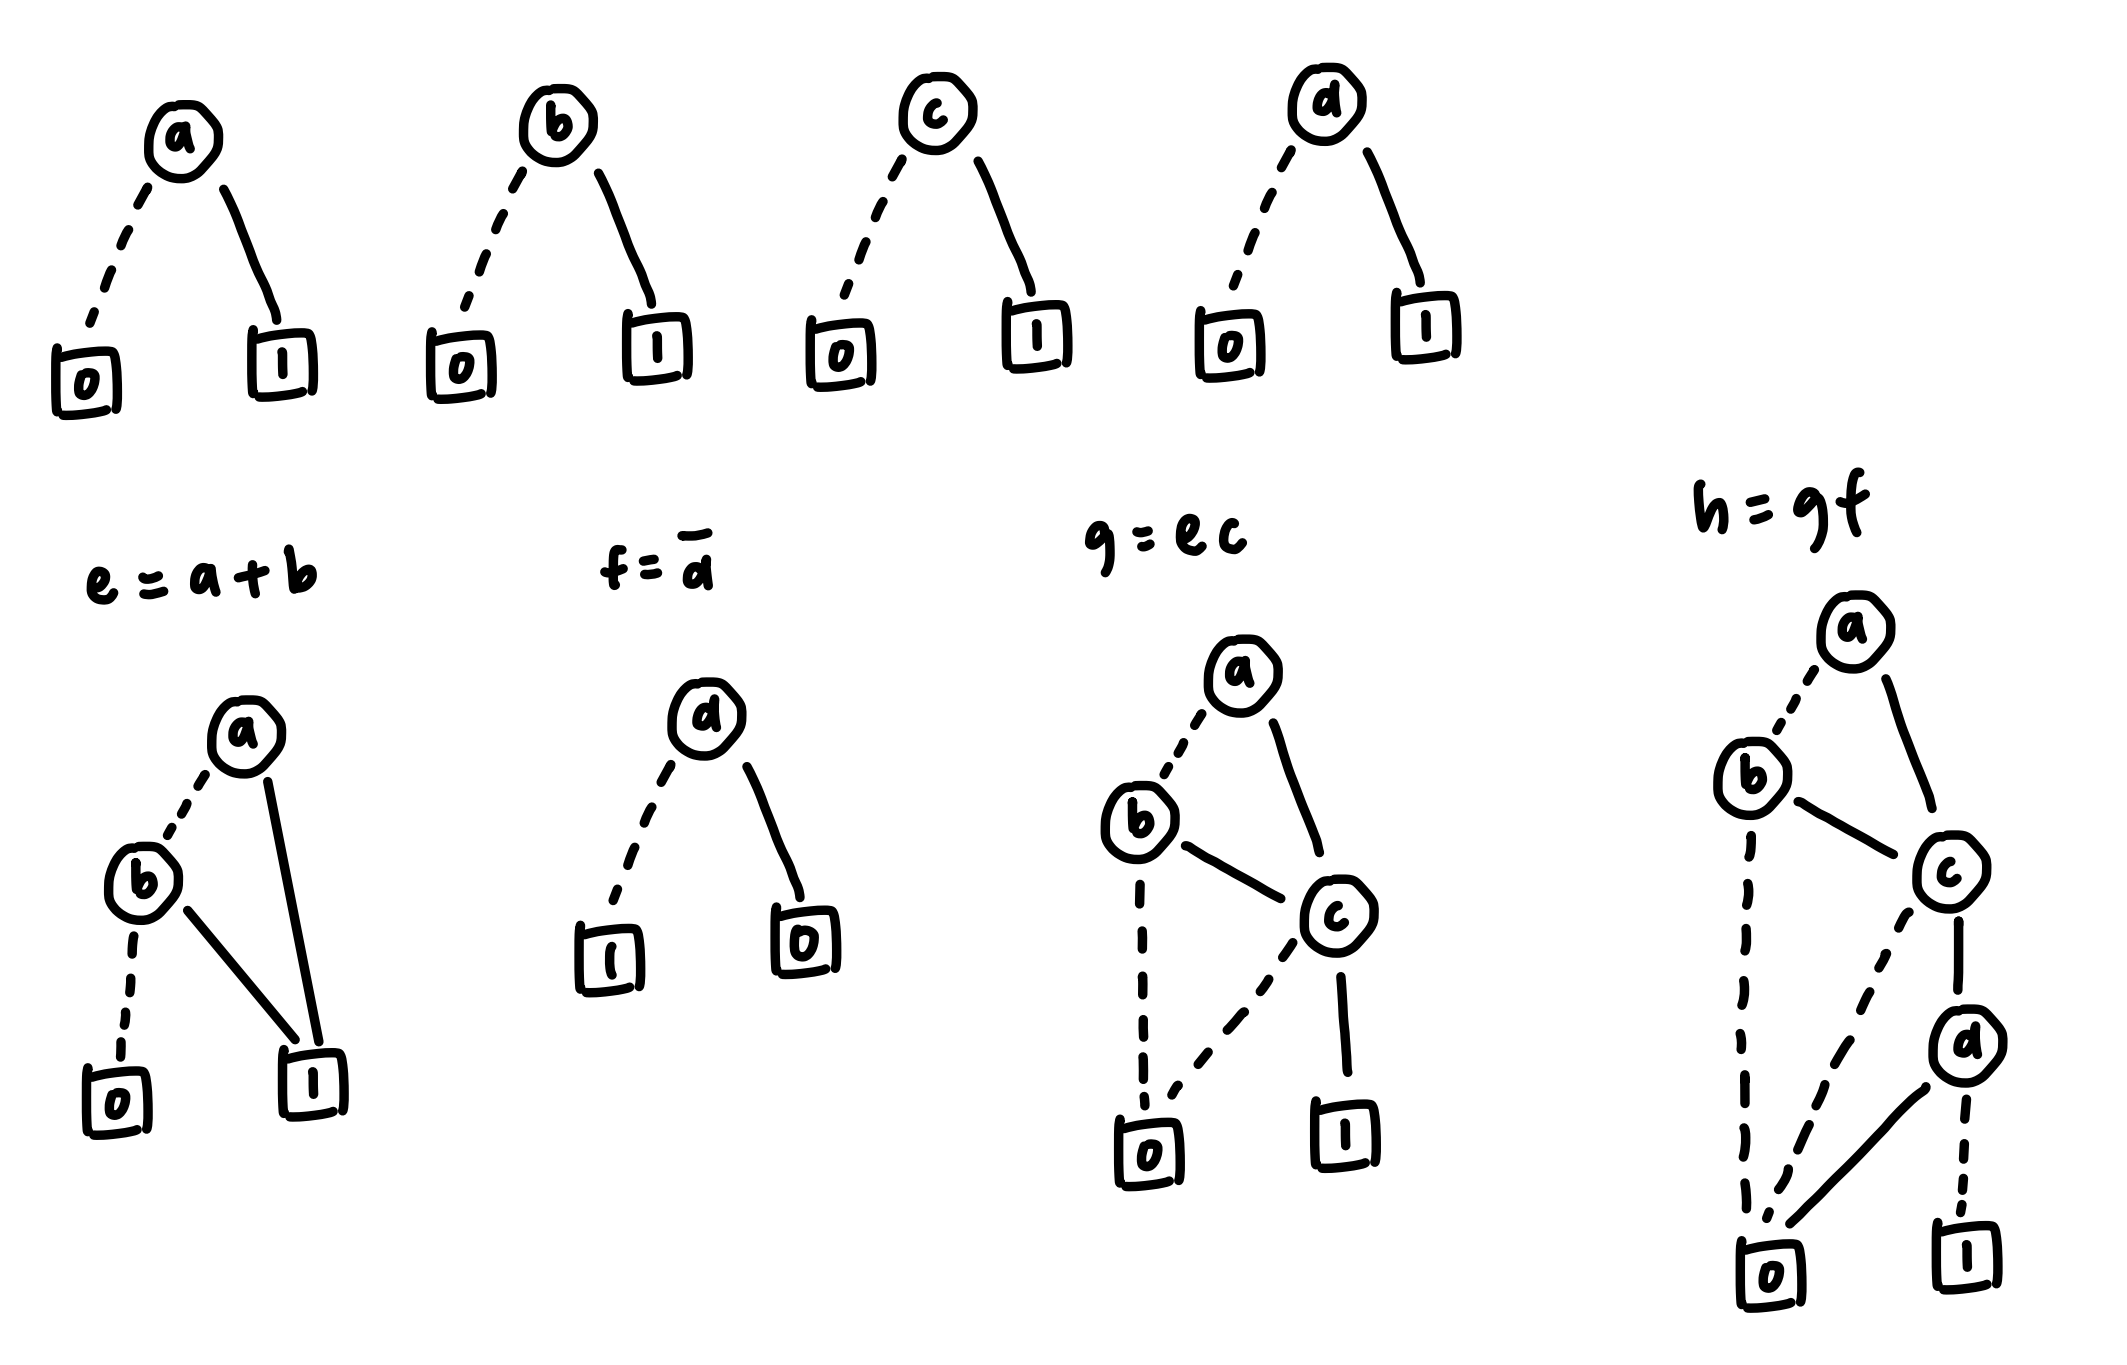
In this case, we are trying to break down the logic circuit into a 3-input LUT, so we could apply the cut after node c.
After that, we could create a 3-input look-up table (LUT) containing the possible signals of node a, node b, and node c in the 3-input LUT.
| a | b | c | output |
|---|---|---|---|
| 0 | 0 | 0 | 0 |
| 0 | 0 | 1 | 0 |
| 0 | 1 | 0 | 0 |
| 0 | 1 | 1 | 1 |
| 1 | 0 | 0 | 0 |
| 1 | 0 | 1 | 1 |
| 1 | 1 | 0 | 0 |
| 1 | 1 | 1 | 1 |
Now, we could create another look-up table for the final output.
| output | d | null input (don't cares) | final output |
|---|---|---|---|
| 0 | 0 | x | 0 |
| 0 | 1 | x | 0 |
| 1 | 0 | x | 1 |
| 1 | 1 | x | 0 |
Finally, the logic circuit with LUT would look like:
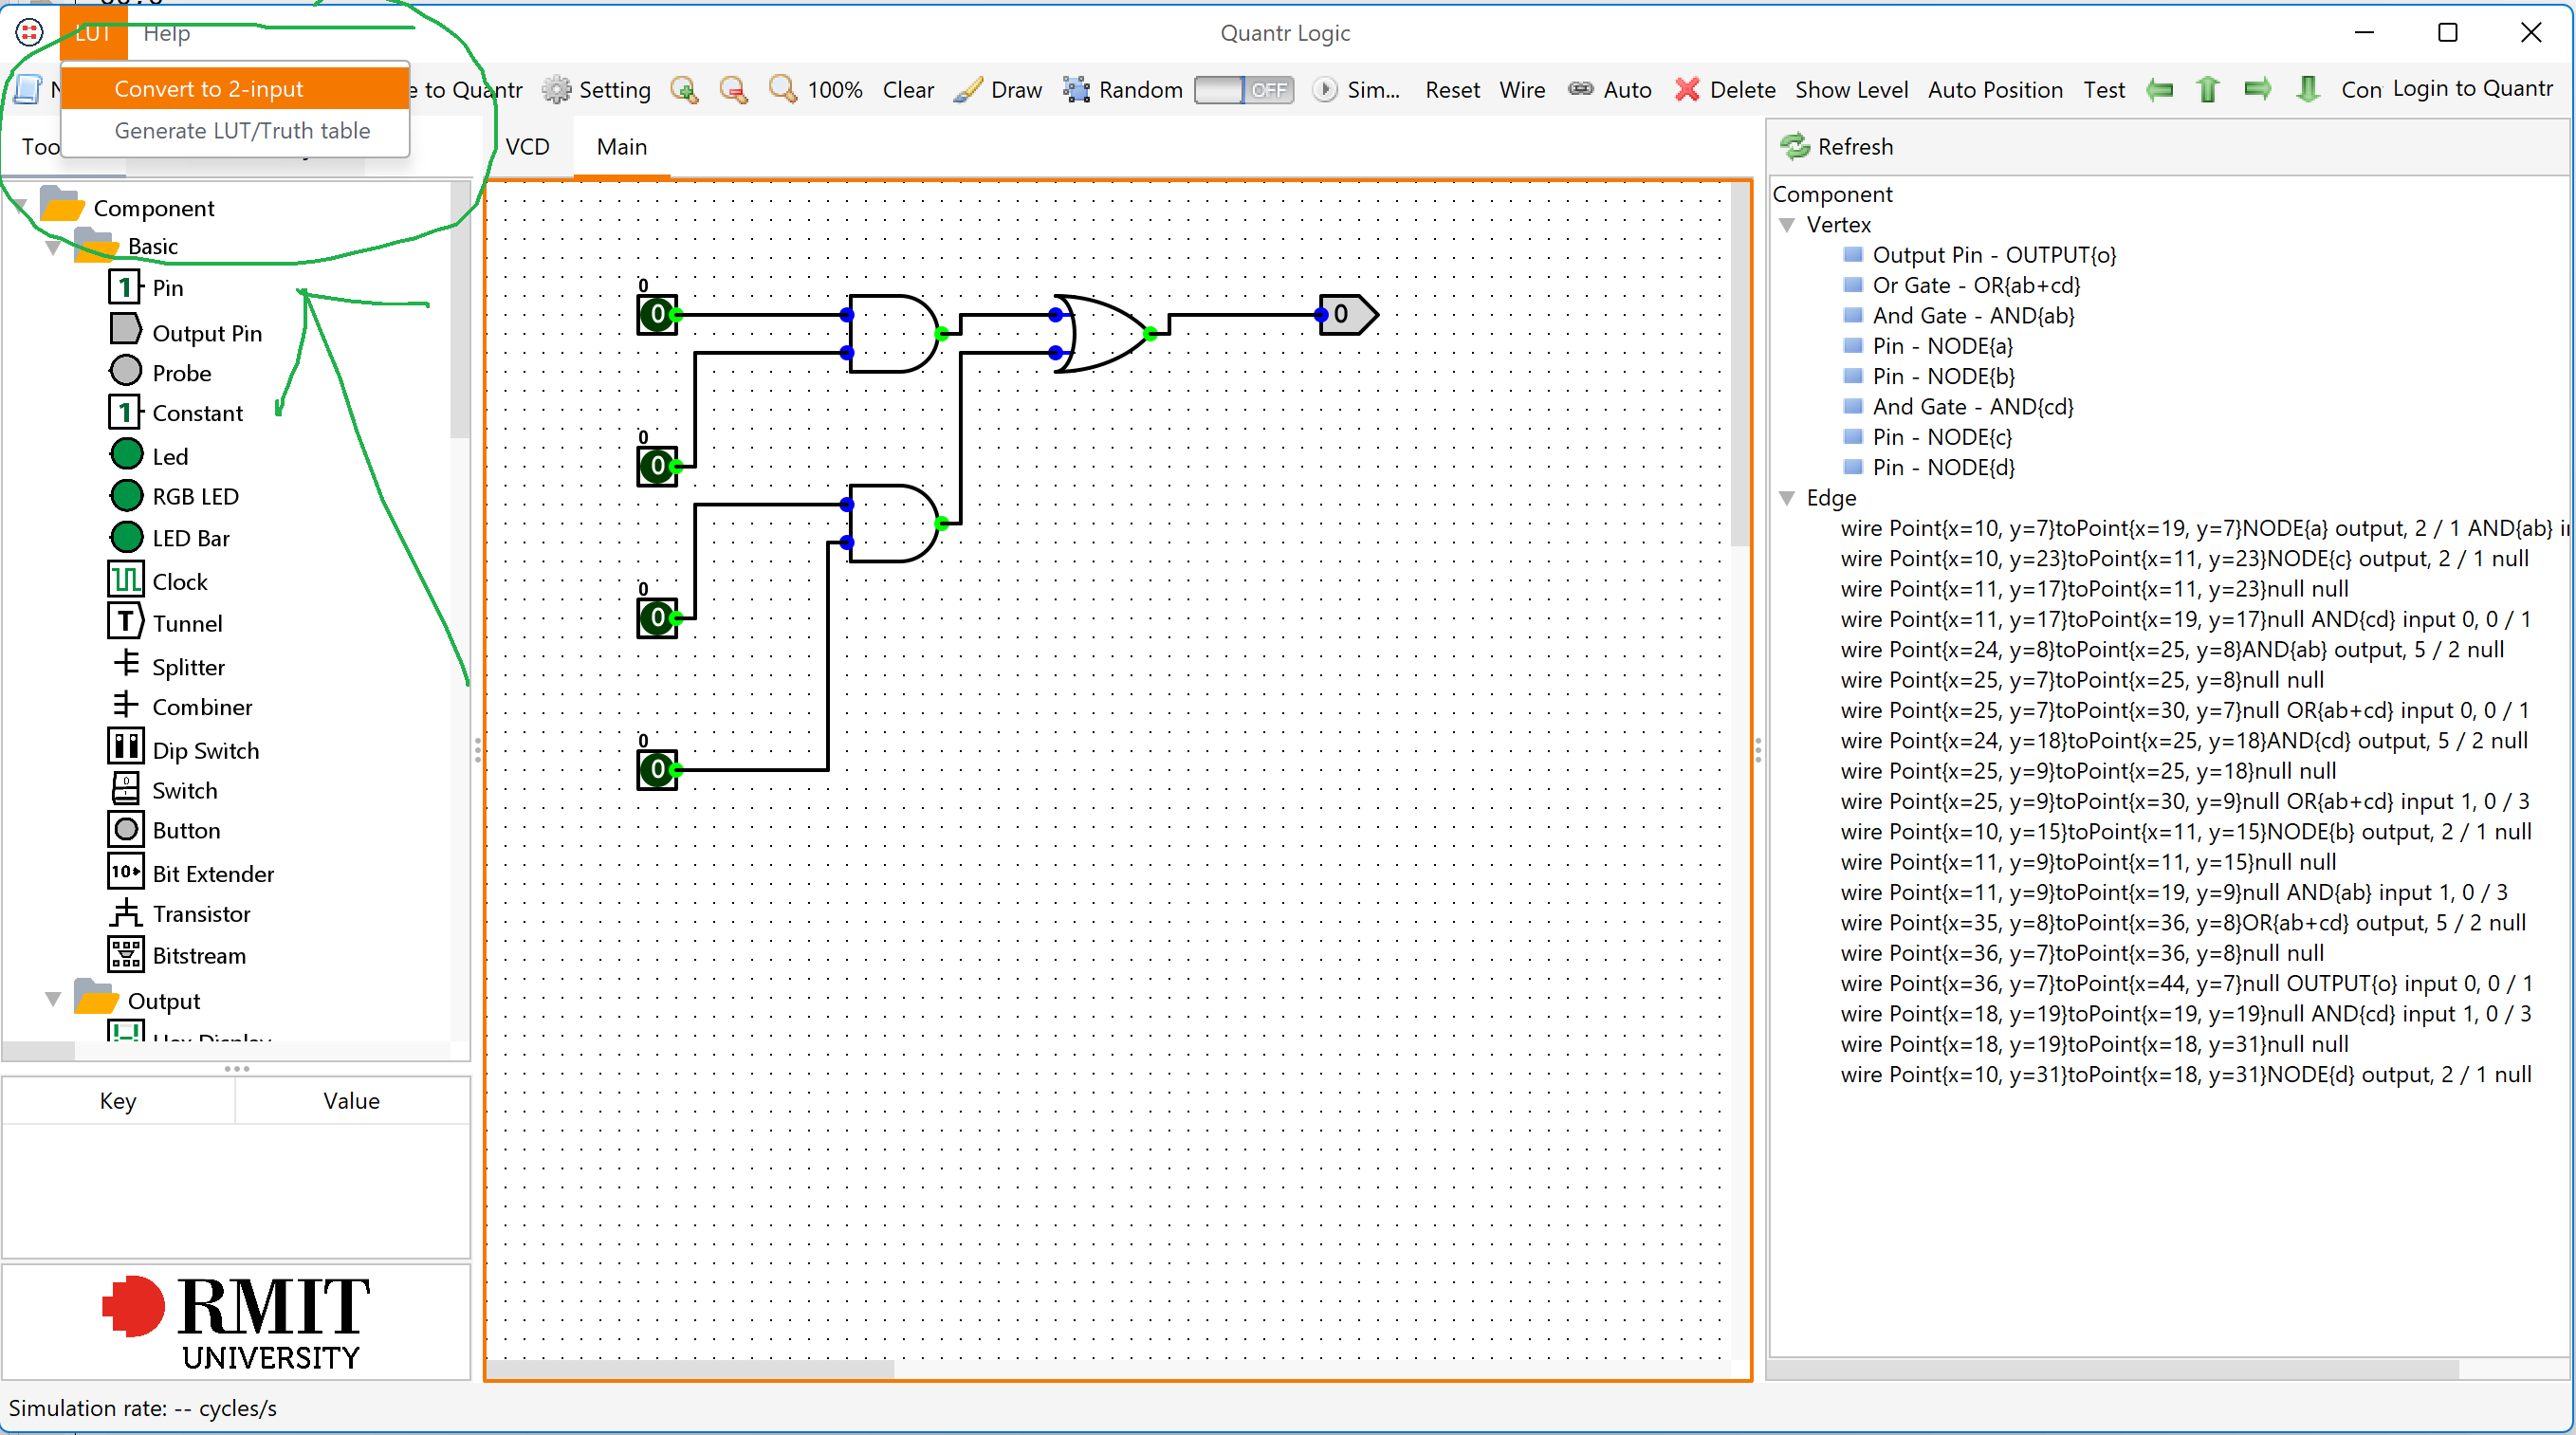
Coming dev plan
Modify quantr-logic to support converting the circuit into LUTs. The LUT library is in here. Added two buttons, one for converting the circuit into a 2-input circuit, second button is to generate everything we need in LUTs.

Author: Michelle
 Avenger License
There are too many guys who claim they are industry leaders and tell teenagers their research is meaningless and not worth doing. As an ancestor, they don’t provide skill and money but rather keep bullshitting around teenagers. As revenge, an “avenger license” is needed, this license is based on Apache License version 2.0 with additional […] 2023-11-12 00:49:12
There are too many guys who claim they are industry leaders and tell teenagers their research is meaningless and not worth doing. As an ancestor, they don't provide skill and money but rather keep bullshitting around teenagers. As revenge, an "avenger license" is needed, this license is based on Apache License version 2.0 with additional terms:
- Avenger license is only applicable in Hong Kong. For anyone outside Hong Kong, the Avenger license is the same as the Apache license version 2.0
- If he/she were a Hong Kong citizen and moved outside Hong Kong, they still applicable for this license
- If he/she says the project is not worth doing or has no chance of success, the Avenger license will block their 10-closest relationship people from using the software/hardware:
- Great-grandfather
- Grandfather
- Father
- Myself
- Son
- Grandson
- Great-grandson
- Colleague
- Wife
- Wife's colleague
有太多人聲稱自己是行業領導者或前輩,並告訴青少年他們的研究毫無意義,不值得做。 作為前輩,他們不但不提供技能和金錢,而是不斷在青少年周圍胡言亂語。 作為報復,需要一個“復仇者許可證”,該許可證基於 Apache License 2.0 版,附加條款:
- Avenger牌照只適用於香港。 對於香港以外的任何人,Avenger 許可證與 Apache 許可證版本 2.0 相同
- 如果他/她是香港公民並移居香港以外地區,他們仍然適用此許可證
- 如果他/她說該專案不值得做或沒有成功的機會,Avenger 許可證將阻止他們關係最密切的十種人使用該軟體/硬體:
- 曾祖父
- 祖父
- 父親
- 我
- 兒子
- 孫子
- 曾孫
- 同事
- 妻子
- 妻子的同事
 Now we need a compiler
Initially, we were thinking of synthesizing our logic into FPGA, but most of the vendors don’t open their bitstream format, and hacking takes a huge amount of time. Now we have changed a new way: we synthesize our logic into PLD (programmable logic device), especially for CPLD or PAL. Now we need a logic compiler, […] 2023-09-01 13:27:12
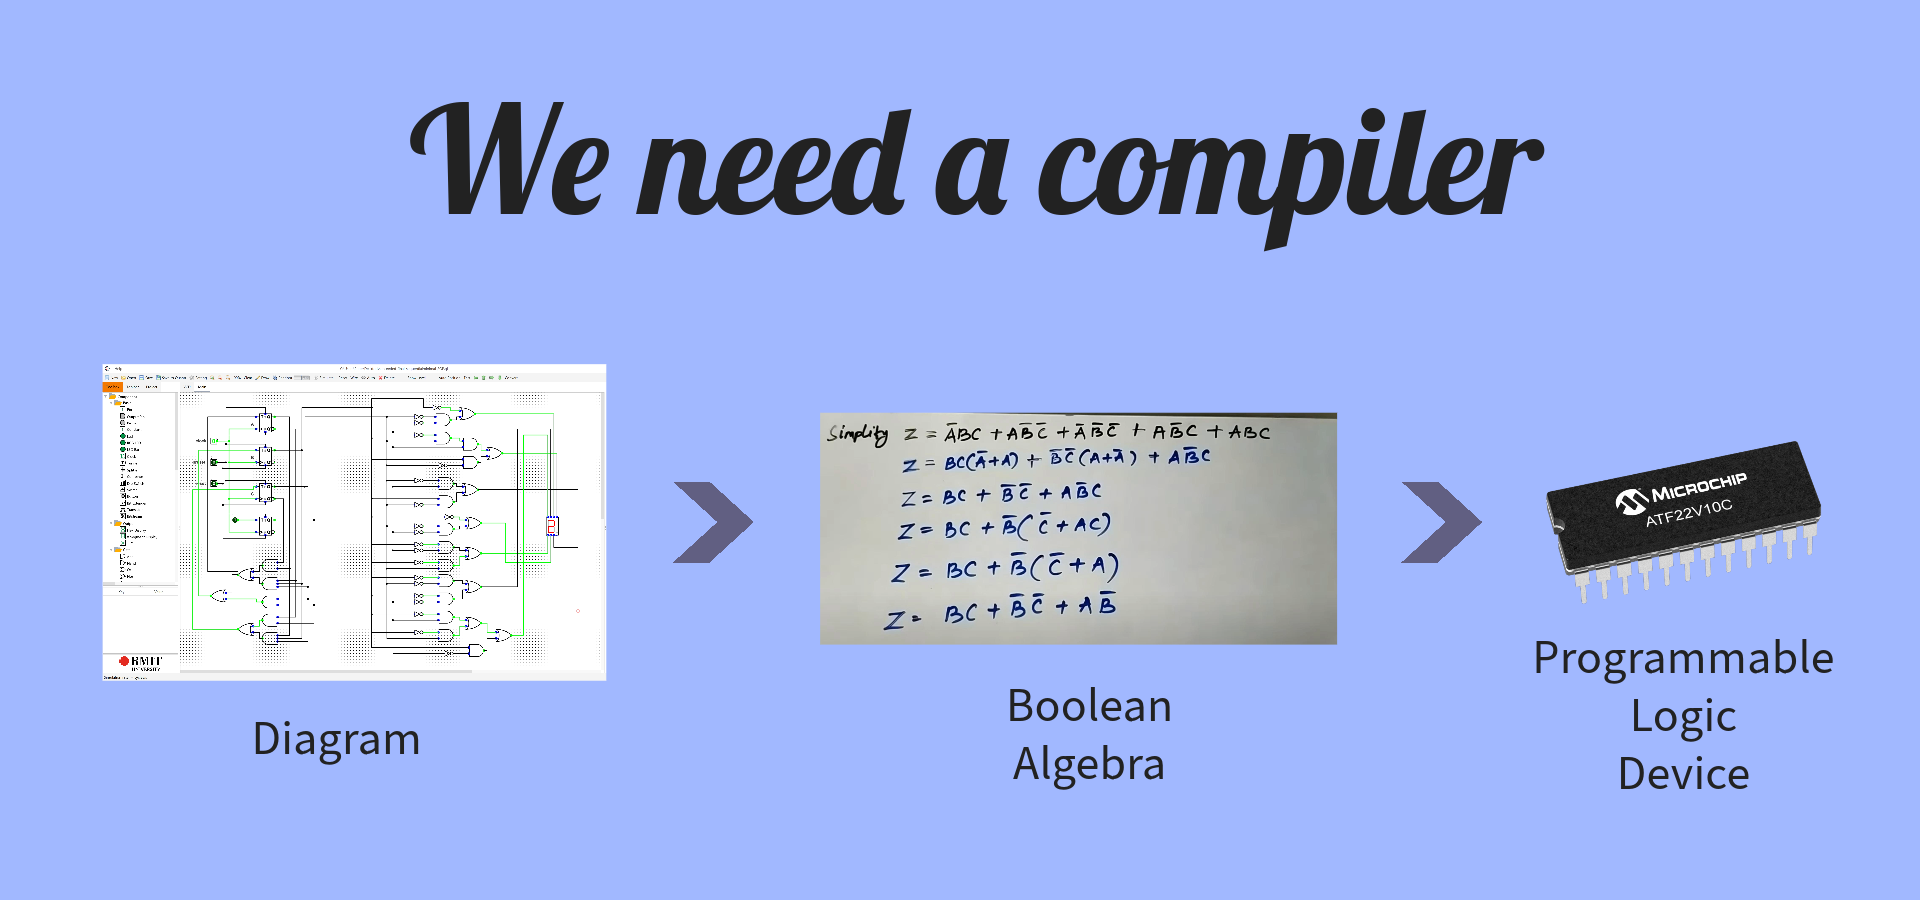
Initially, we were thinking of synthesizing our logic into FPGA, but most of the vendors don't open their bitstream format, and hacking takes a huge amount of time. Now we have changed a new way: we synthesize our logic into PLD (programmable logic device), especially for CPLD or PAL.
Now we need a logic compiler, converting the diagram data structure which outputs from Quantr-Logic to boolean algebra, and compiles it into PLD format, which can be sent to the programmer to burn the logic.
 Debug timer example
The principle is to generate two h2 database file, one from executing qemu, one from executing riscv-simulator 5. run it, then you got the “dump.mv.db” in riscv-simulator folder 6. Now you can run the qemu-log-panel Then you see this 2023-08-28 00:21:46
The principle is to generate two h2 database file, one from executing qemu, one from executing riscv-simulator
- Go to /Users/peter/workspace/riscv-simulator/src/test/resources/hk/quantr/riscv_simulator/elf/timer
- make run , then you have cpu.log
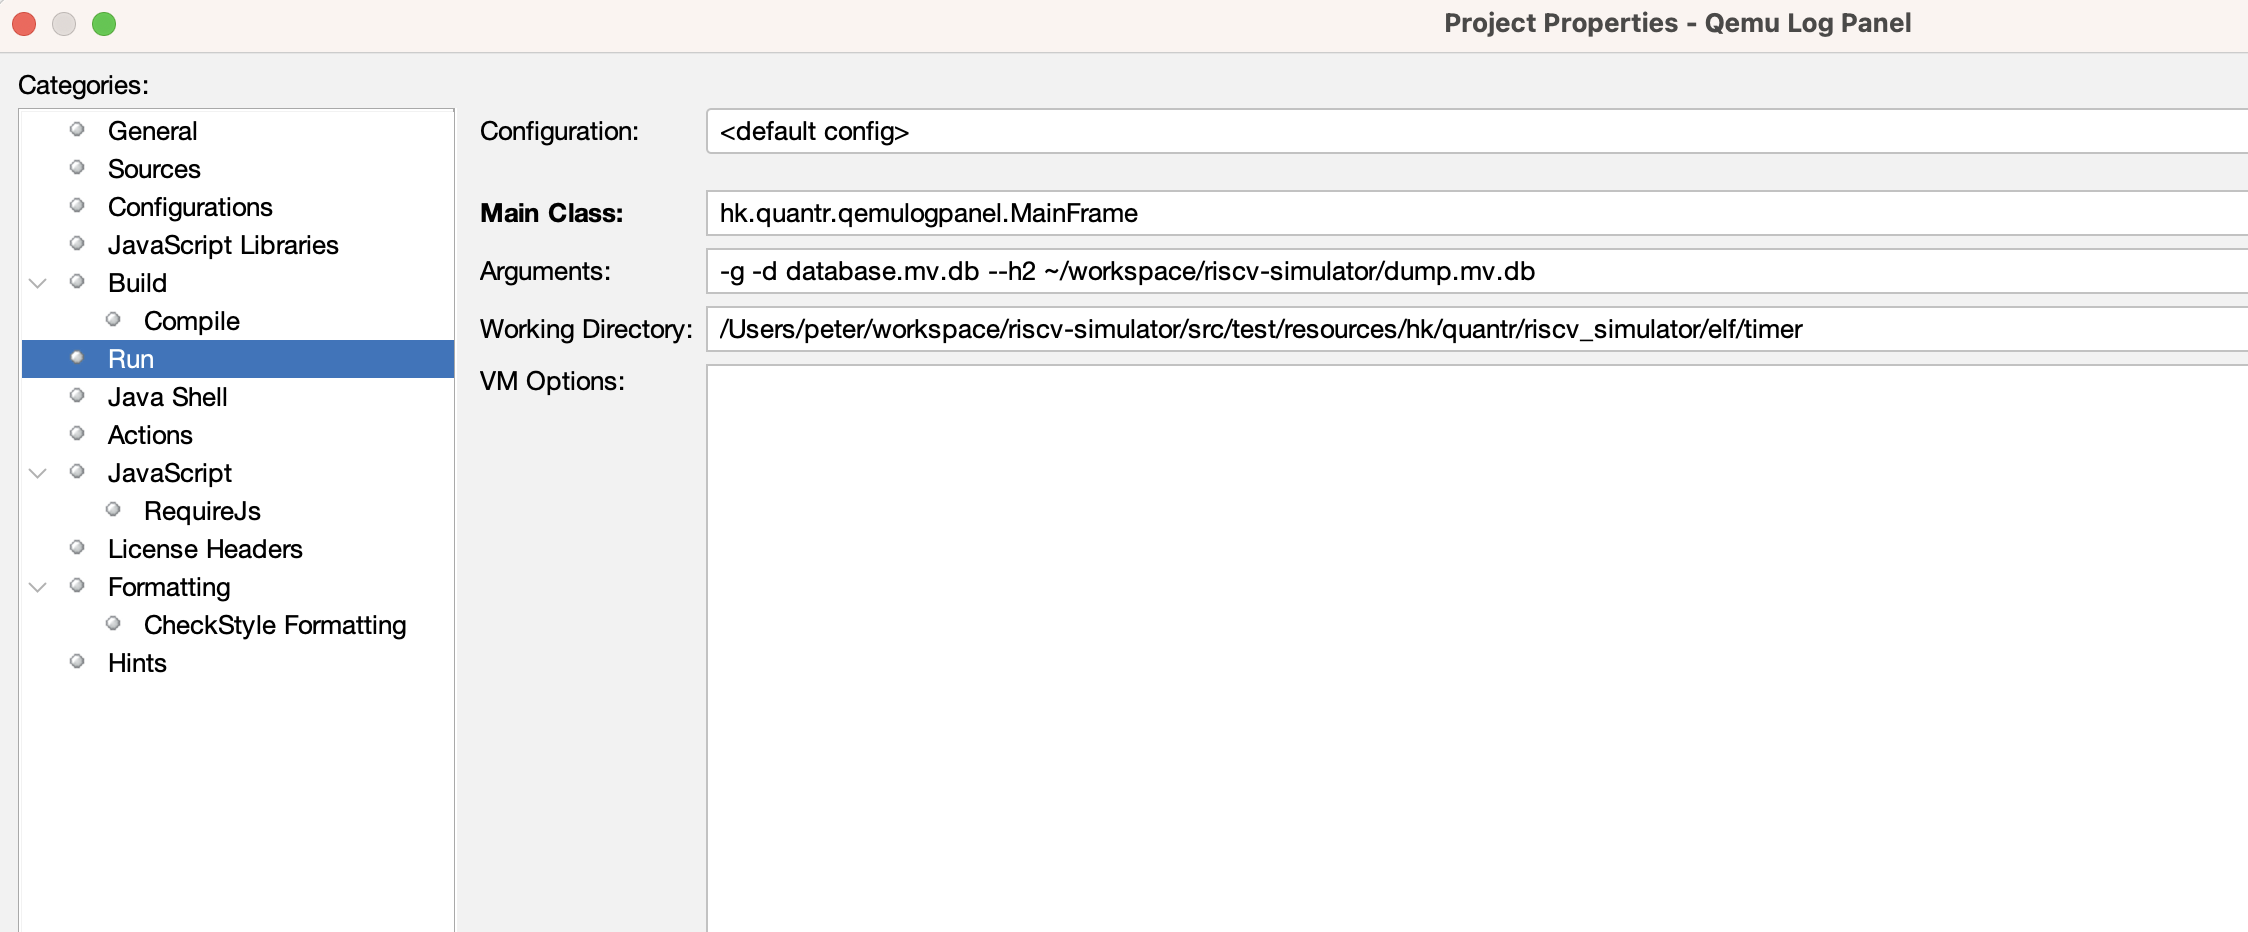
- run "java -jar ~/workspace/qemu-log-panel/target/qemu-log-panel-1.0-jar-with-dependencies.jar -f cpu.log -t" to convert cpu.log to database.mv.db, which is the h2 database file
- Setup riscv-simulator as
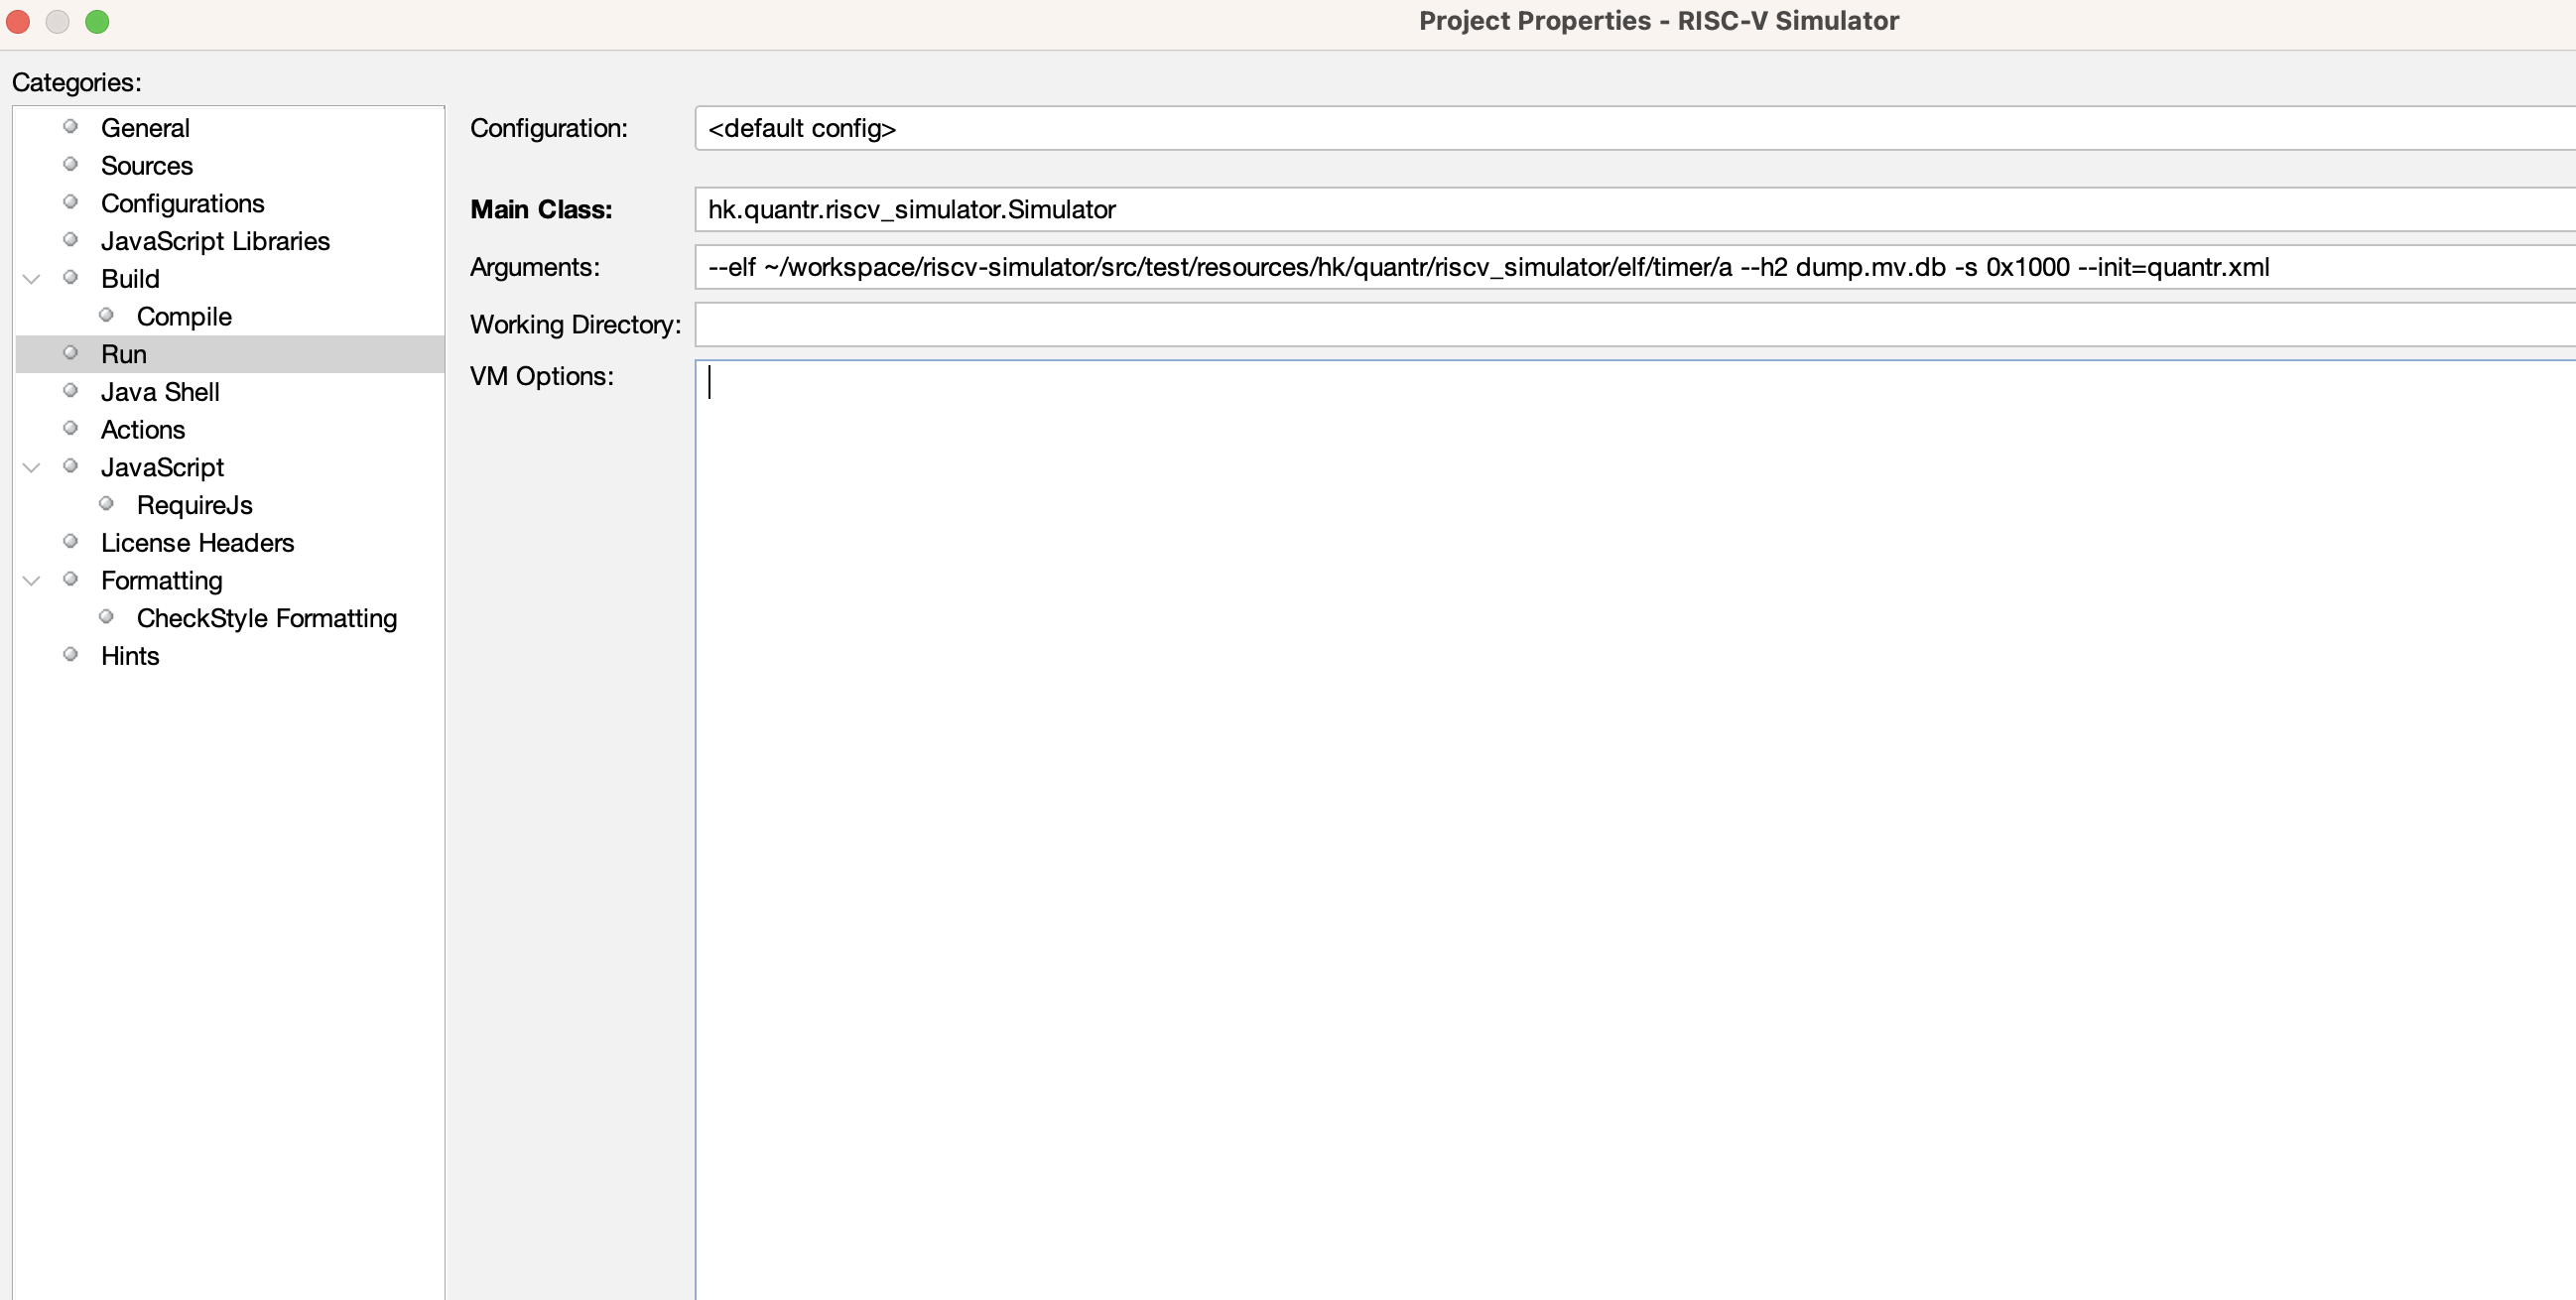
5. run it, then you got the "dump.mv.db" in riscv-simulator folder
6. Now you can run the qemu-log-panel
Then you see this
 MUHK FYP
This year MUHK FYP, join if you are MUHK student. These are our past project: https://www.hkmu.edu.hk/st/engsc/fyp/2021-22/risc-v-simd-simulation/ 2023-08-21 13:45:01
This year MUHK FYP, join if you are MUHK student. These are our past project:
https://www.hkmu.edu.hk/st/engsc/fyp/2021-22/risc-v-simd-simulation/
 Our next move with Arduino
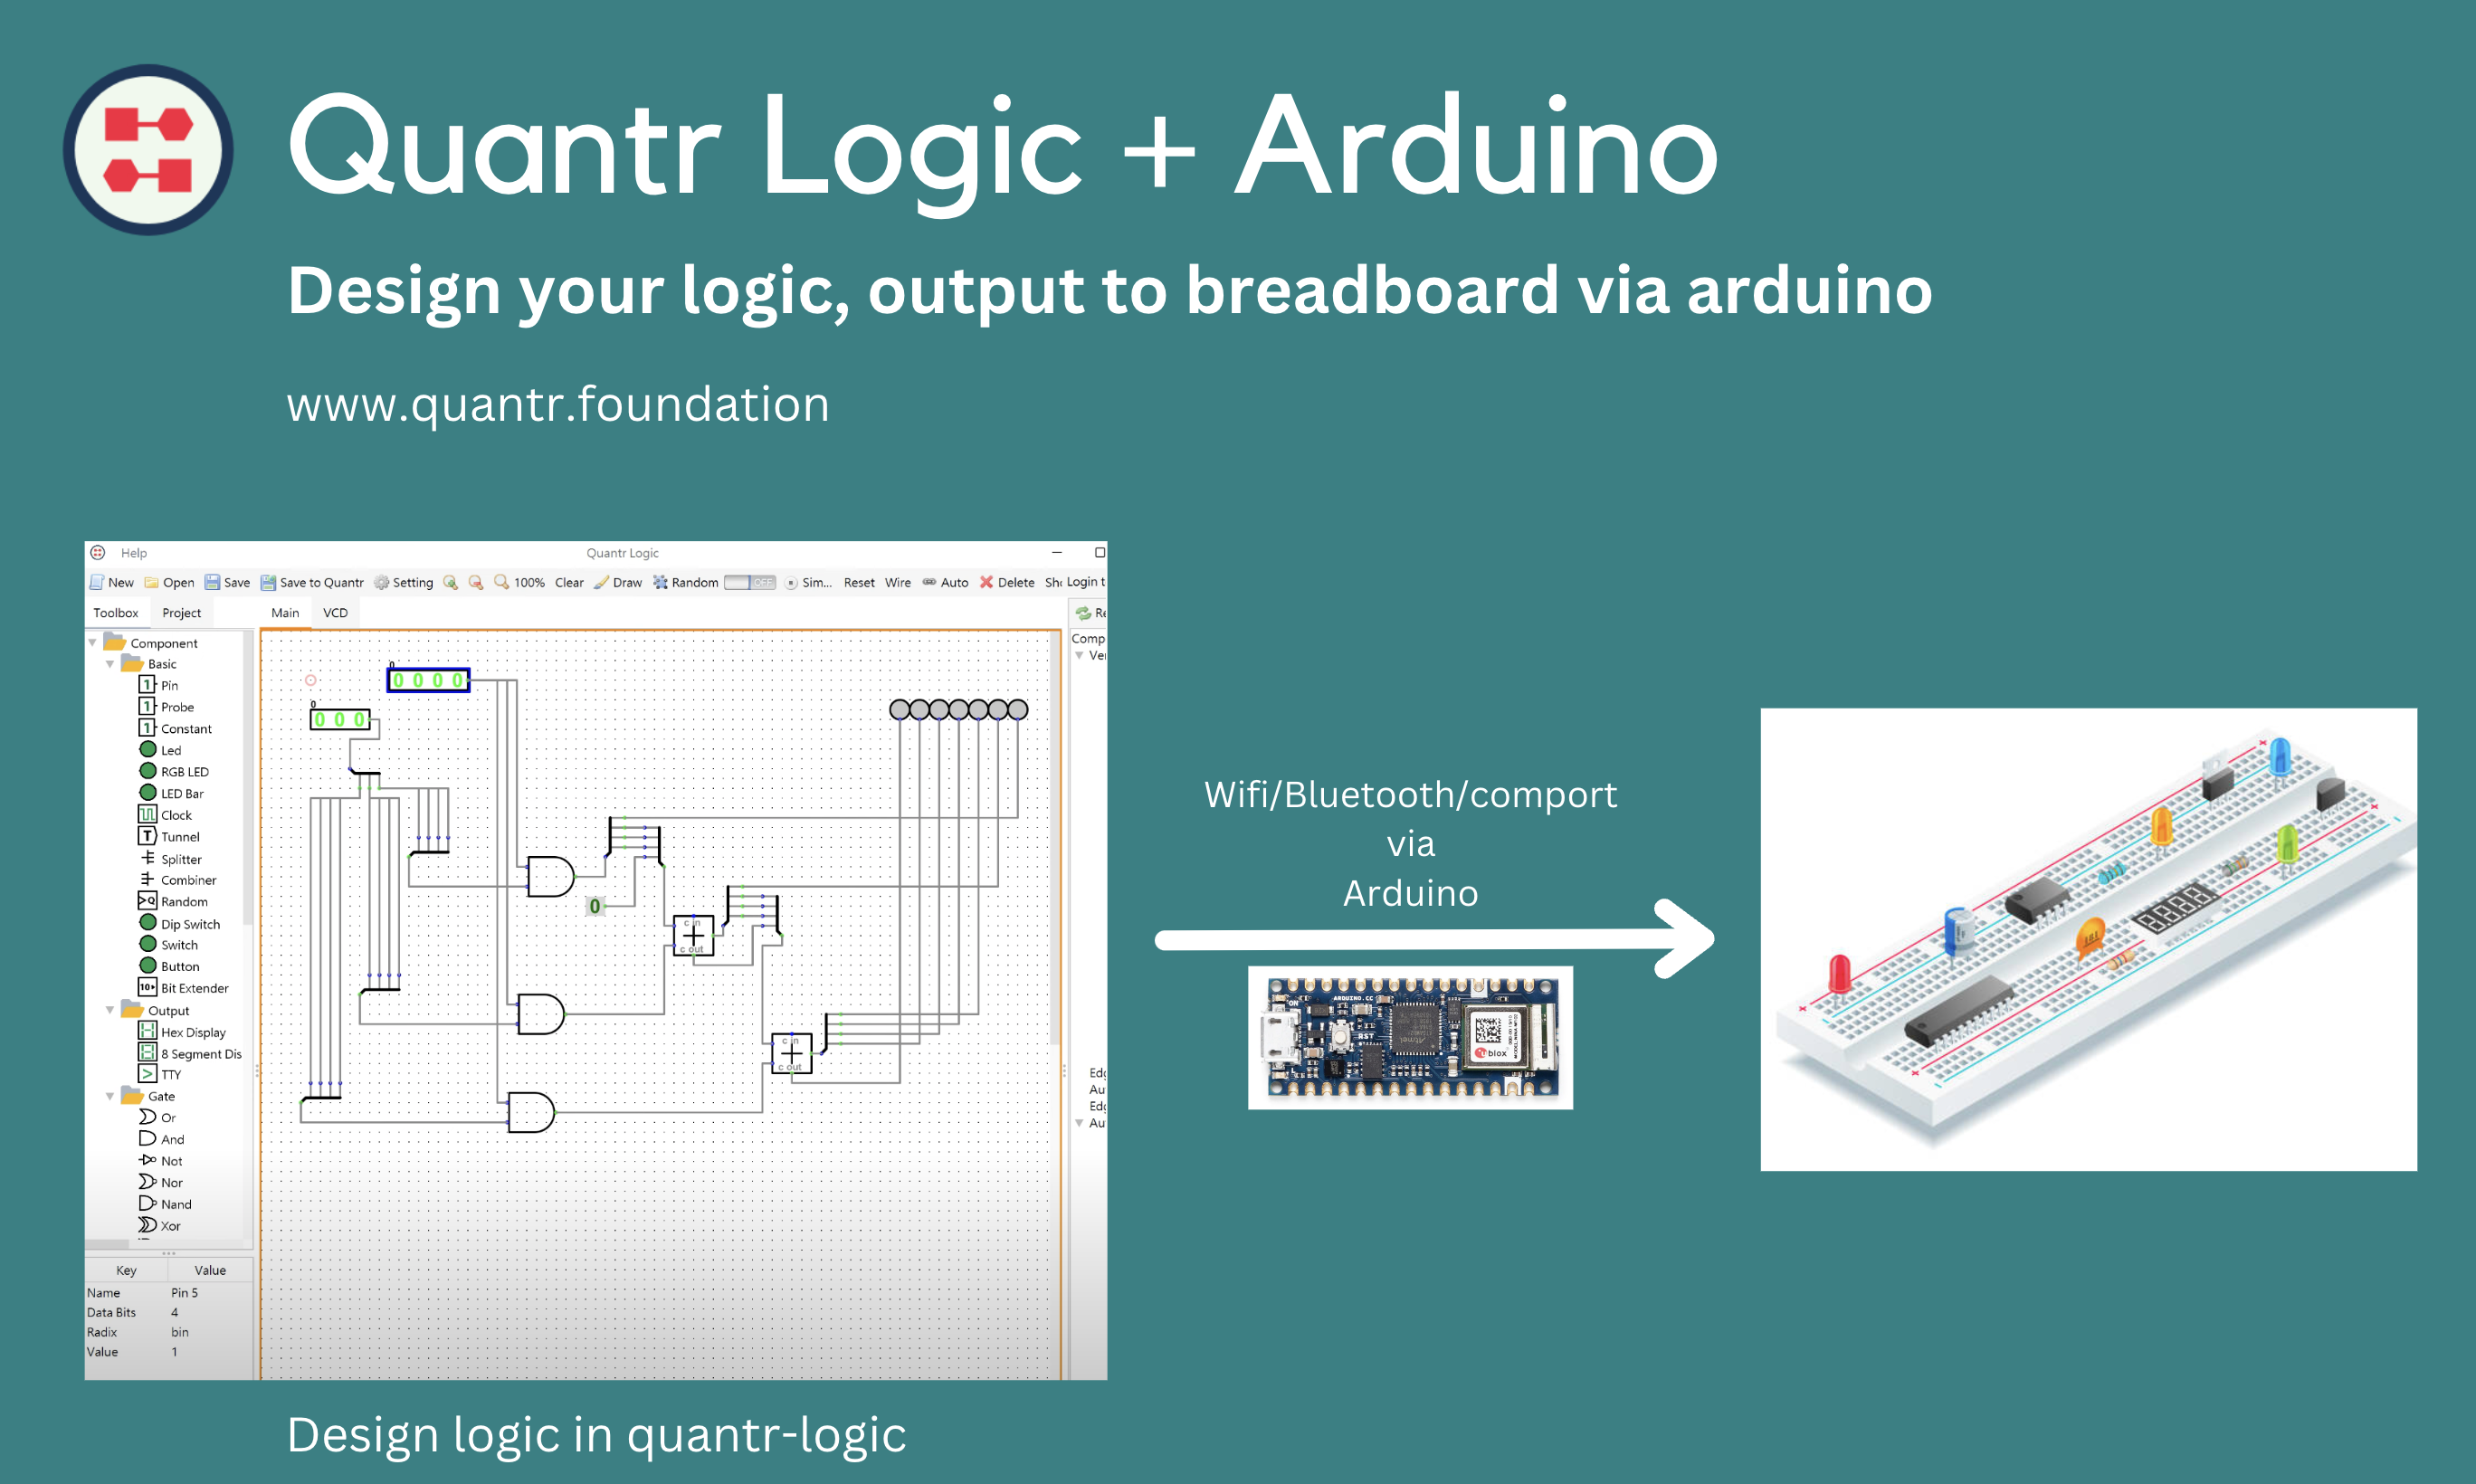
It would be super fun to connect Quantr-Logic to breadboard, we need a media to do that and we think of Arduino. We will build the connector using Arduino boards, lets see how funny it is. 2023-07-09 22:12:49
It would be super fun to connect Quantr-Logic to breadboard, we need a media to do that and we think of Arduino. We will build the connector using Arduino boards, lets see how funny it is.
 Seeking a way to simulate billion gate
Gate-by-gate simulation is easy to implement, so our first stage is to implement the whole skeleton, including all components, the plugin engine, and the simulation engine. It has an obvious weak point: slow. We are now seeking a way to simulate a billion gates. We put our progress here. Here is our first attempt: 2023-07-05 13:57:51
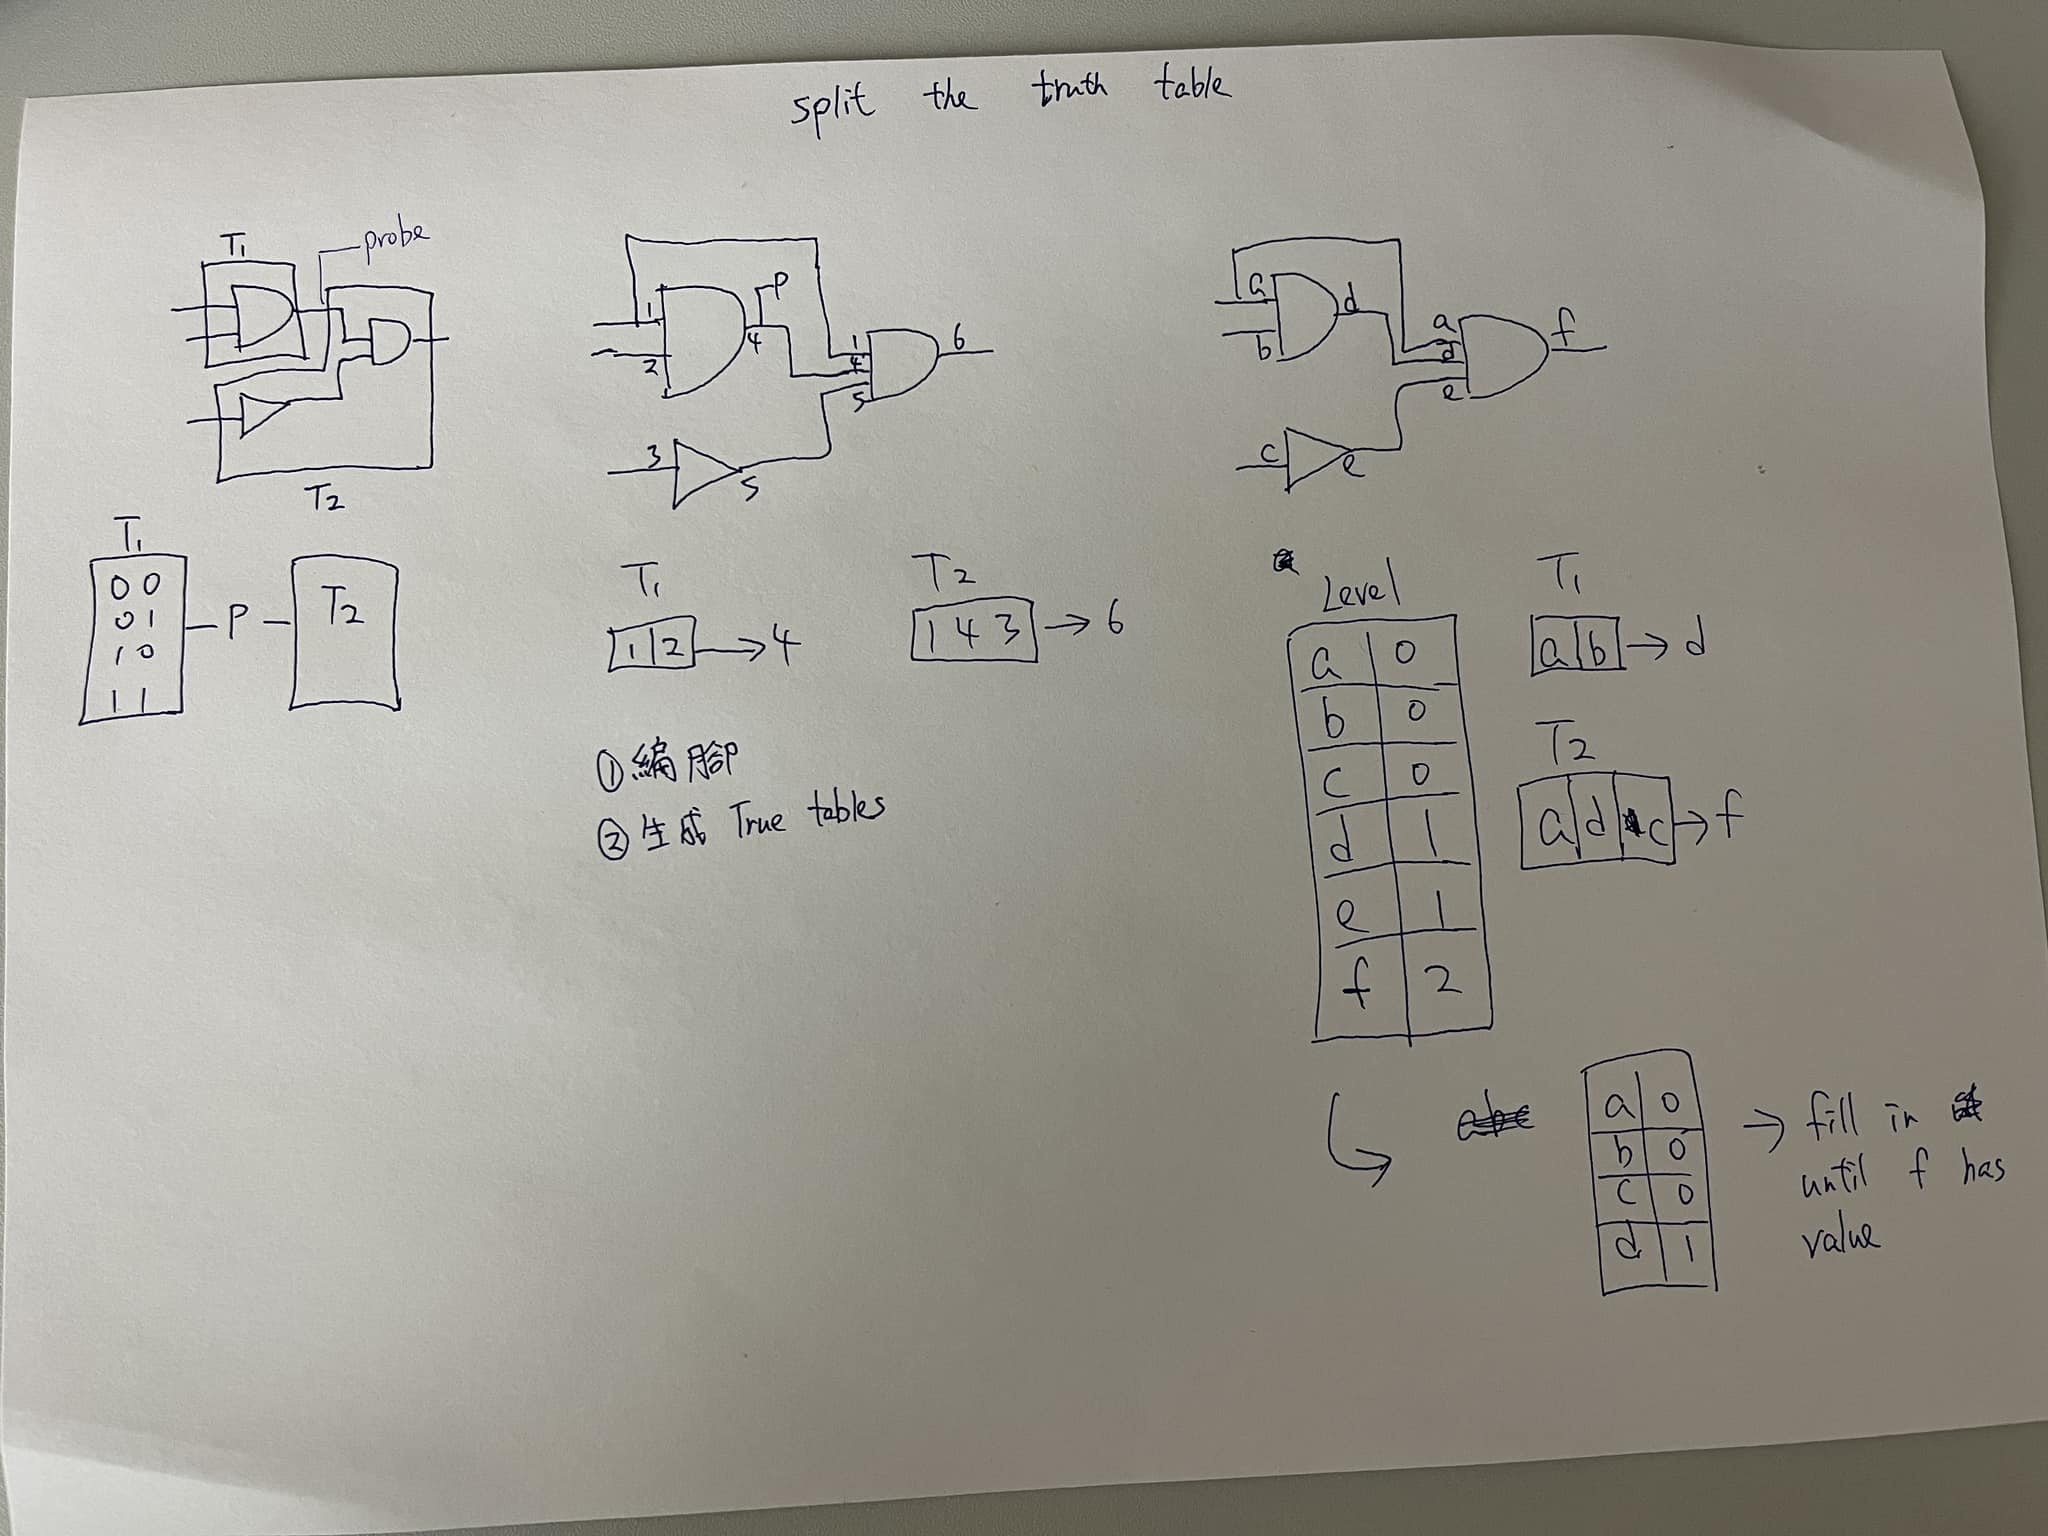
Gate-by-gate simulation is easy to implement, so our first stage is to implement the whole skeleton, including all components, the plugin engine, and the simulation engine. It has an obvious weak point: slow. We are now seeking a way to simulate a billion gates. We put our progress here. Here is our first attempt:
- We split the truth table and use RAM to direct output the result. Then the simulate no need to depend on the level of gate, it works much faster in most combinational circuits.
- We need to split the combinational circuit into piece and each piece work in similar duration, otherwise multithreading result will not be good, since some circuits take long time and some take short time to complete
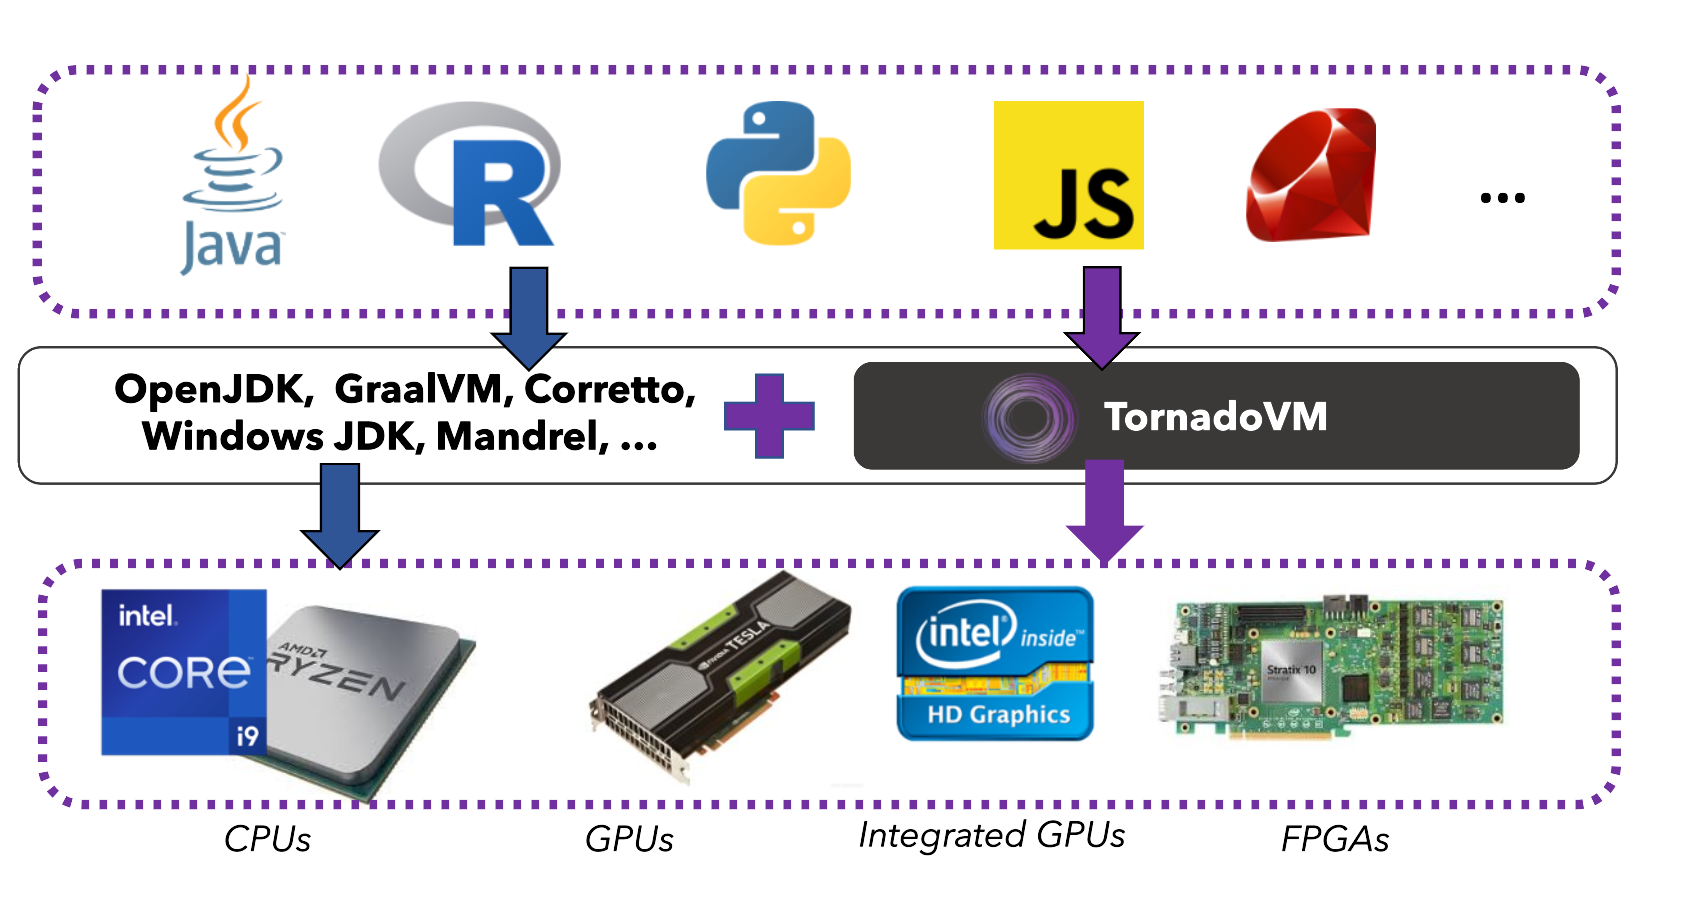
- We need to think of offloading the simulation in GPU or FPGA. FPGA will work faster but the programming model is much harder and lack of cross-platform ability
- Trying the Tornardo VM to offload some java to CUDA
 Breadboard RISC-V
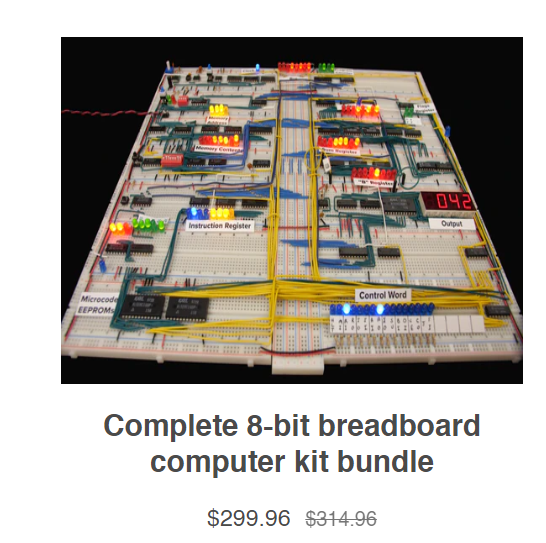
We are going to start our breadboard RISC-V project. We build a simple RISC-V with students to fulfill the below requirements. The breadboard CPU is simple, but we will be in full stack, code the testing program in GCC, debug via GDB with our own jtag and by openocd. Requirements: Remark 1: Outside the RISC-V […] 2023-04-23 19:48:49
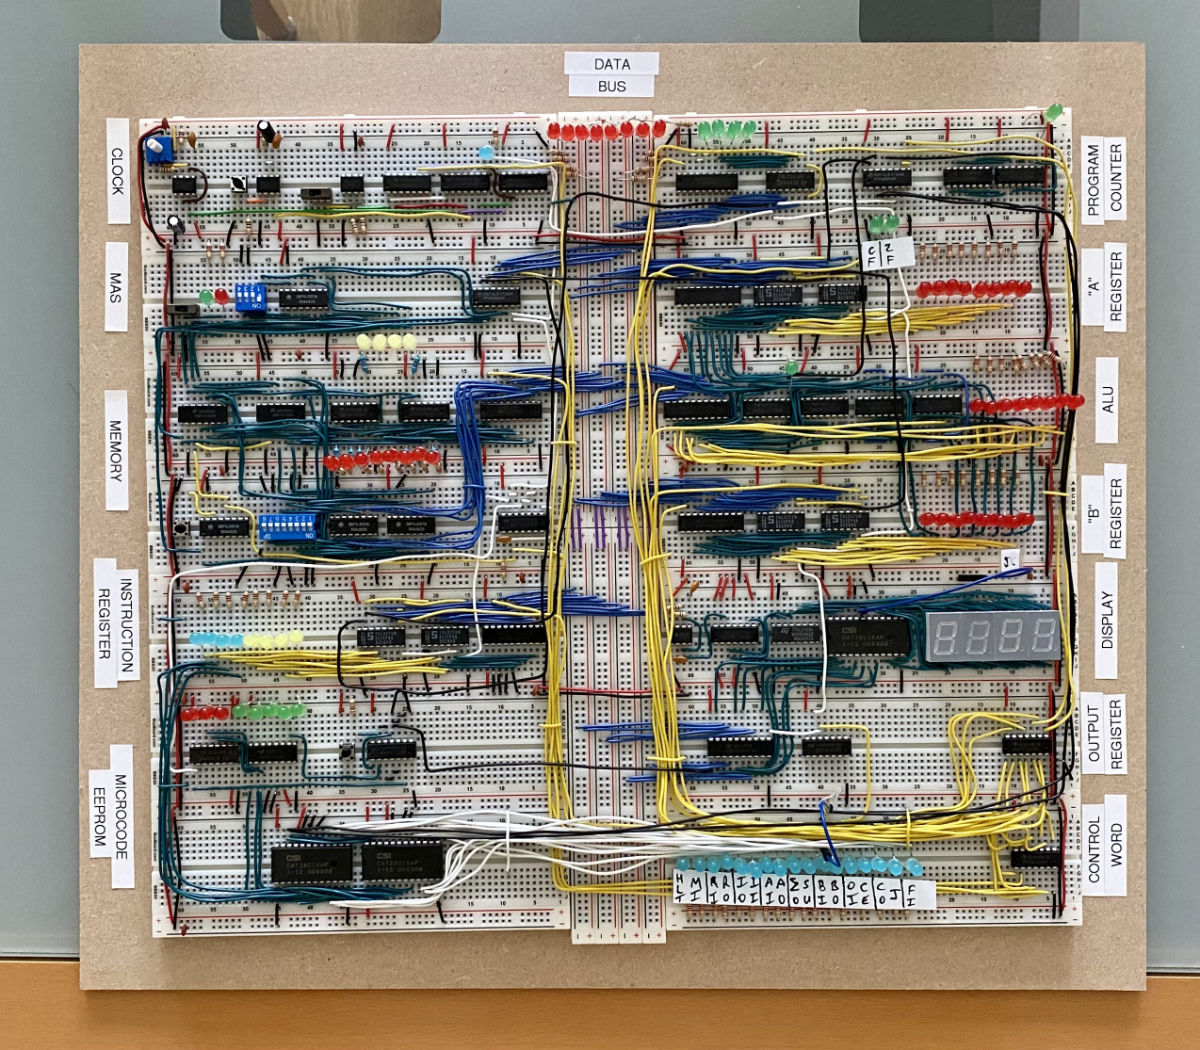
We are going to start our breadboard RISC-V project. We build a simple RISC-V with students to fulfill the below requirements. The breadboard CPU is simple, but we will be in full stack, code the testing program in GCC, debug via GDB with our own jtag and by openocd.
Requirements:
- A controllable program counter. We can set its speed and pause it at any time manually
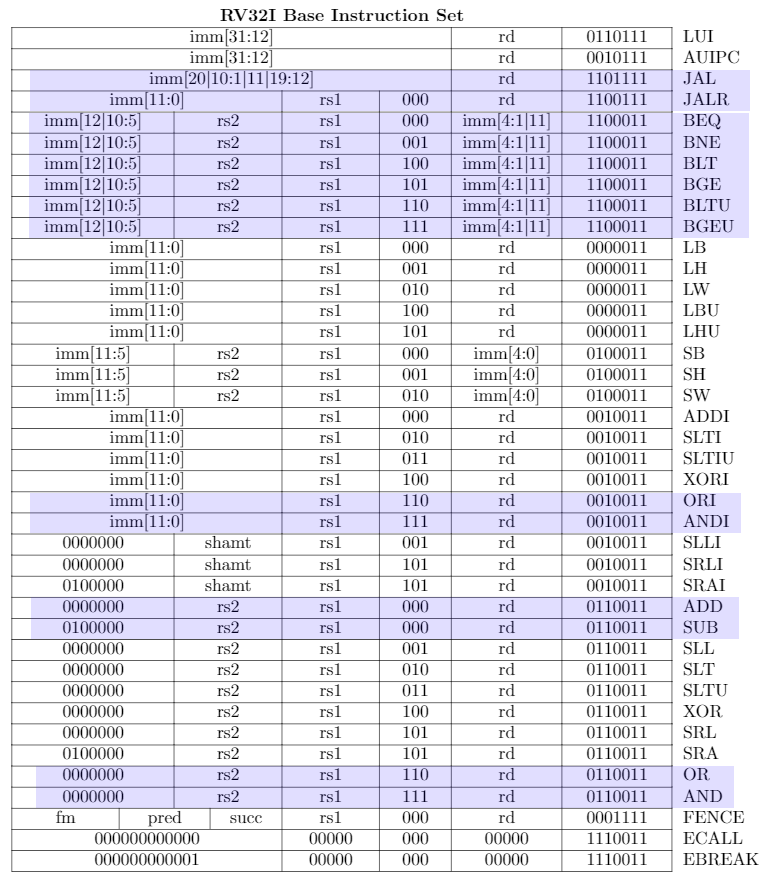
- Support some basic instructions such as below
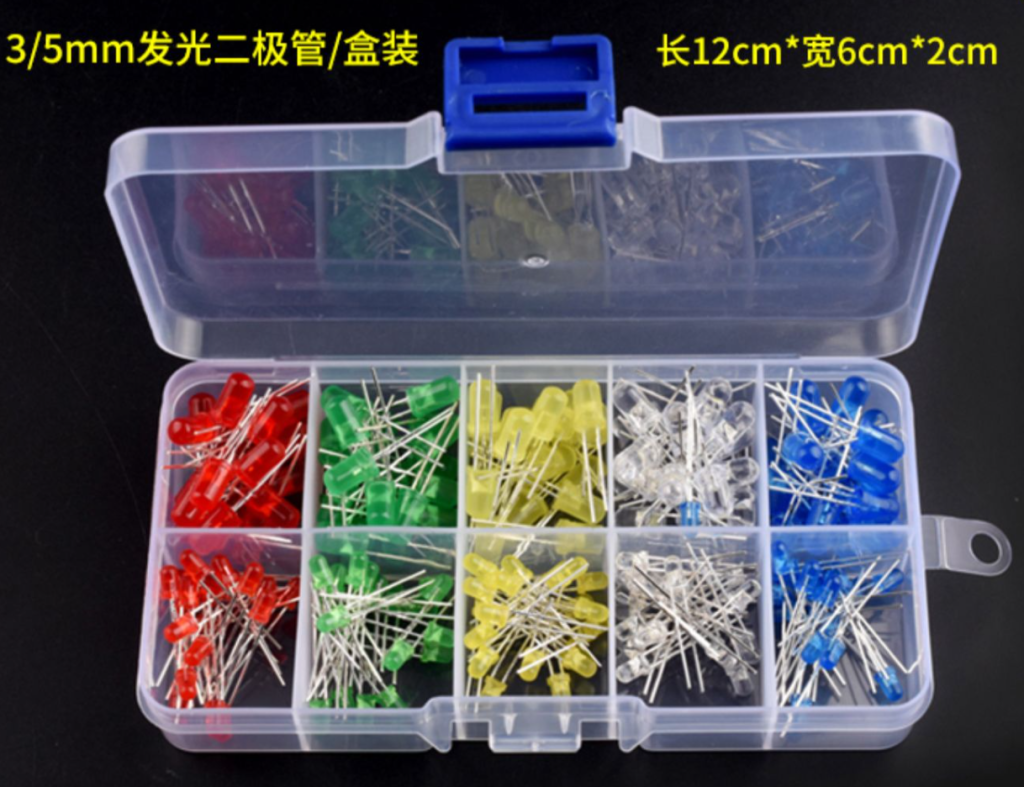
- Provide LED to indicate the status and register values on board
- Data bus & instruction bus
- 3 Stage pipeline and visualize it
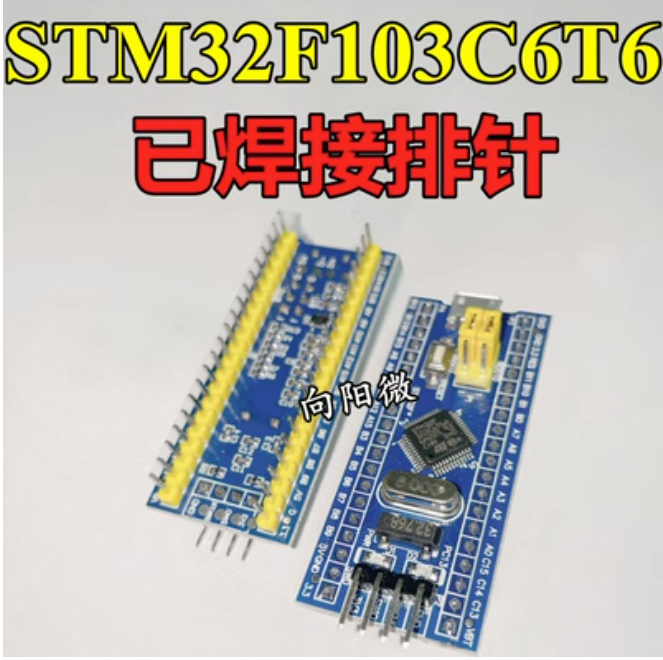
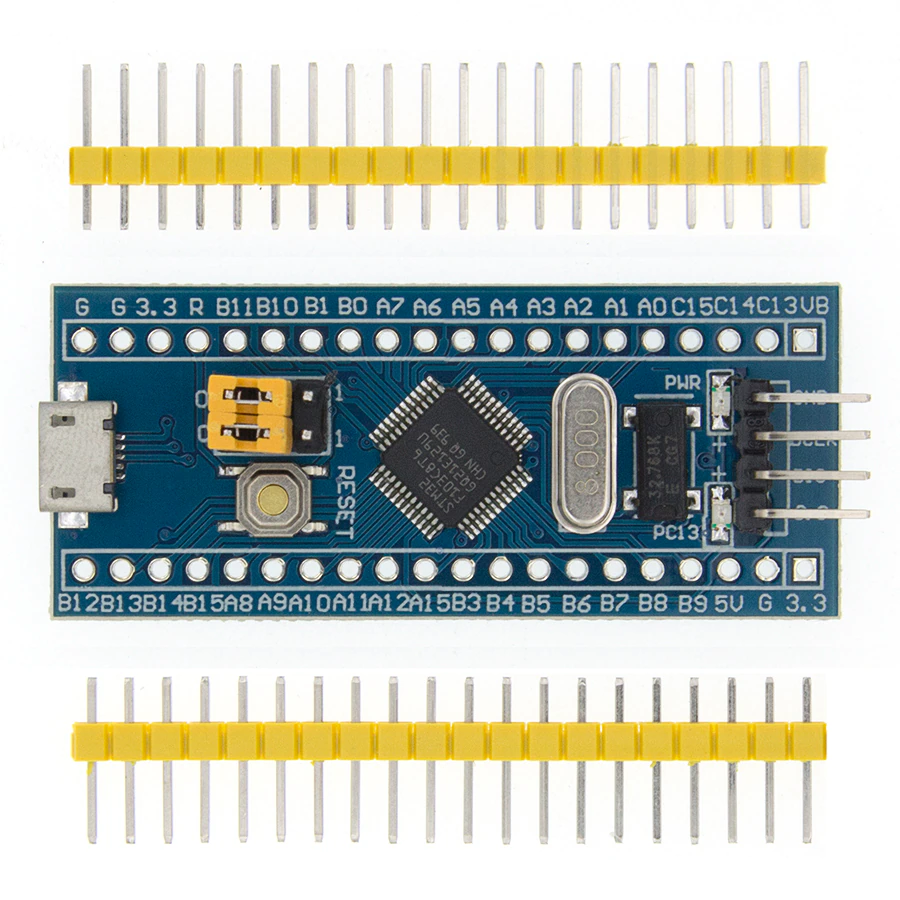
- We use STM32 to build the USB tag and plug to our breadboard RISC-V, write openocd driver and able to dump out registers and single step via GDB
Remark 1:
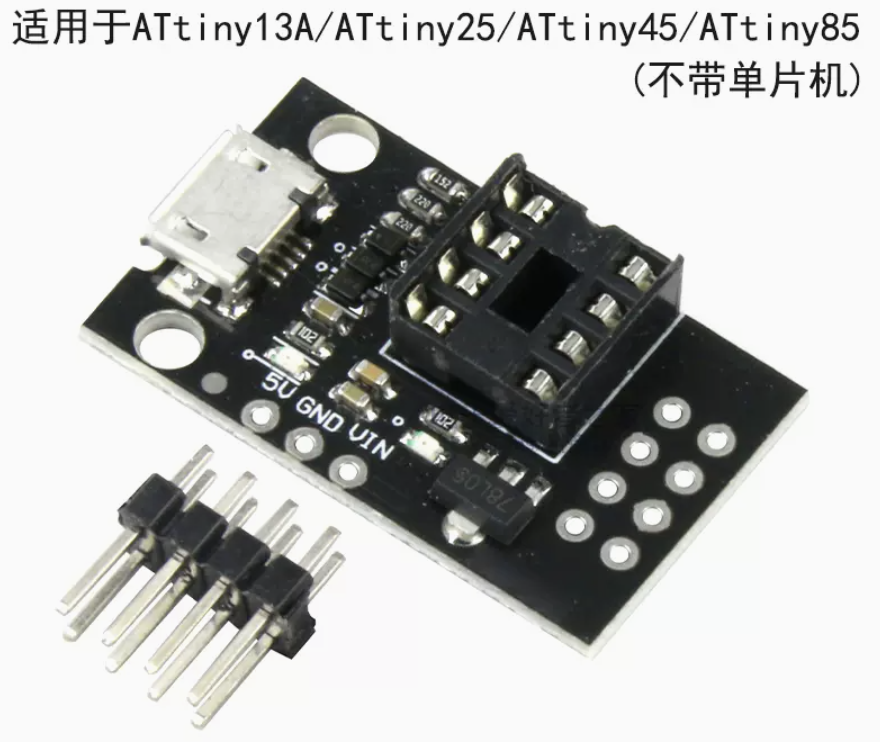
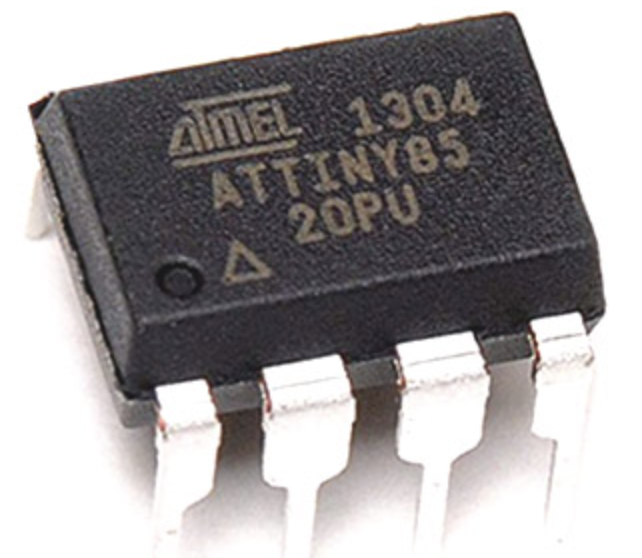
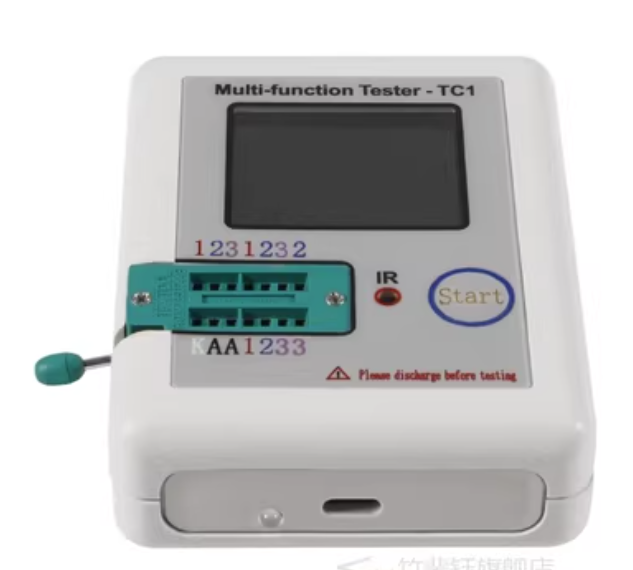
Outside the RISC-V we still need some components such as a programmable clock generator, we do all that by ATtiny85 and flash it via this device
Remark 2:
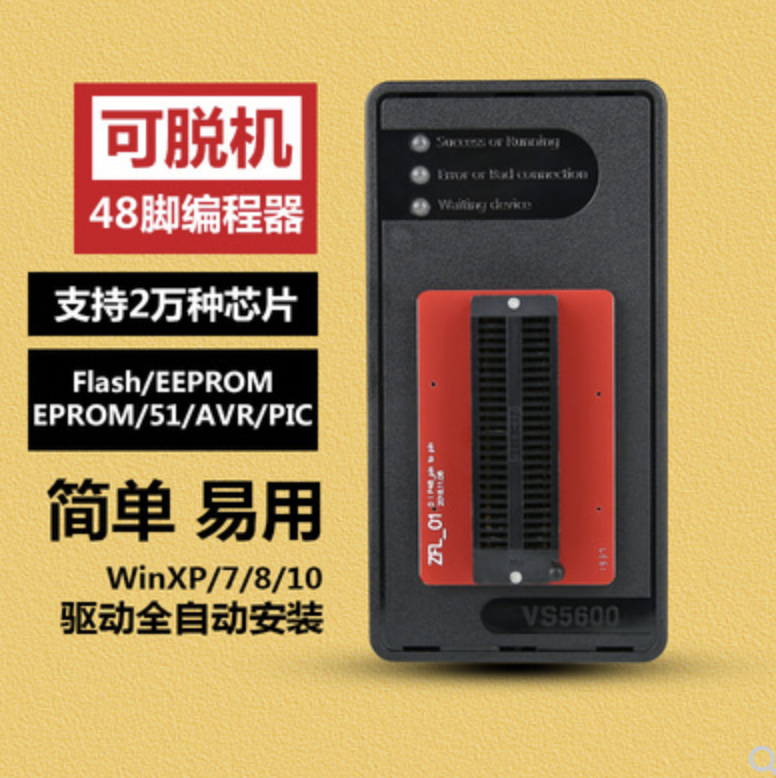
For the memory rather than using gates, we use dip memory such as 24AA32AF and this device and flash the EEPROM memory
Bill Of Material


 STM32 project with Dim Sum Labs
We will have another hobby project with Dim Sum Labs. Our ultimate goal is to design our own STM32 board. Philip Paeps is one of the guy running Dim Sum Labs and he is a low-level guy, I and him have nearly the same interests. Philip is a FreeBSD committer contributing mainly to the kernel […] 2023-04-18 00:07:17


We will have another hobby project with Dim Sum Labs. Our ultimate goal is to design our own STM32 board. Philip Paeps is one of the guy running Dim Sum Labs and he is a low-level guy, I and him have nearly the same interests. Philip is a FreeBSD committer contributing mainly to the kernel and a member of the FreeBSD security team.
Our plan:
- We design and make our own STM32 board
- We use this to put the STM32 chip into the breadboard and make it work first
- We use kicad as the tool, there are some tutorials we just follow
- For Jtag, we should support ST-Link
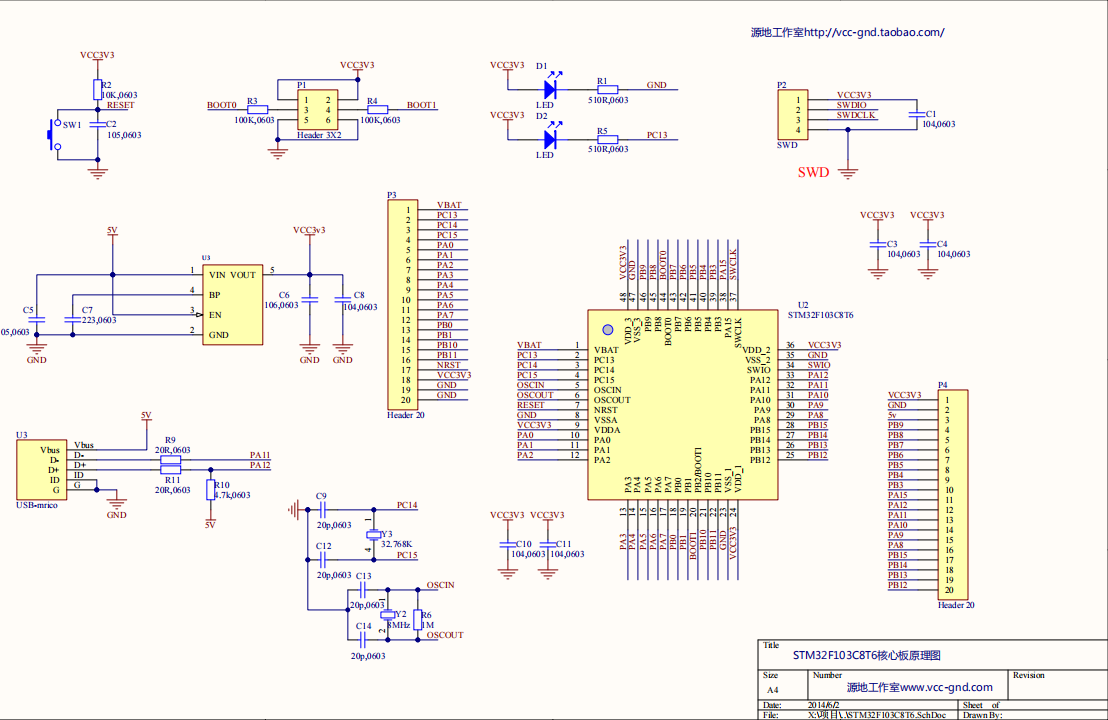
- I got STM32 board and they provide the schema, maybe we just follow first. But we have to understand the meaning of every piece and every number in it.
- We produce our PCB board in here. It got PCB assembly service, lets get familiar with it.
- If we are not dead, our next stop would be design our own FPGA board just like the icesugar-pro and make sure the open source toolchain can run on it.
 Qemu Log Panel tutorial
“Qemu Log Panel” is the tailor-made software to Step to run it Record xf6-riscv Record our simulator Run the GUI 2023-03-29 16:13:11
"Qemu Log Panel" is the tailor-made software to
- Convert qemu.log into H2 database
- Provide a GUI to diff the H2 database from xv6-riscv to the H2 database generated by our simulator
Step to run it
Record xf6-riscv
- Clone xv6
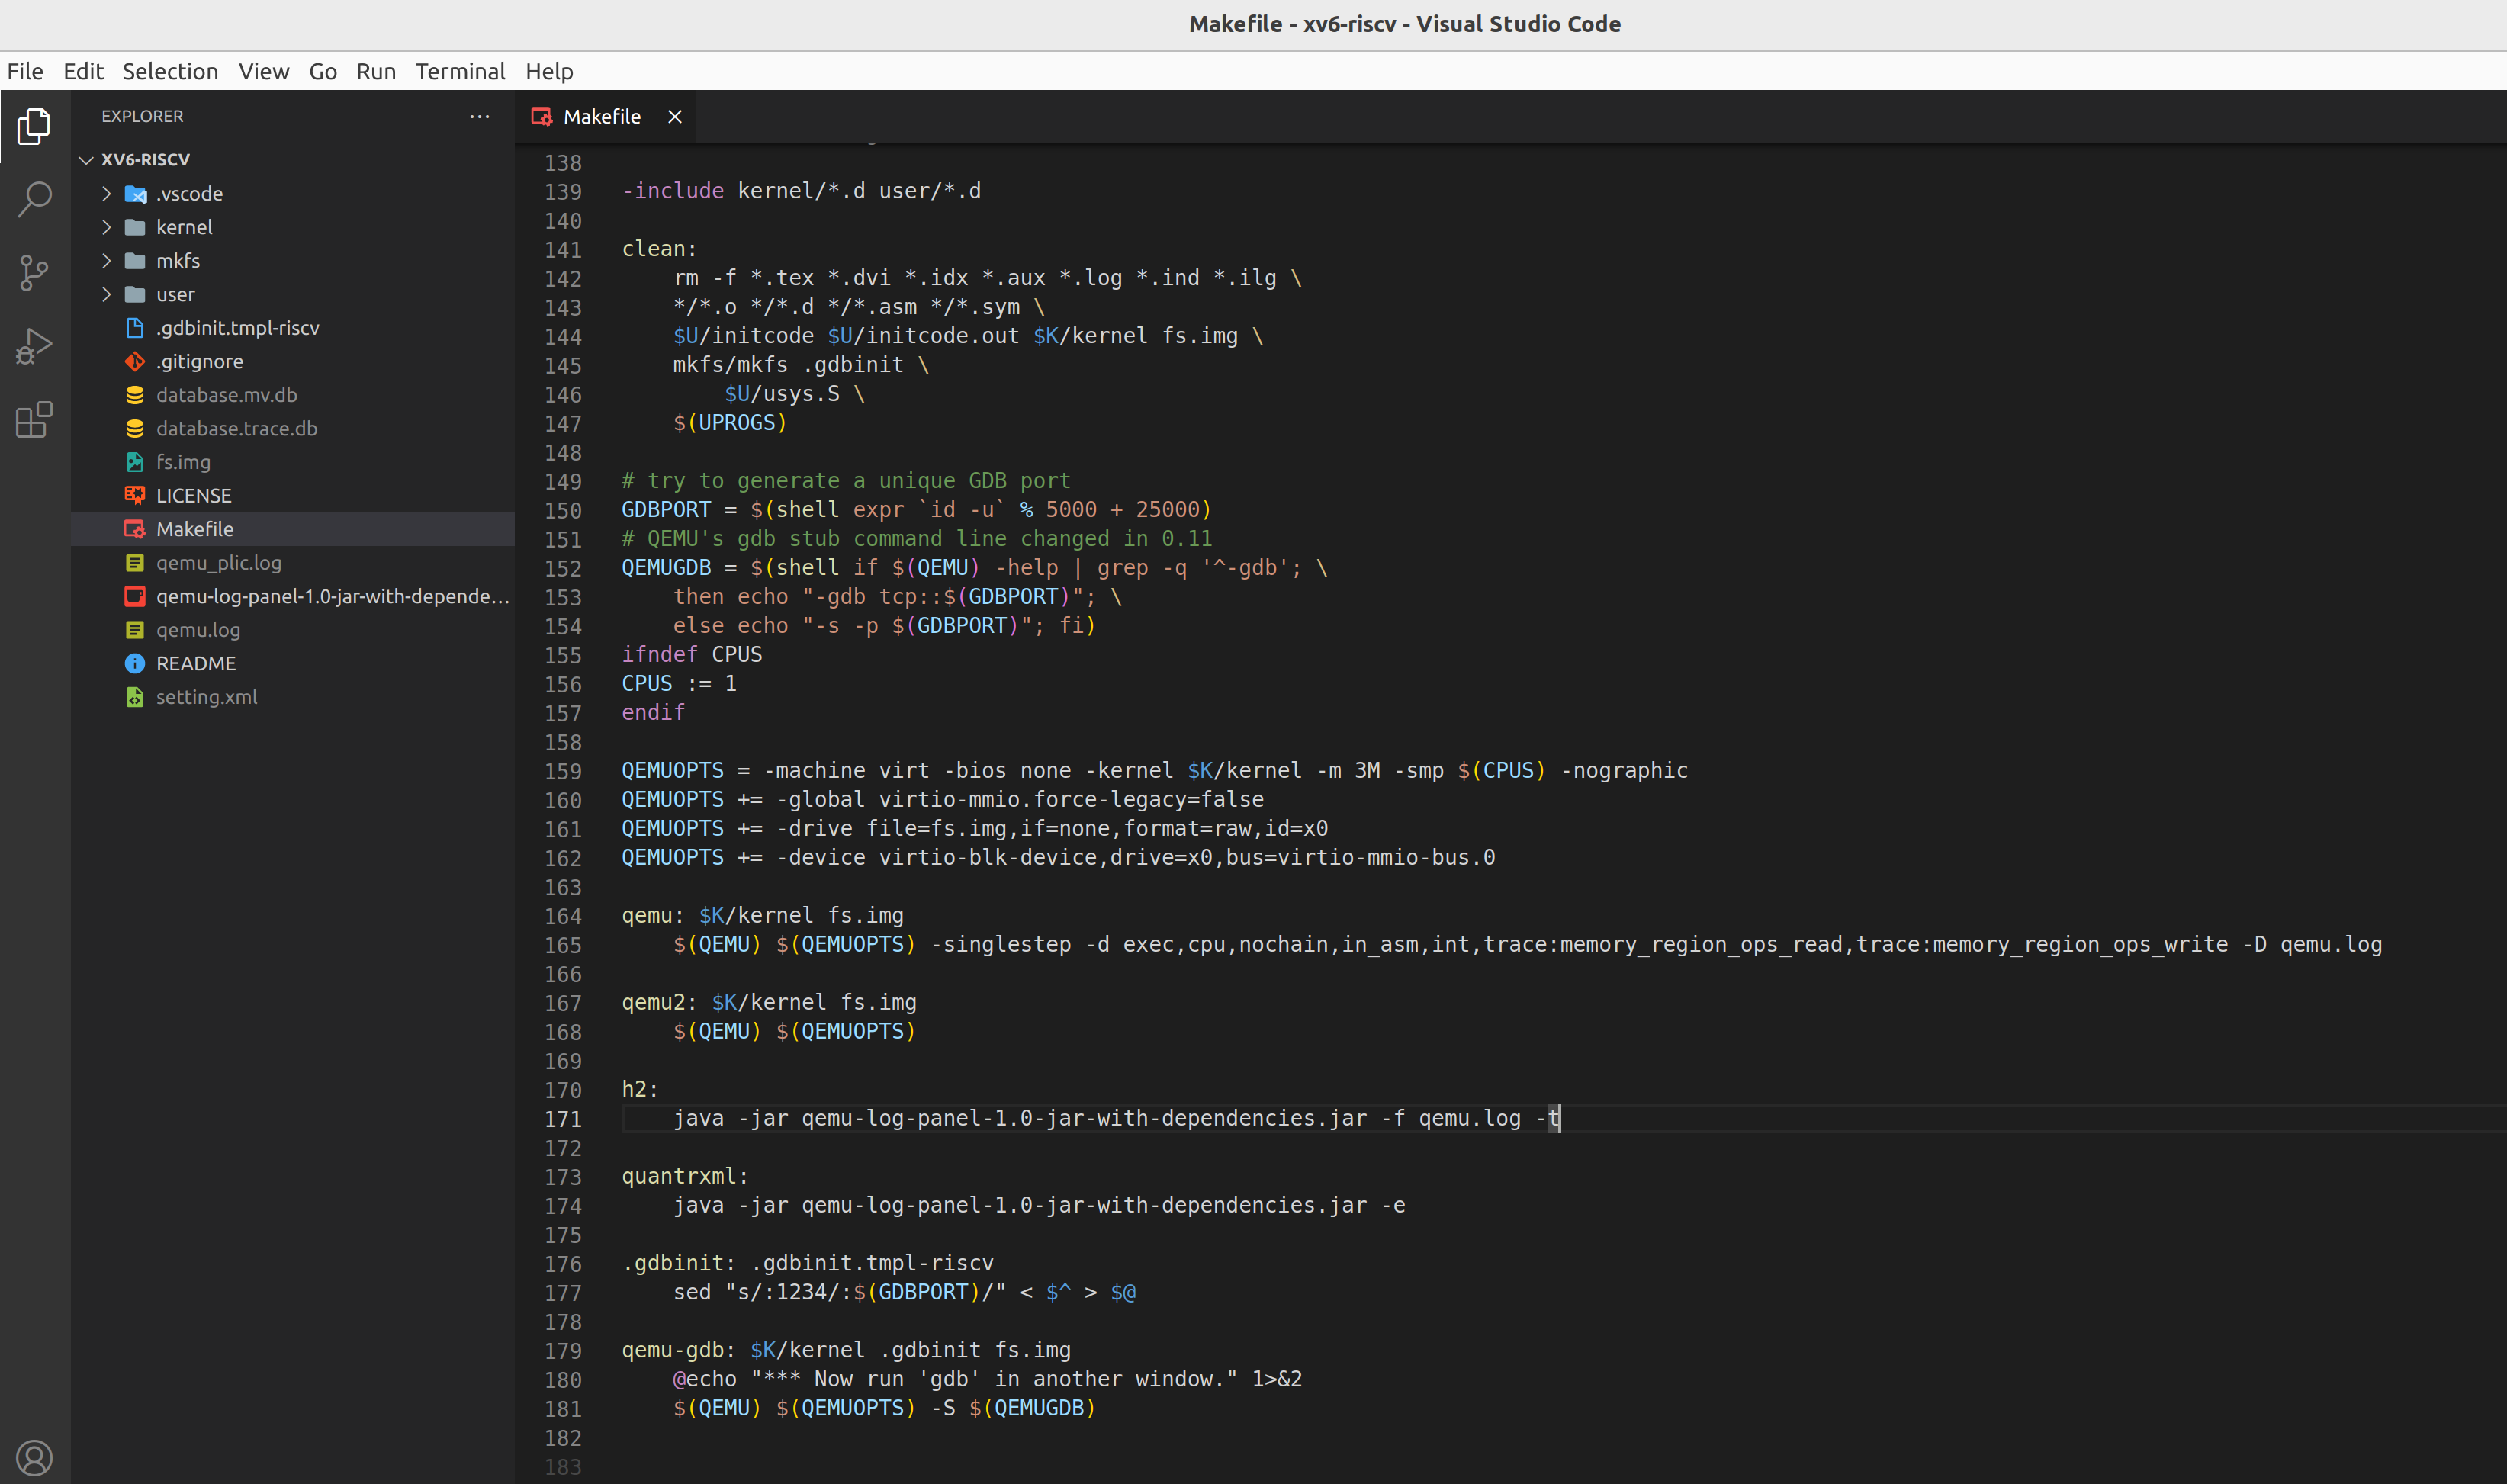
- Modify the Makefile
- Run "make qemu", then you got qemu.log
- Run "make h2", then it converts qemu.log into h2 database "database.mv.db"
Record our simulator
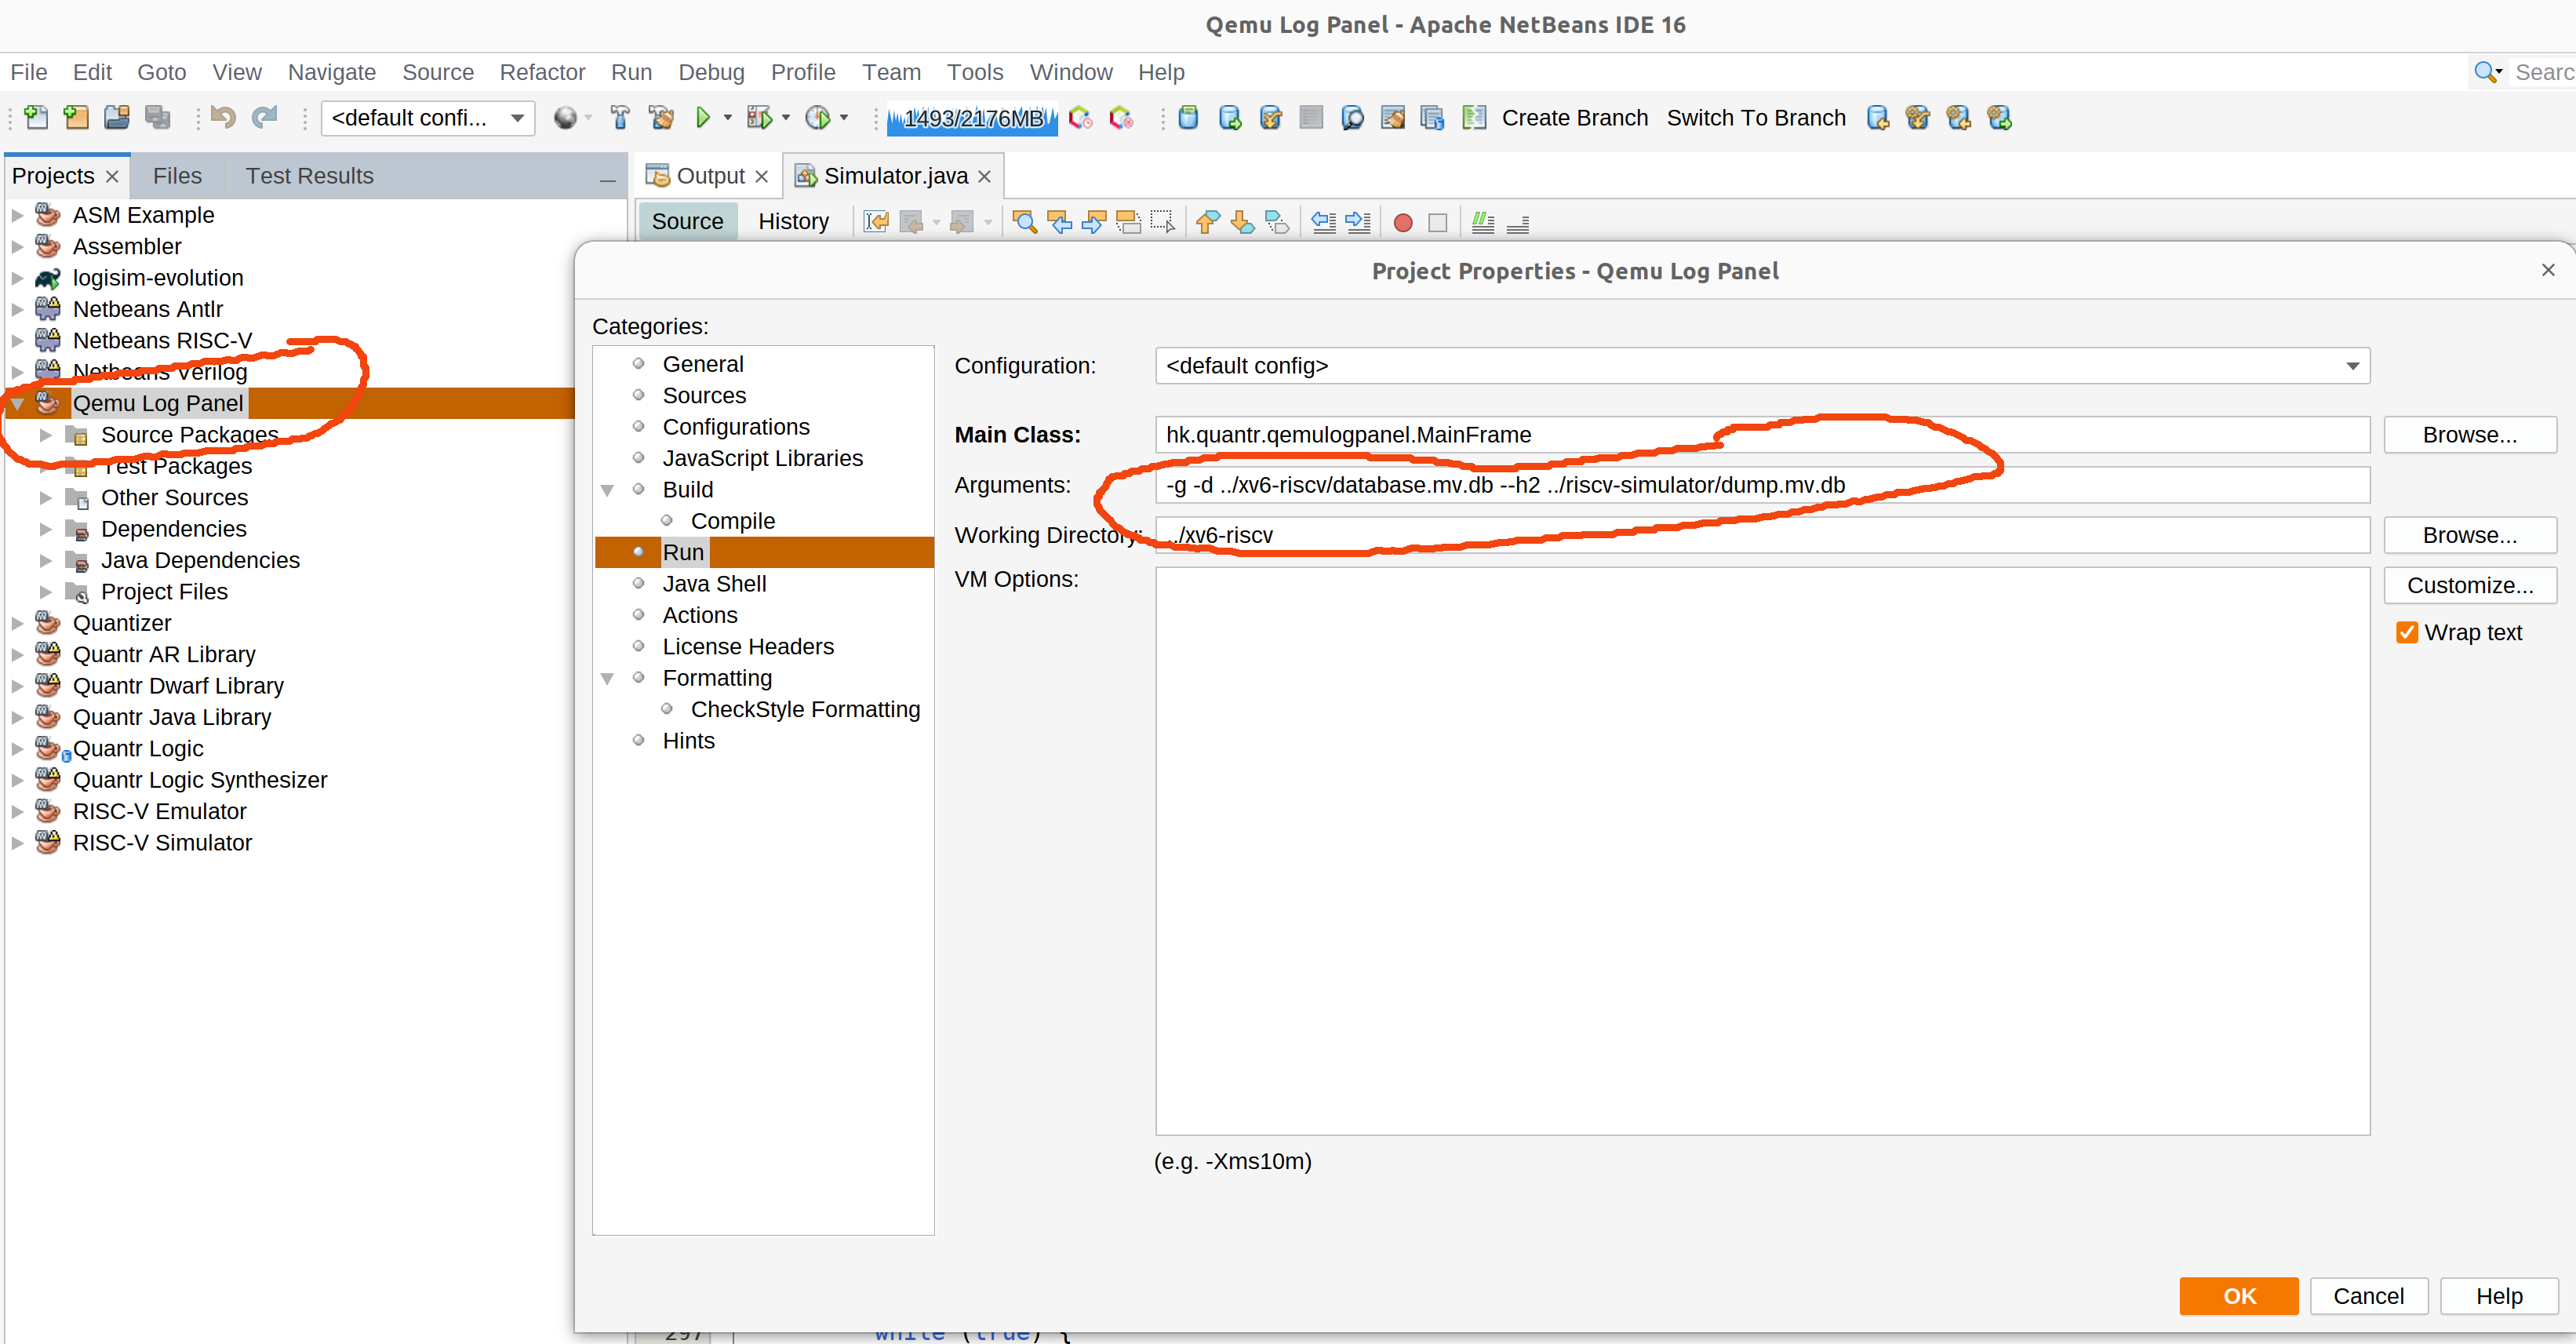
- Run our simulator in netbeans with "-h2" option
- Then you got "dump.mv.db"
Run the GUI
- run qemu-log-panel, point to those two H2 database files
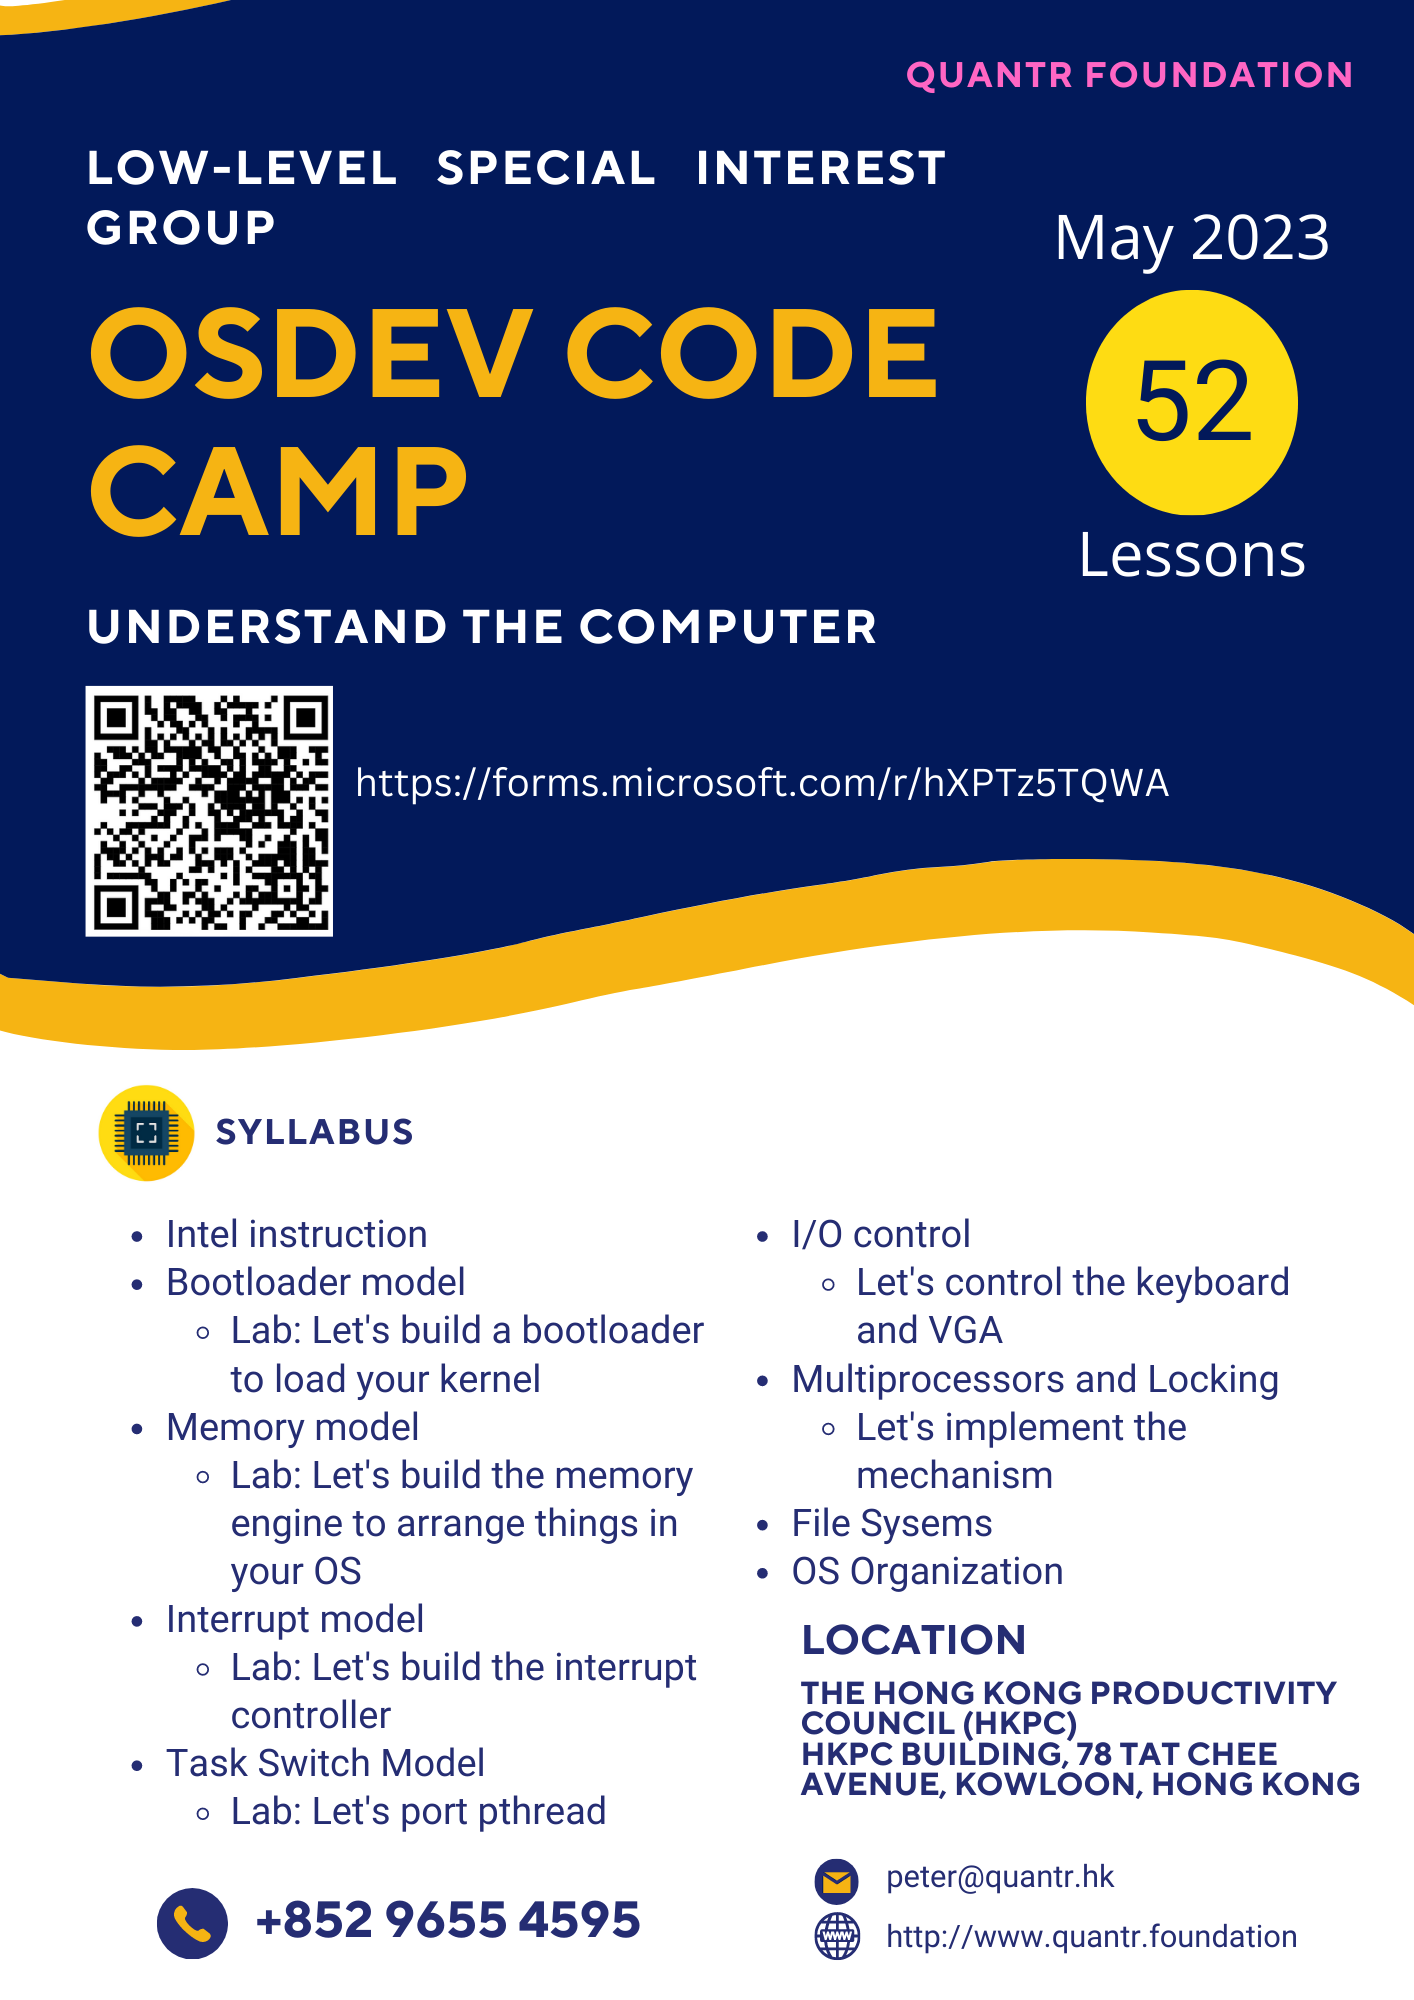 OSDev free course
2023-03-28 13:58:18
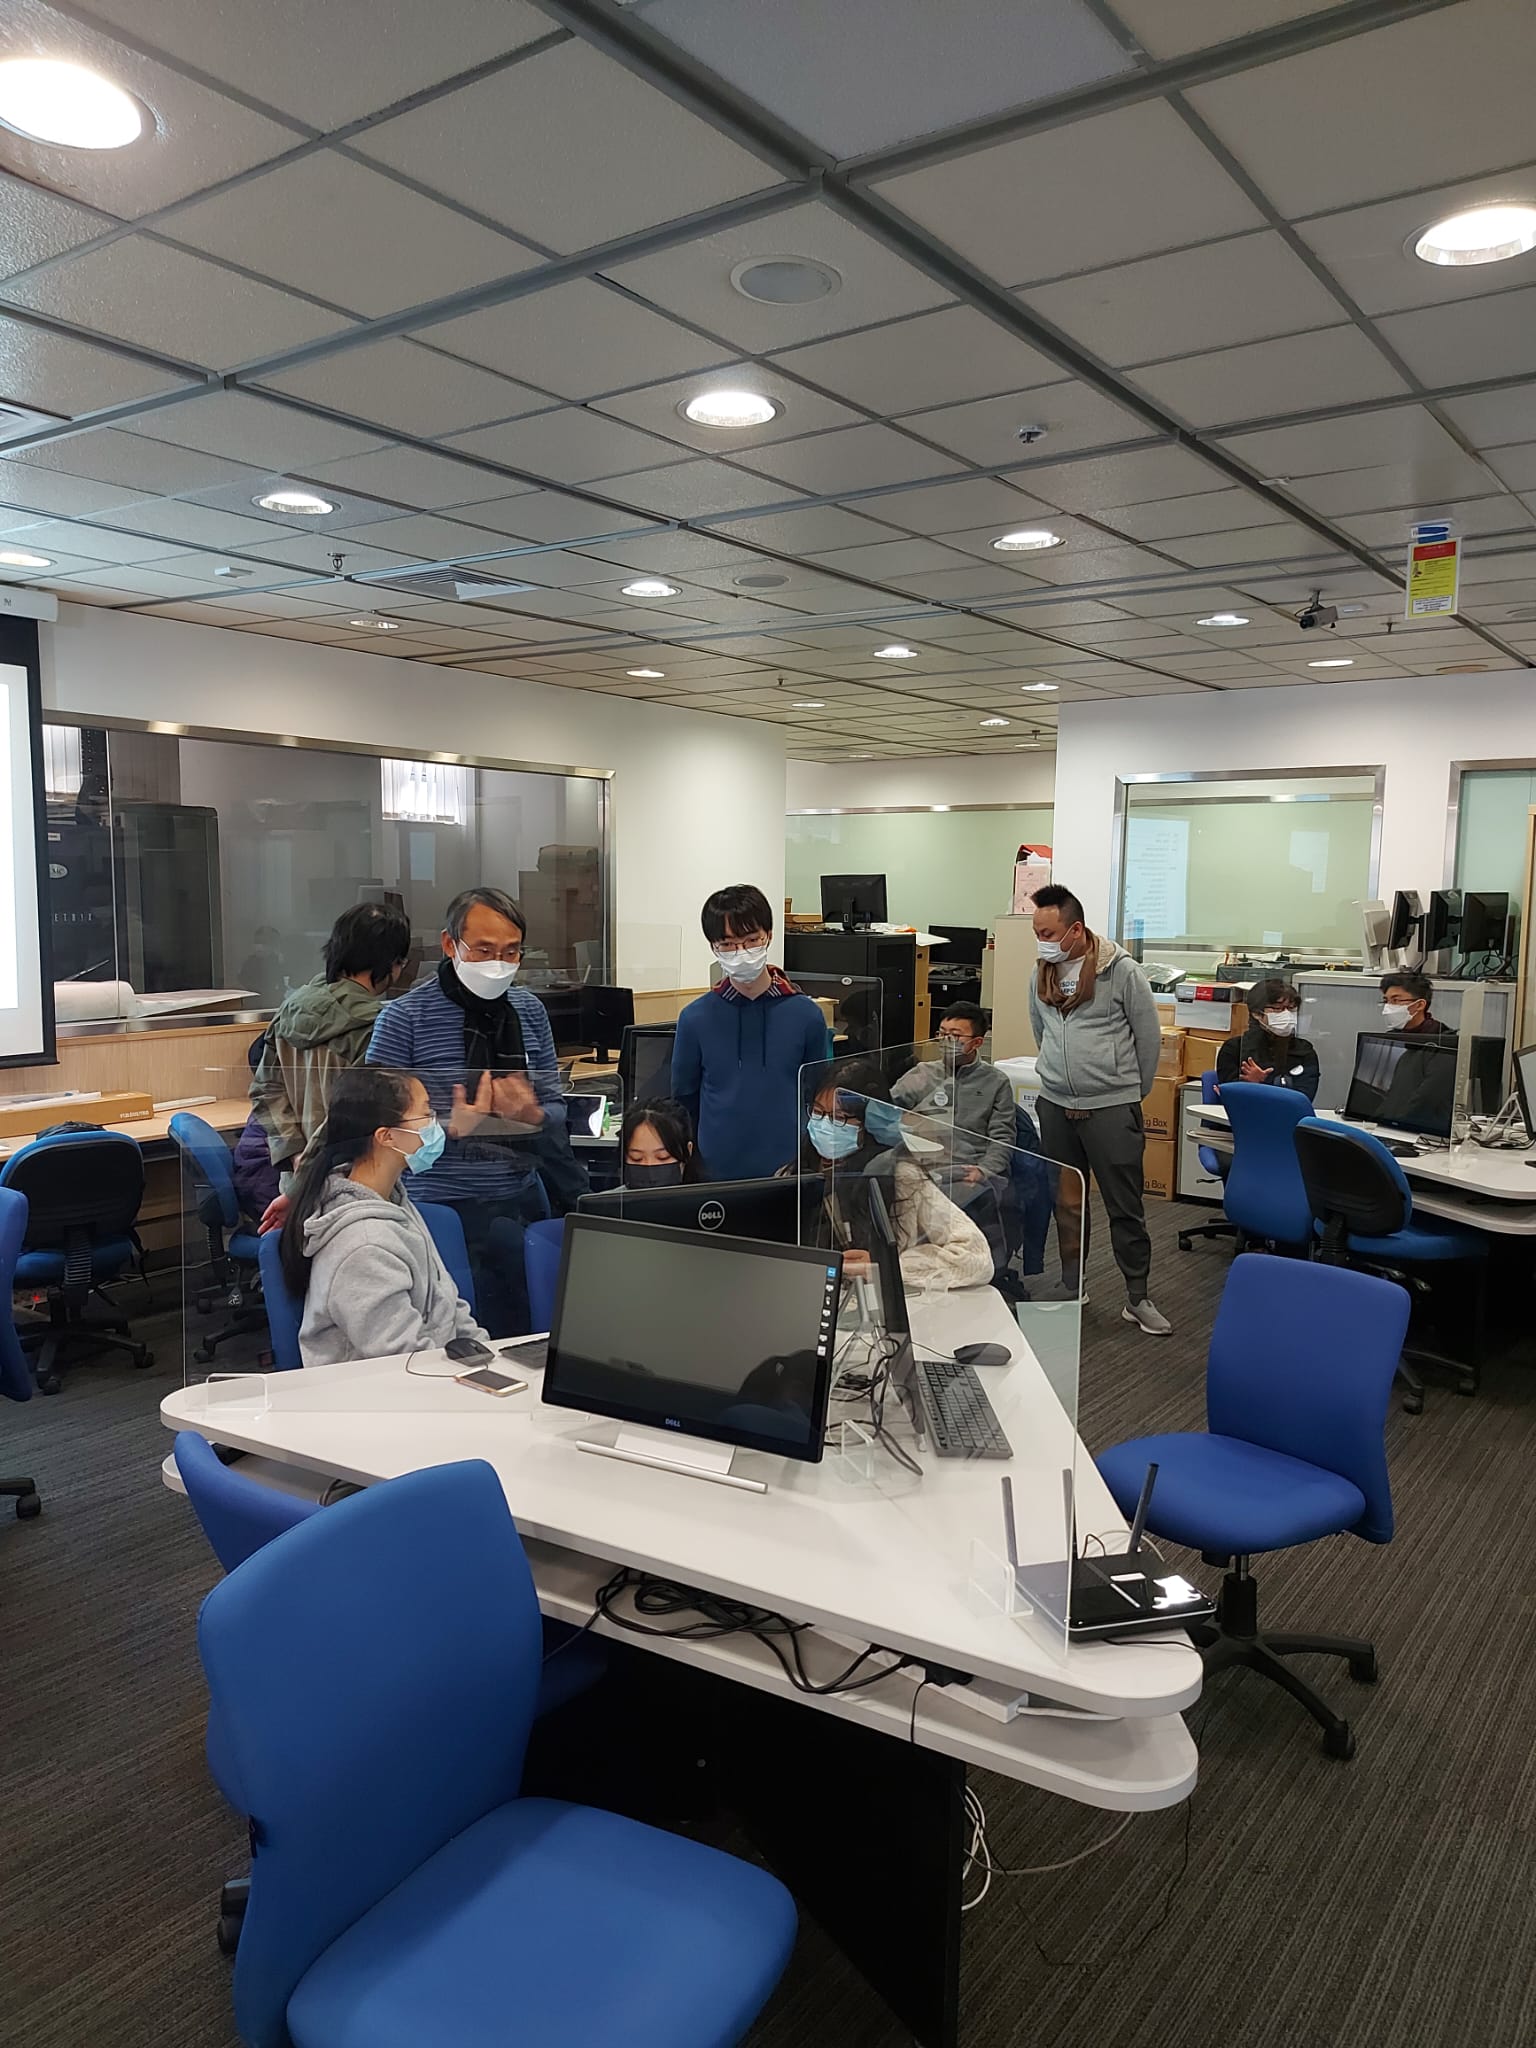
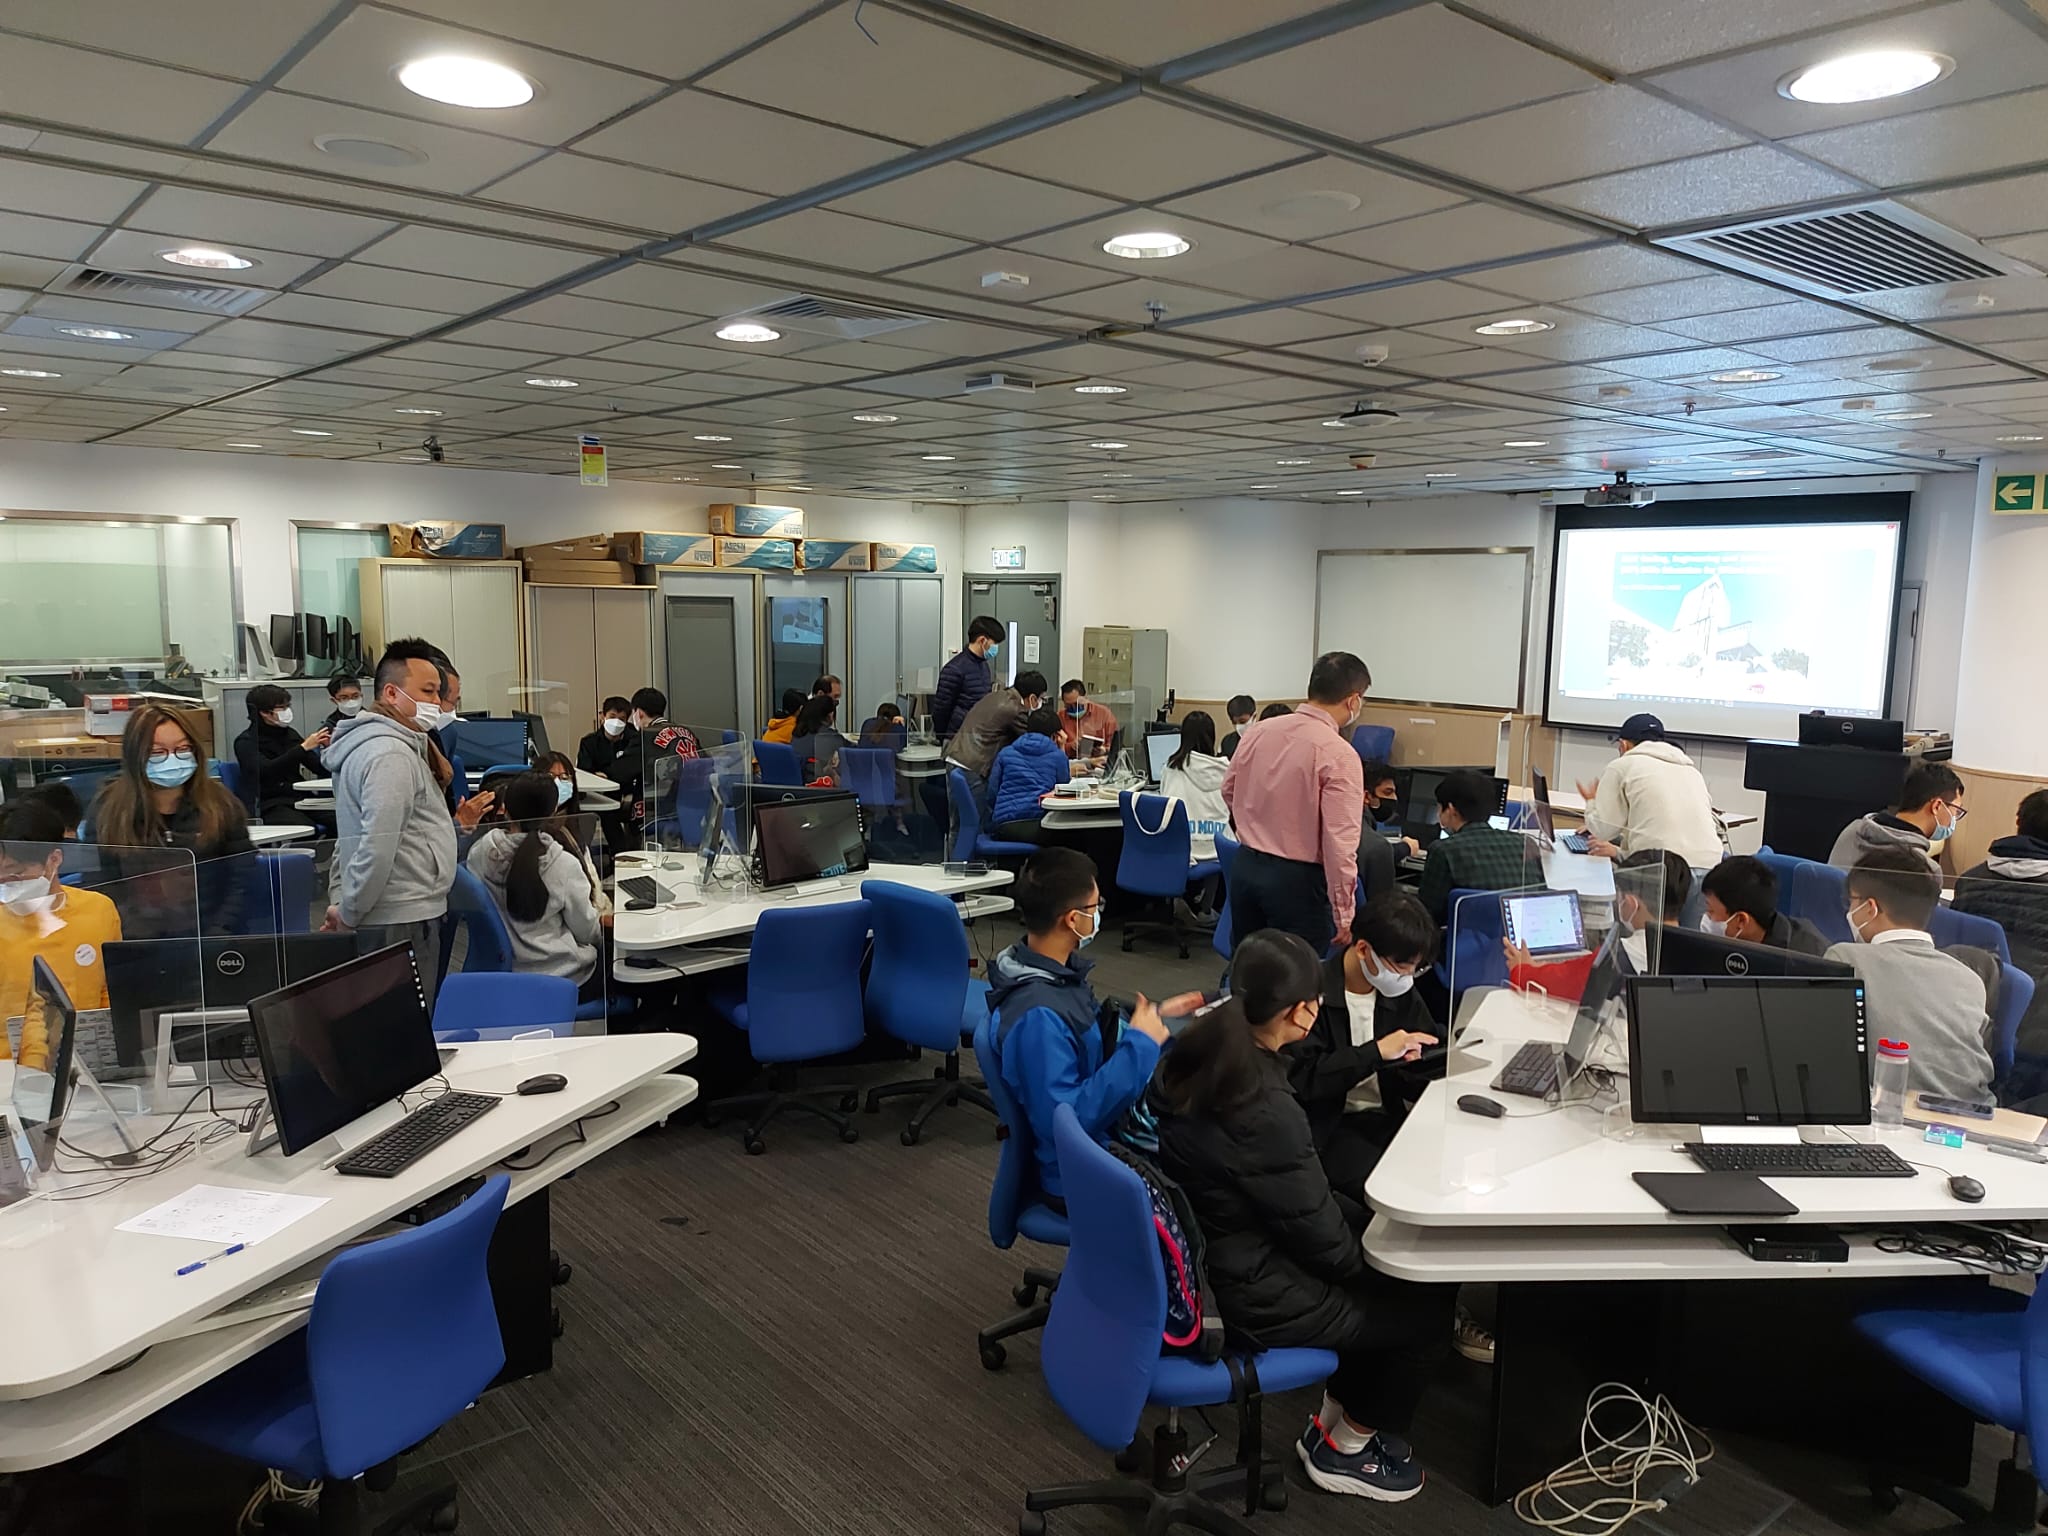
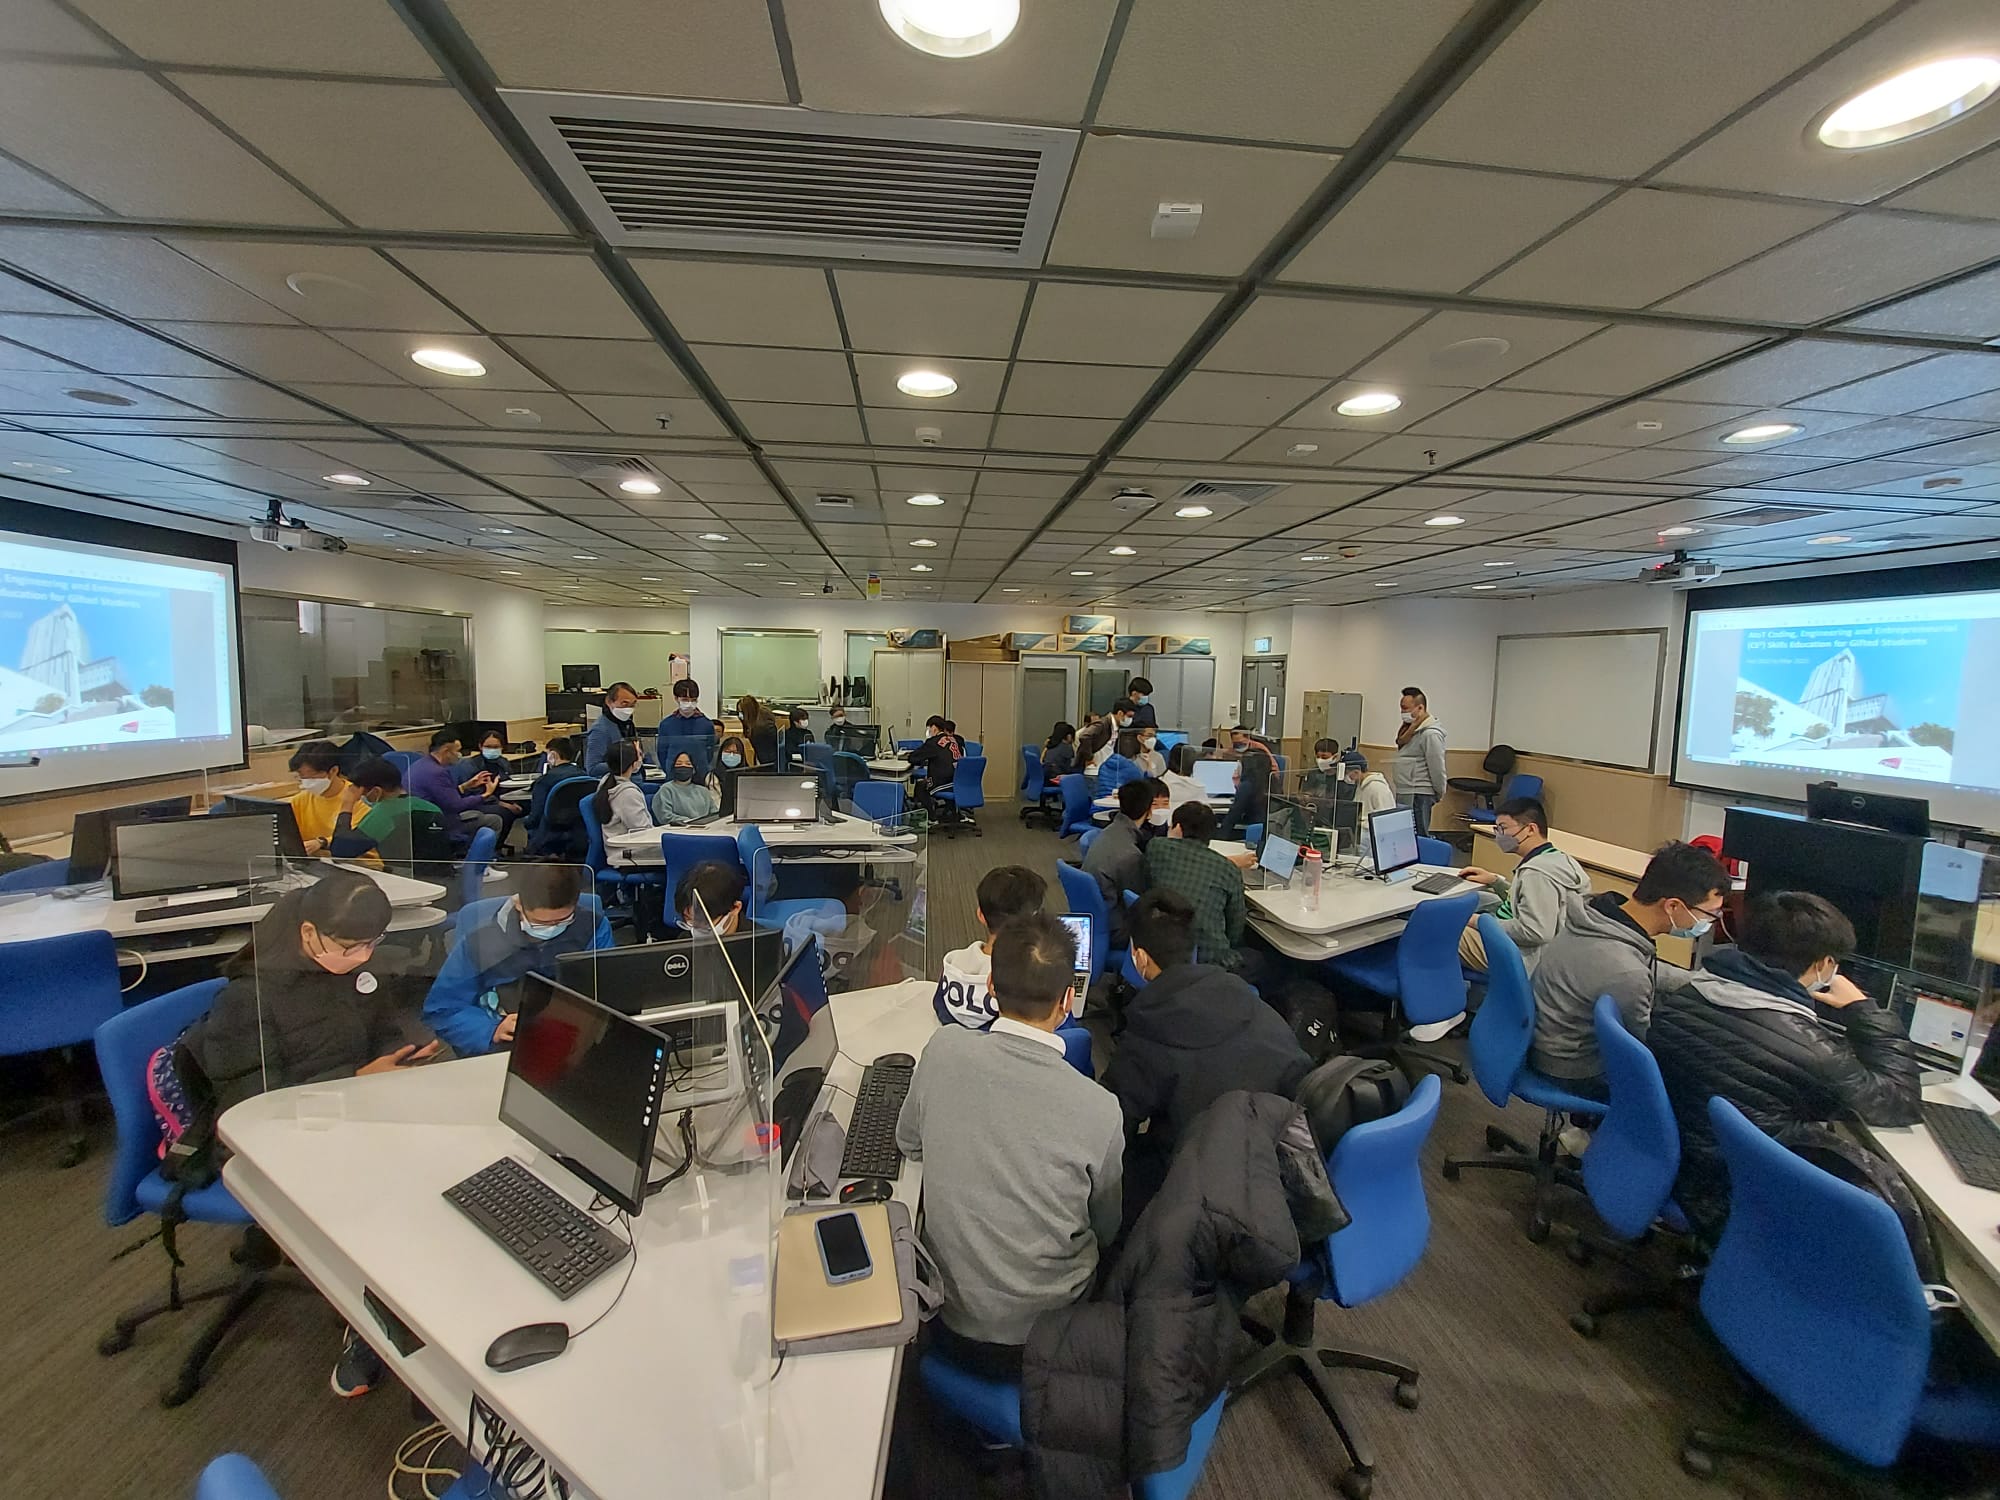
 We support gifted talent
Lets Code Together We support gifted talent, including technical training, and join our open-source projects to grant coding experience. Teen has talent in coding, they code well on logic. But the modern coding world is complex, lots of frameworks, libraries, hidden rules, and styles. They need experienced people to provide them with hand-to-hand training, and […] 2023-03-23 10:51:23
Lets Code Together

We support gifted talent, including technical training, and join our open-source projects to grant coding experience. Teen has talent in coding, they code well on logic. But the modern coding world is complex, lots of frameworks, libraries, hidden rules, and styles. They need experienced people to provide them with hand-to-hand training, and level up their skills. This will shorten the time to conquer these skill sets, rather than spending decades for self-learning. We have three streams
CPU stream - Join our CPU team to develop a microprocessor. Our goal is to fabricate a CPU with all basic features such as cache, branch prediction, jtag & trace capability, I/O, interrupt controller, and others. Students will learn a new programming paradigm: HDL, understand how your code converts to logic, and how all fundamental stuff work. CPU is the heart of the computer and the ground of logic execution. If you are interest into how the computer executes your code, join this.
Operating system stream - To create an OS for x86 and RISC-V, support all modern OS features such as multitasking, libc/libc++, driver model, locking, and others... OS works like the human brain, controlling all peripheral devices just like our brain controls our hands and legs. OS is the big brother of all software, it decide what to run and how all other programs behave.
Web team - We are not just doing website programming, we are building fundamental blocks to support websites. Many projects, such as web server, database, high-availability layer, logging engine, CMS, and others. We put effort into understanding how every piece works by building our own.
If you have spare time, join us
We are researching the http protocol and building our own http server. This guide build nginx and test it out. Build php Build nginx Make nginx works with php configure nginx 2. sudo ../sbin/nginx Browse to http://localhost Wireshark Install wireshark, remember install ChmodBPF. Open loopback, then you see how nginx talk to php-fpm by port […] 2023-03-11 21:56:10
We are researching the http protocol and building our own http server. This guide build nginx and test it out.
Build php
wget https://www.php.net/distributions/php-8.2.3.tar.xz
tar xvf php-8.2.3.tar.xz
cd php-8.2.3
Mac: ./configure --enable-fpm --prefix=/Users/peter/Downloads/my-php --with-iconv=$(brew --prefix libiconv) --with-mysqli
Linux: ./configure --enable-fpm --prefix=$HOME/Downloads/my-php --with-mysqli

If you in WSL, comment out "#define HAVE_LQ_TCP_INFO 1" from "main/php_config.h"

make -j
make install
cd ..
Build nginx
wget https://nginx.org/download/nginx-1.23.2.tar.gz
tar zxvf nginx-1.23.2.tar.gz
cd nginx-1.23.2
./configure --prefix=$HOME/Downloads/my-nginx
make -j
make install
Make nginx works with php
cd $HOME/Downloads/my-php/etc
cp php-fpm.conf.default php-fpm.conf
cd $HOME/Downloads/my-php/etc/php-fpm.d
cp www.conf.default www.conf
edit www.conf , change to "listen = 127.0.0.1:9876"
make sure "user = peter" and "group = peter". Remark : "group = peter" is for linux only
create index.php in $HOME/Downloads/my-nginx/html
cd $HOME/Downloads/my-php/sbin
sudo ./php-fpm
configure nginx
cd $HOME/Downloads/my-nginx/conf
edit nginx.conf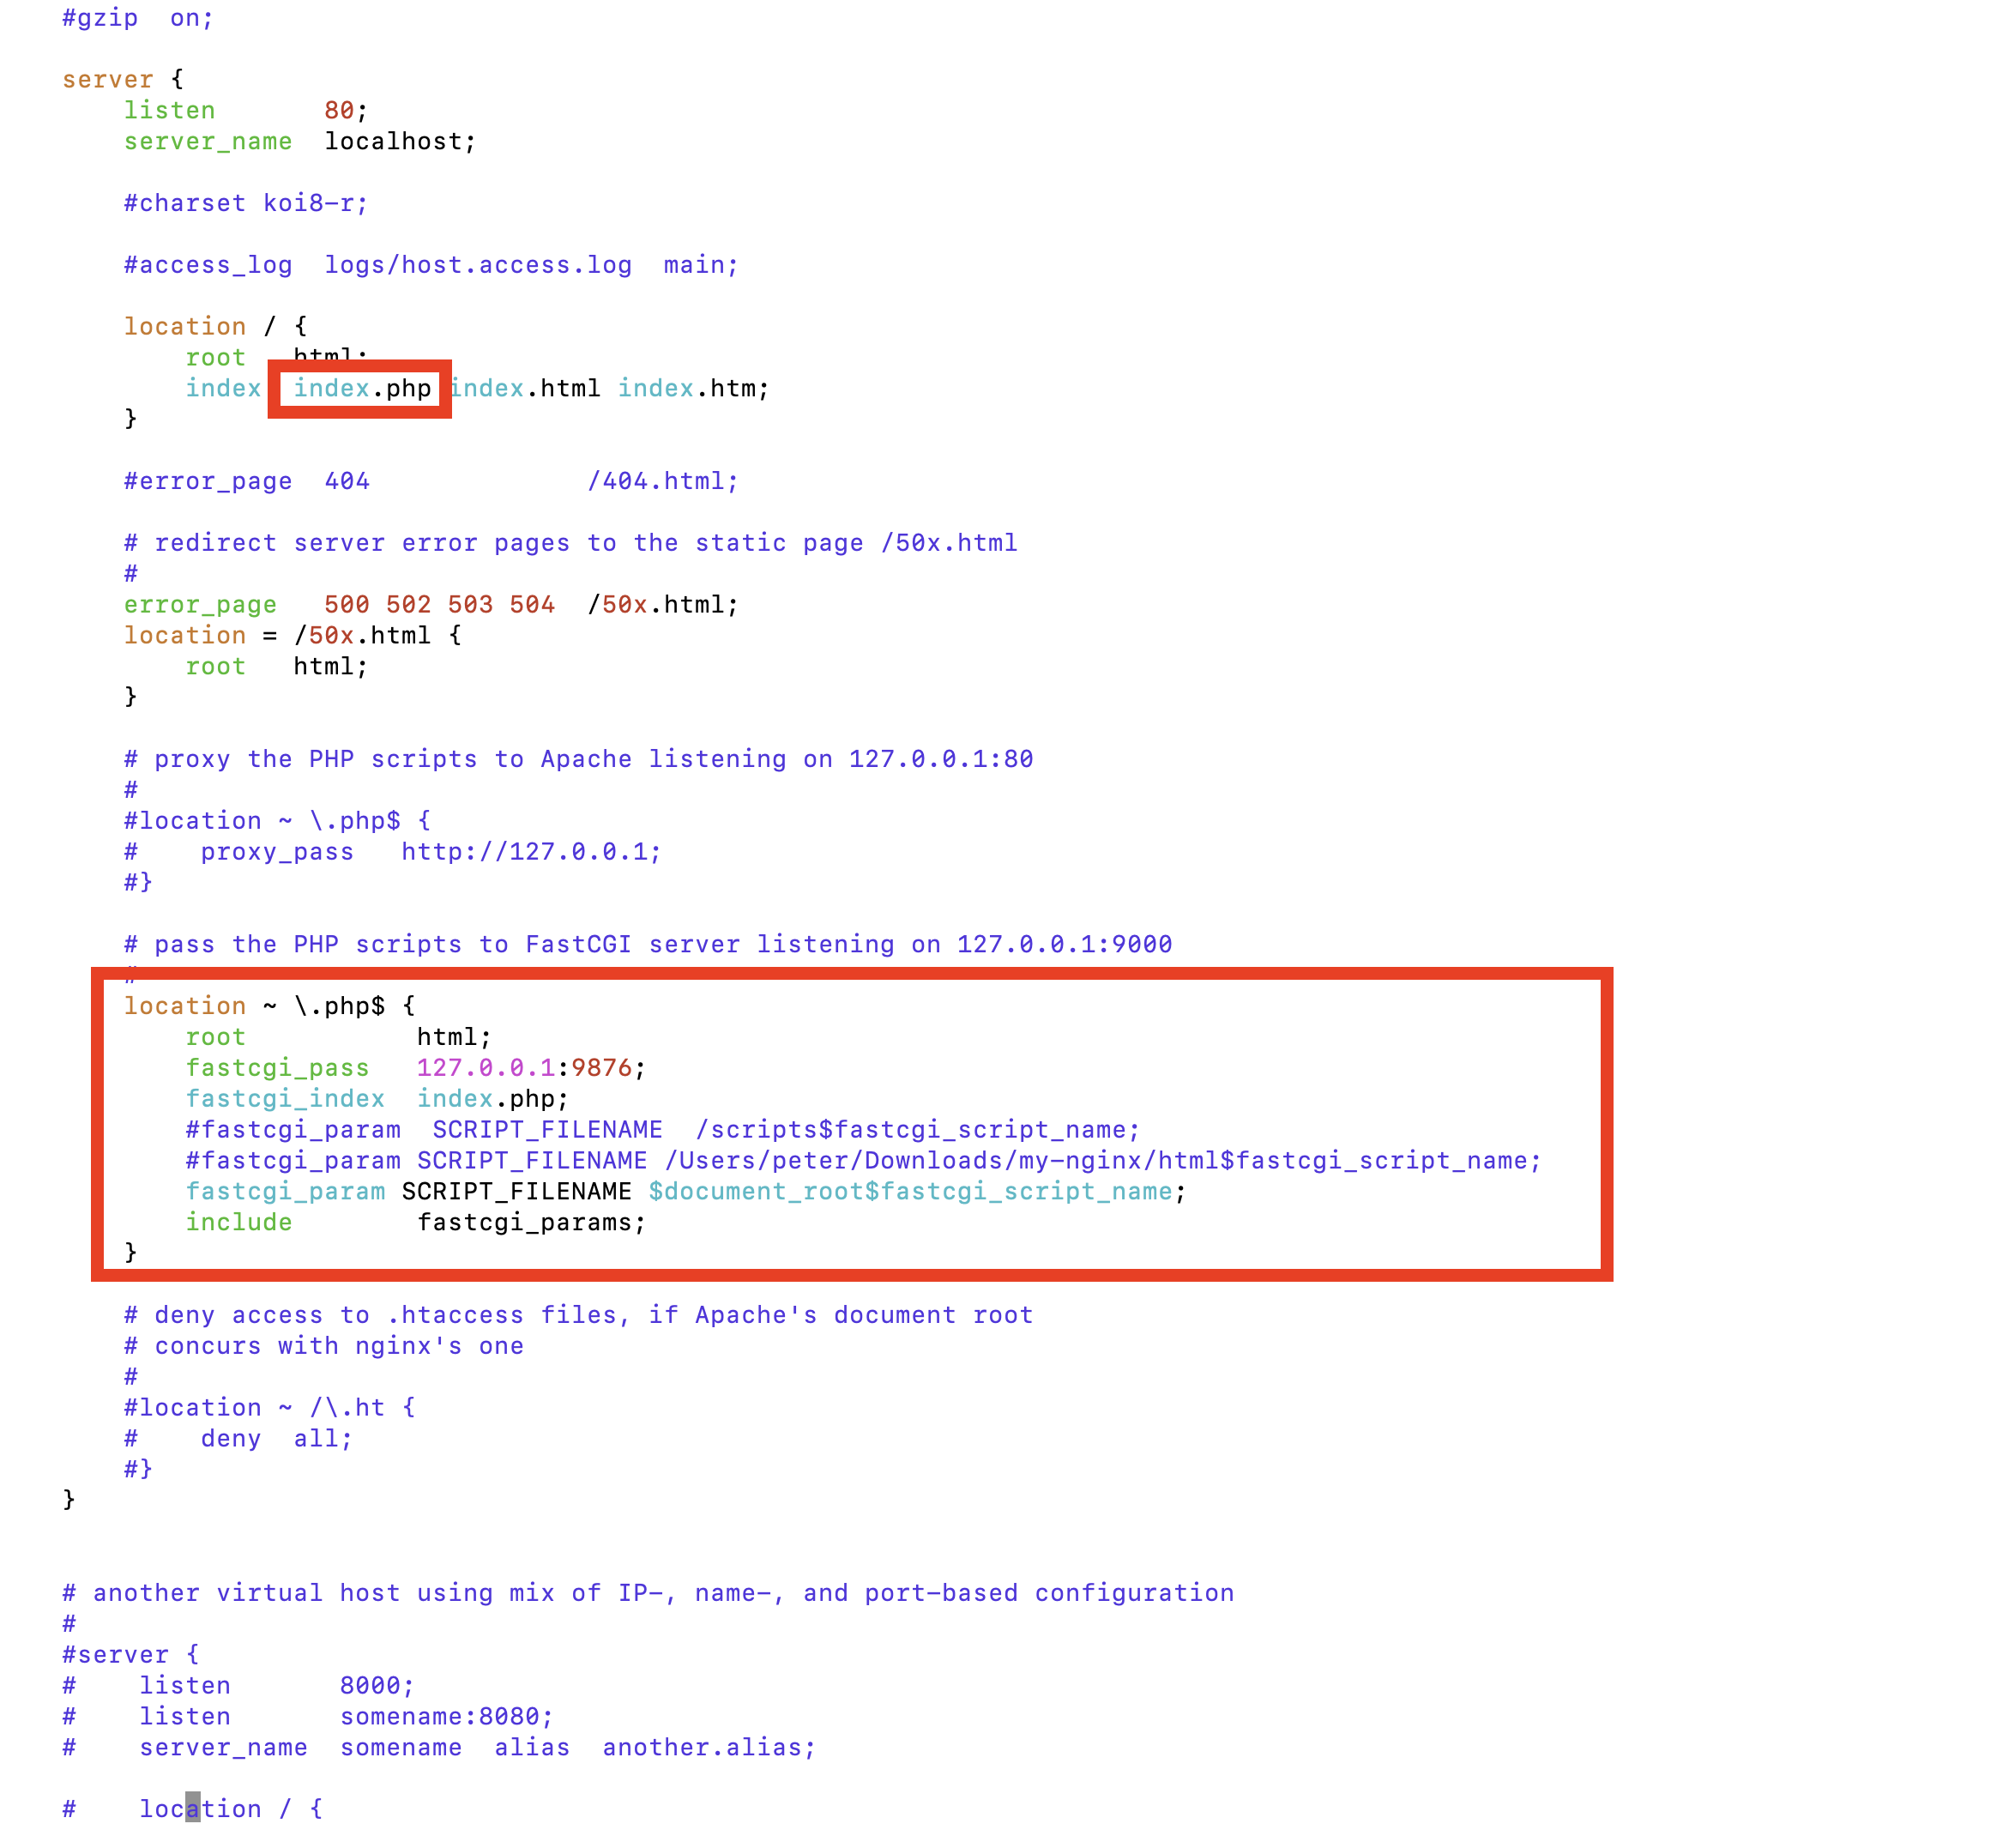
2. sudo ../sbin/nginx
To stop php-fpm and nginx:
sudo killall -9 nginx
sudo killall -9 php-fpm
Browse to http://localhost
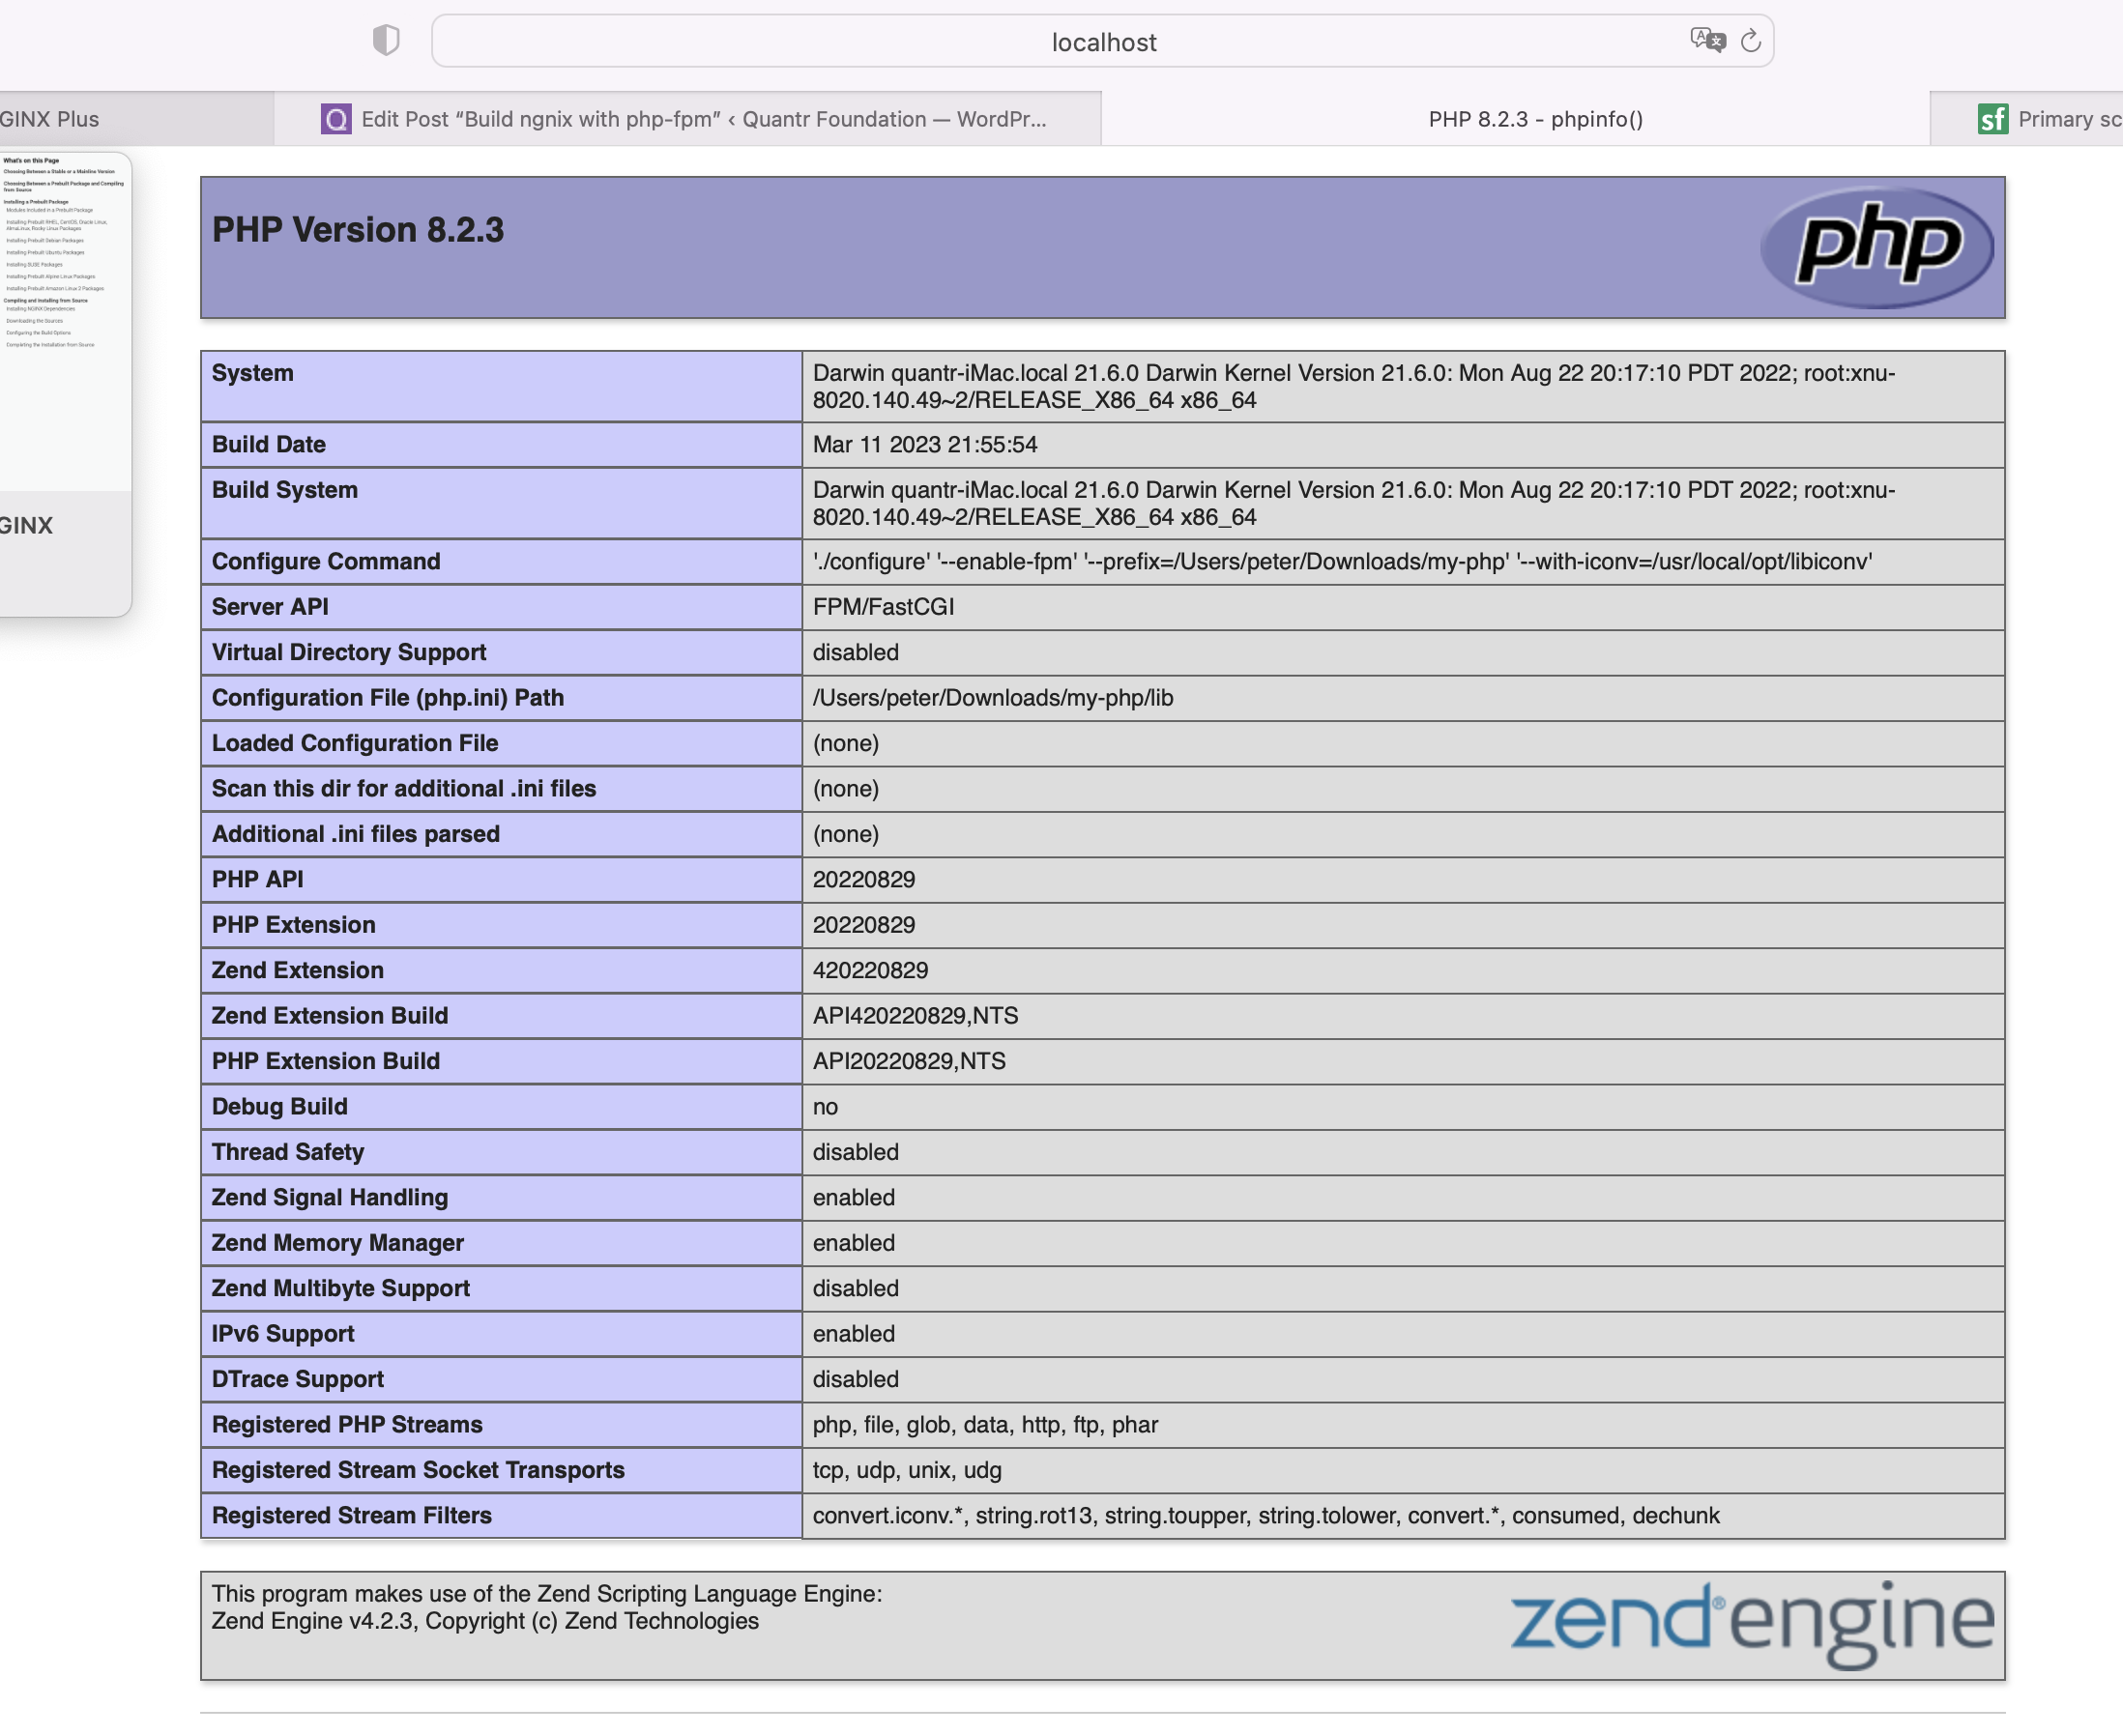
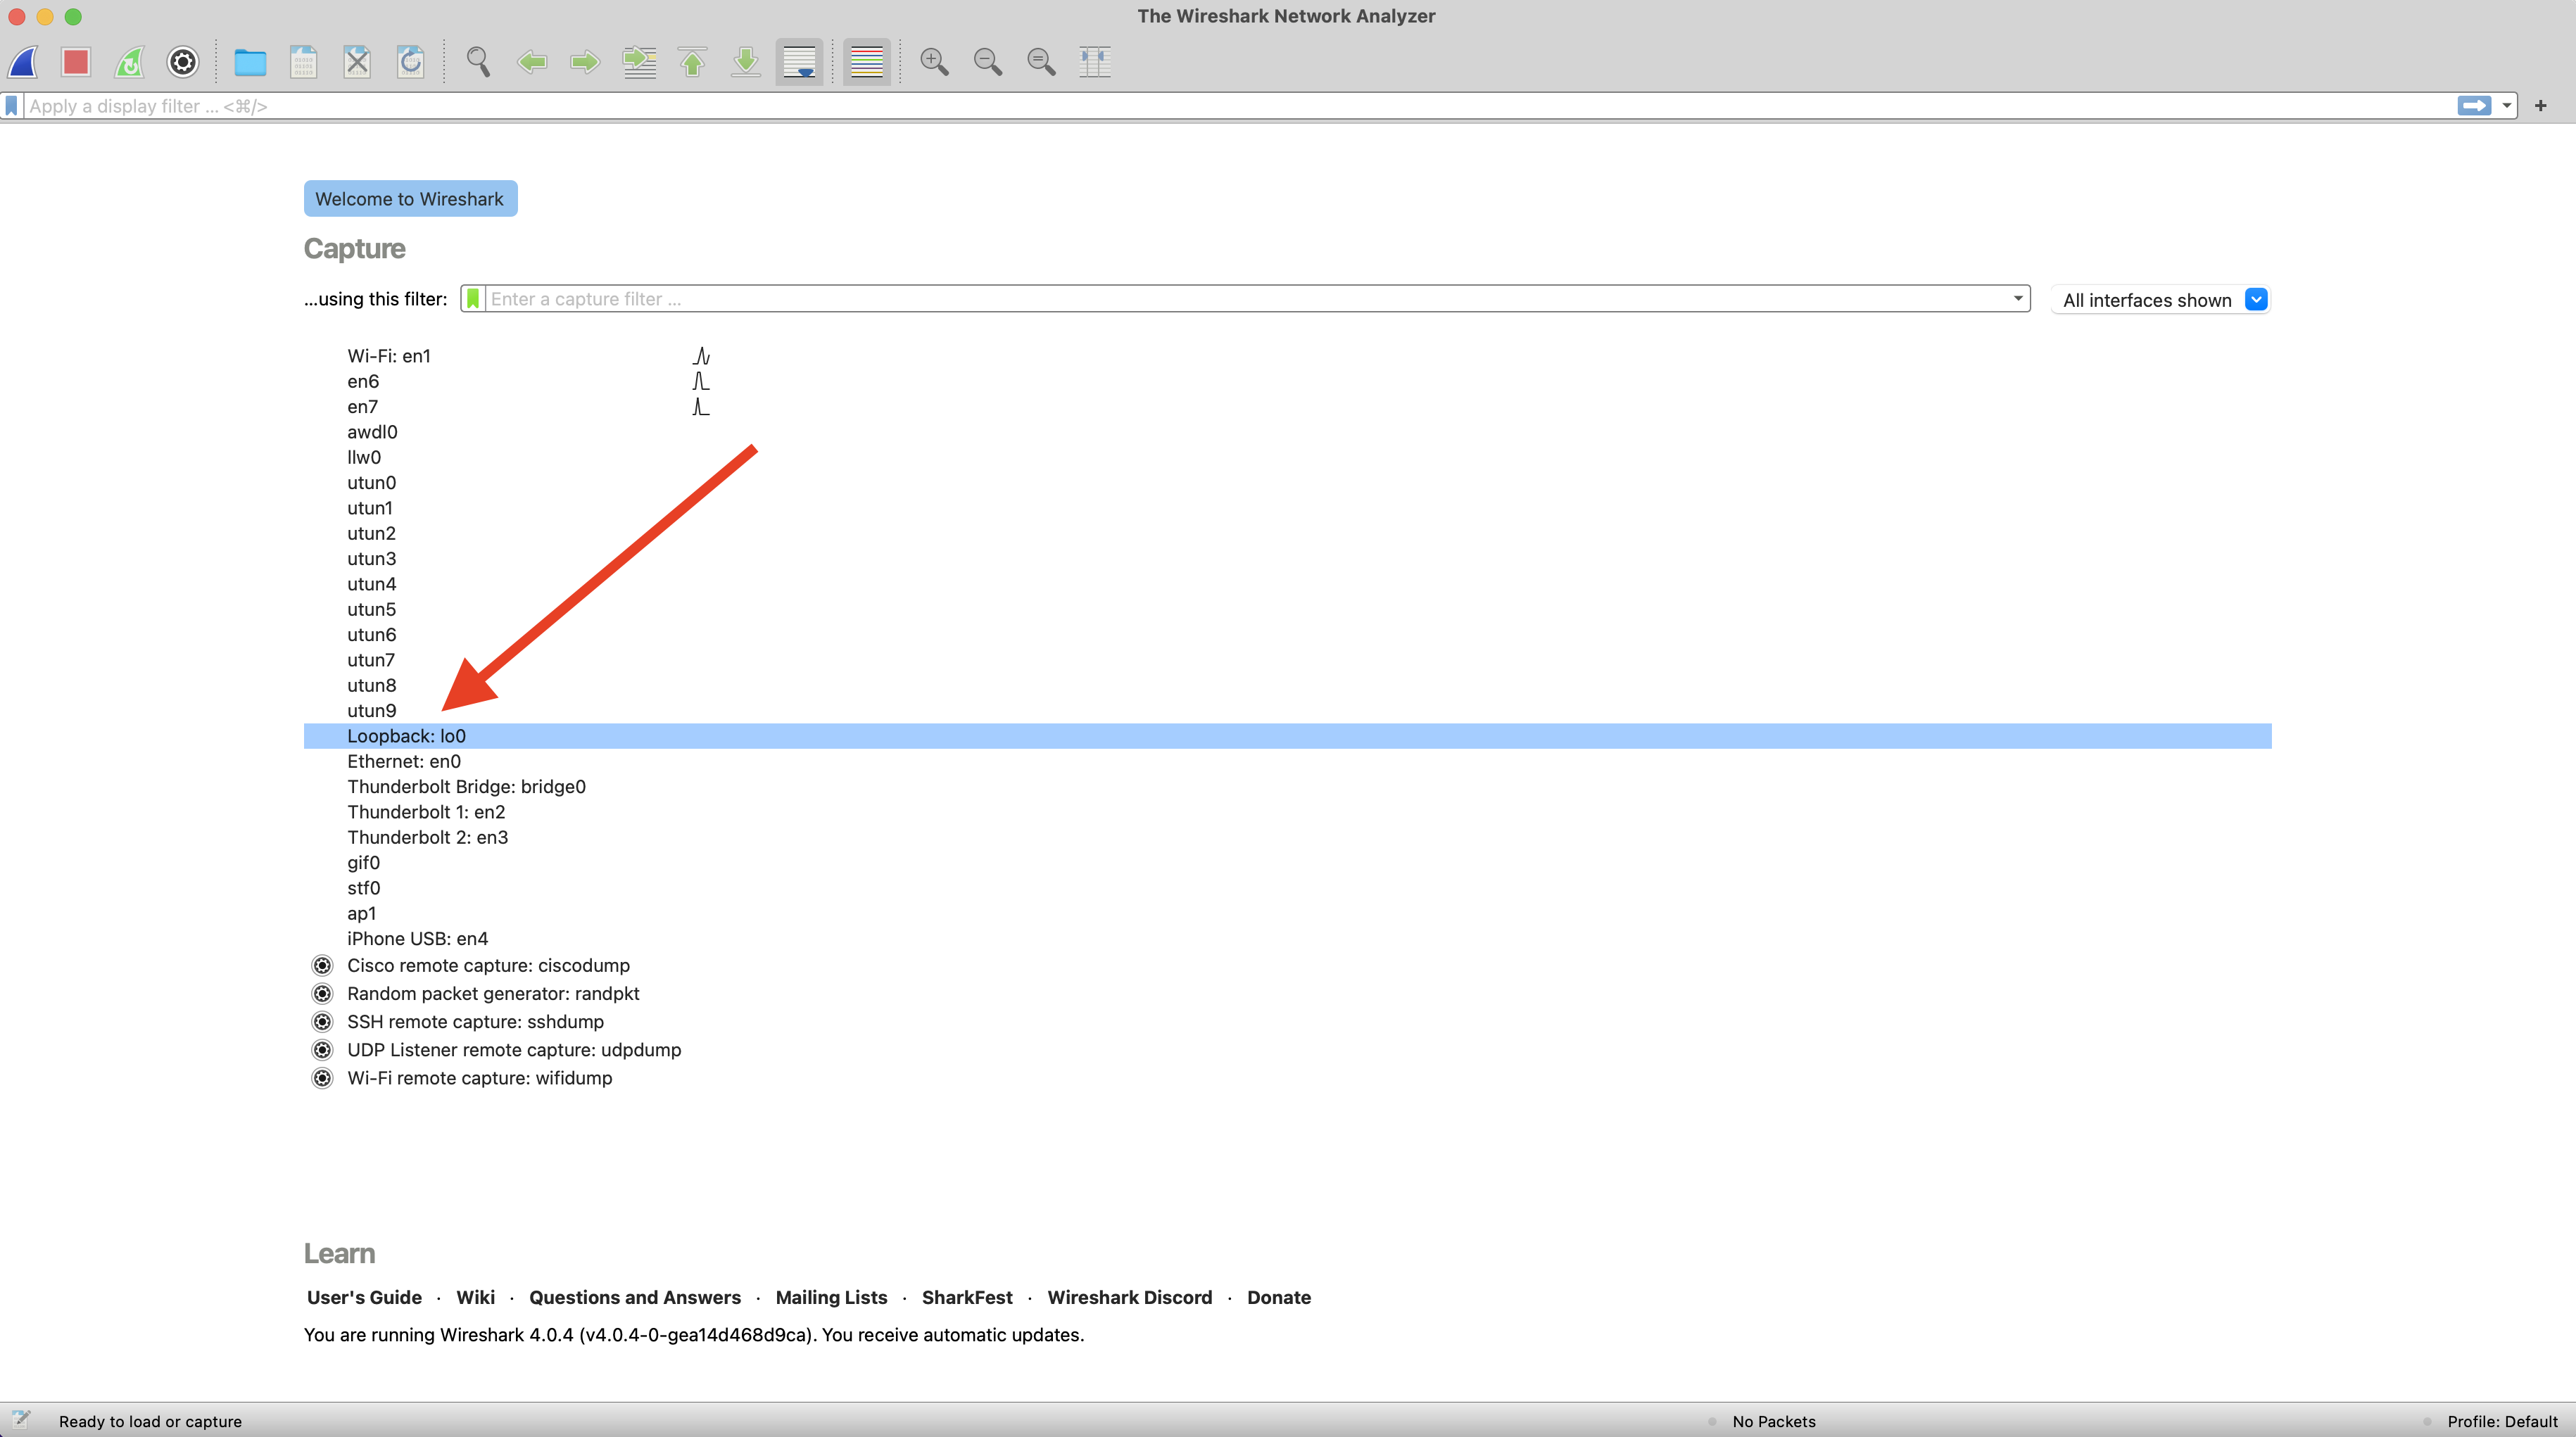
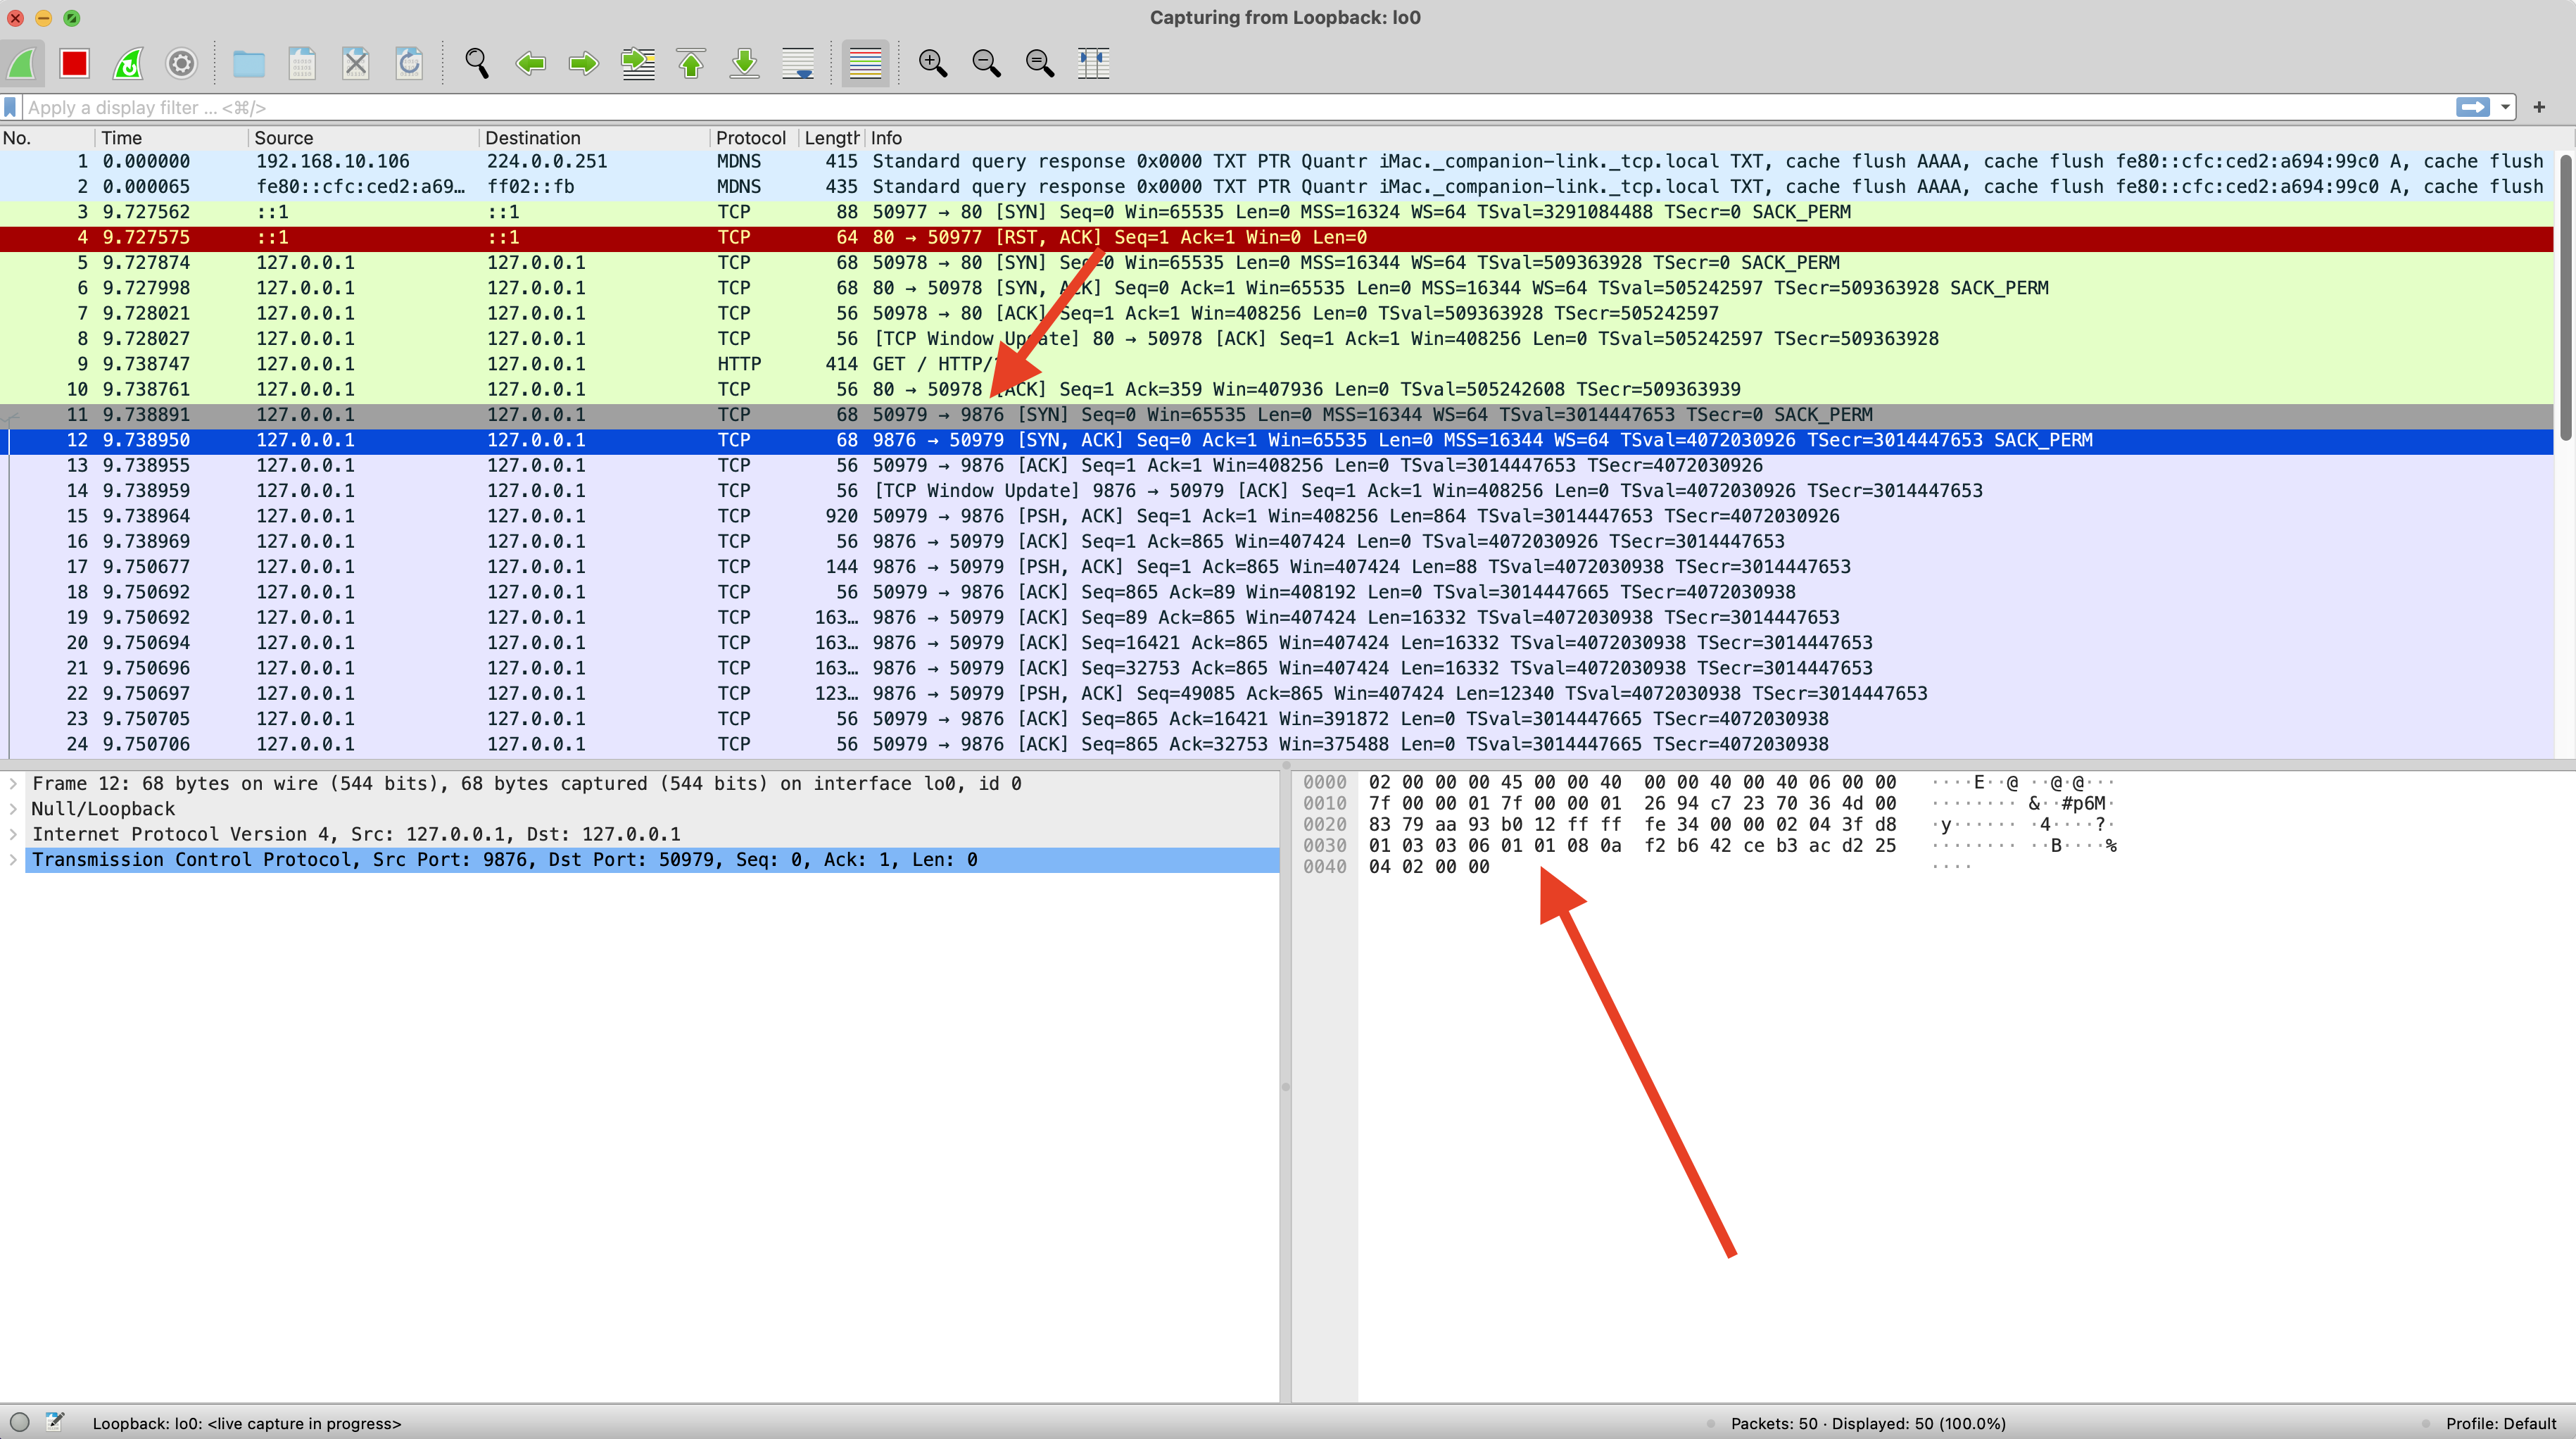
Wireshark
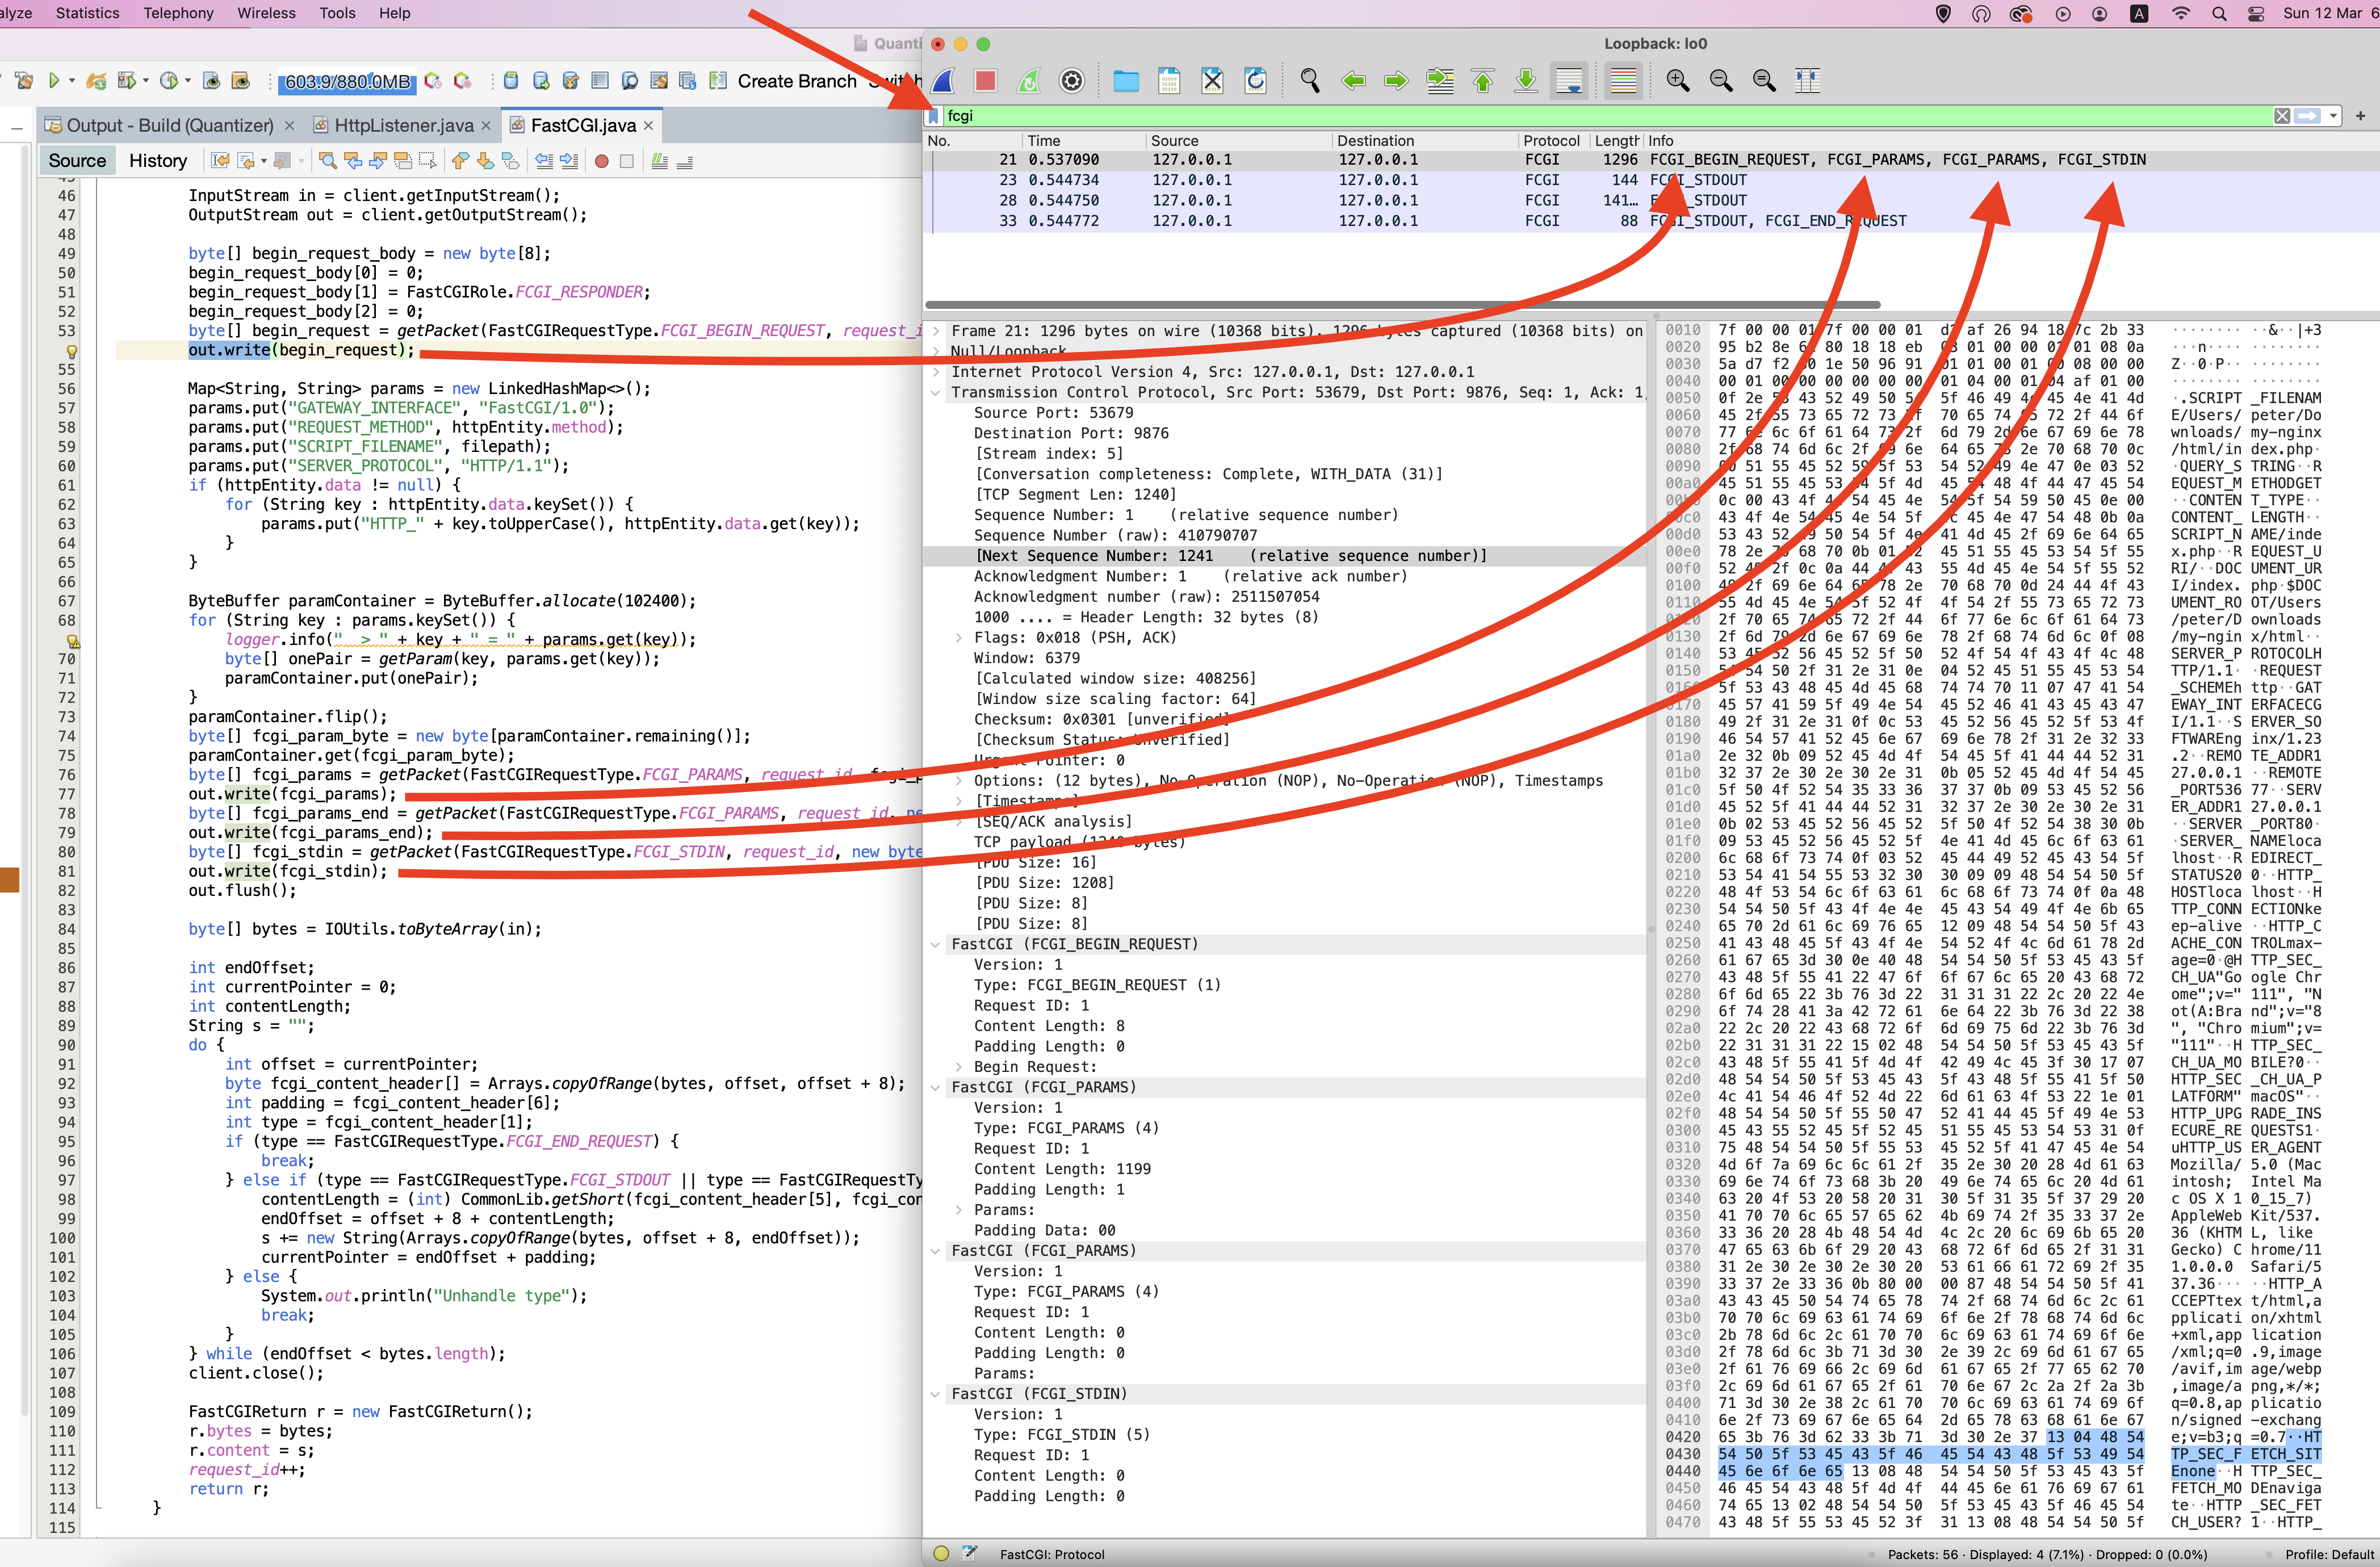
Install wireshark, remember install ChmodBPF. Open loopback, then you see how nginx talk to php-fpm by port 9876
To enable FCGI, make sure FCGI is enabled by menu "analyze" -> "Enabled Protocols":
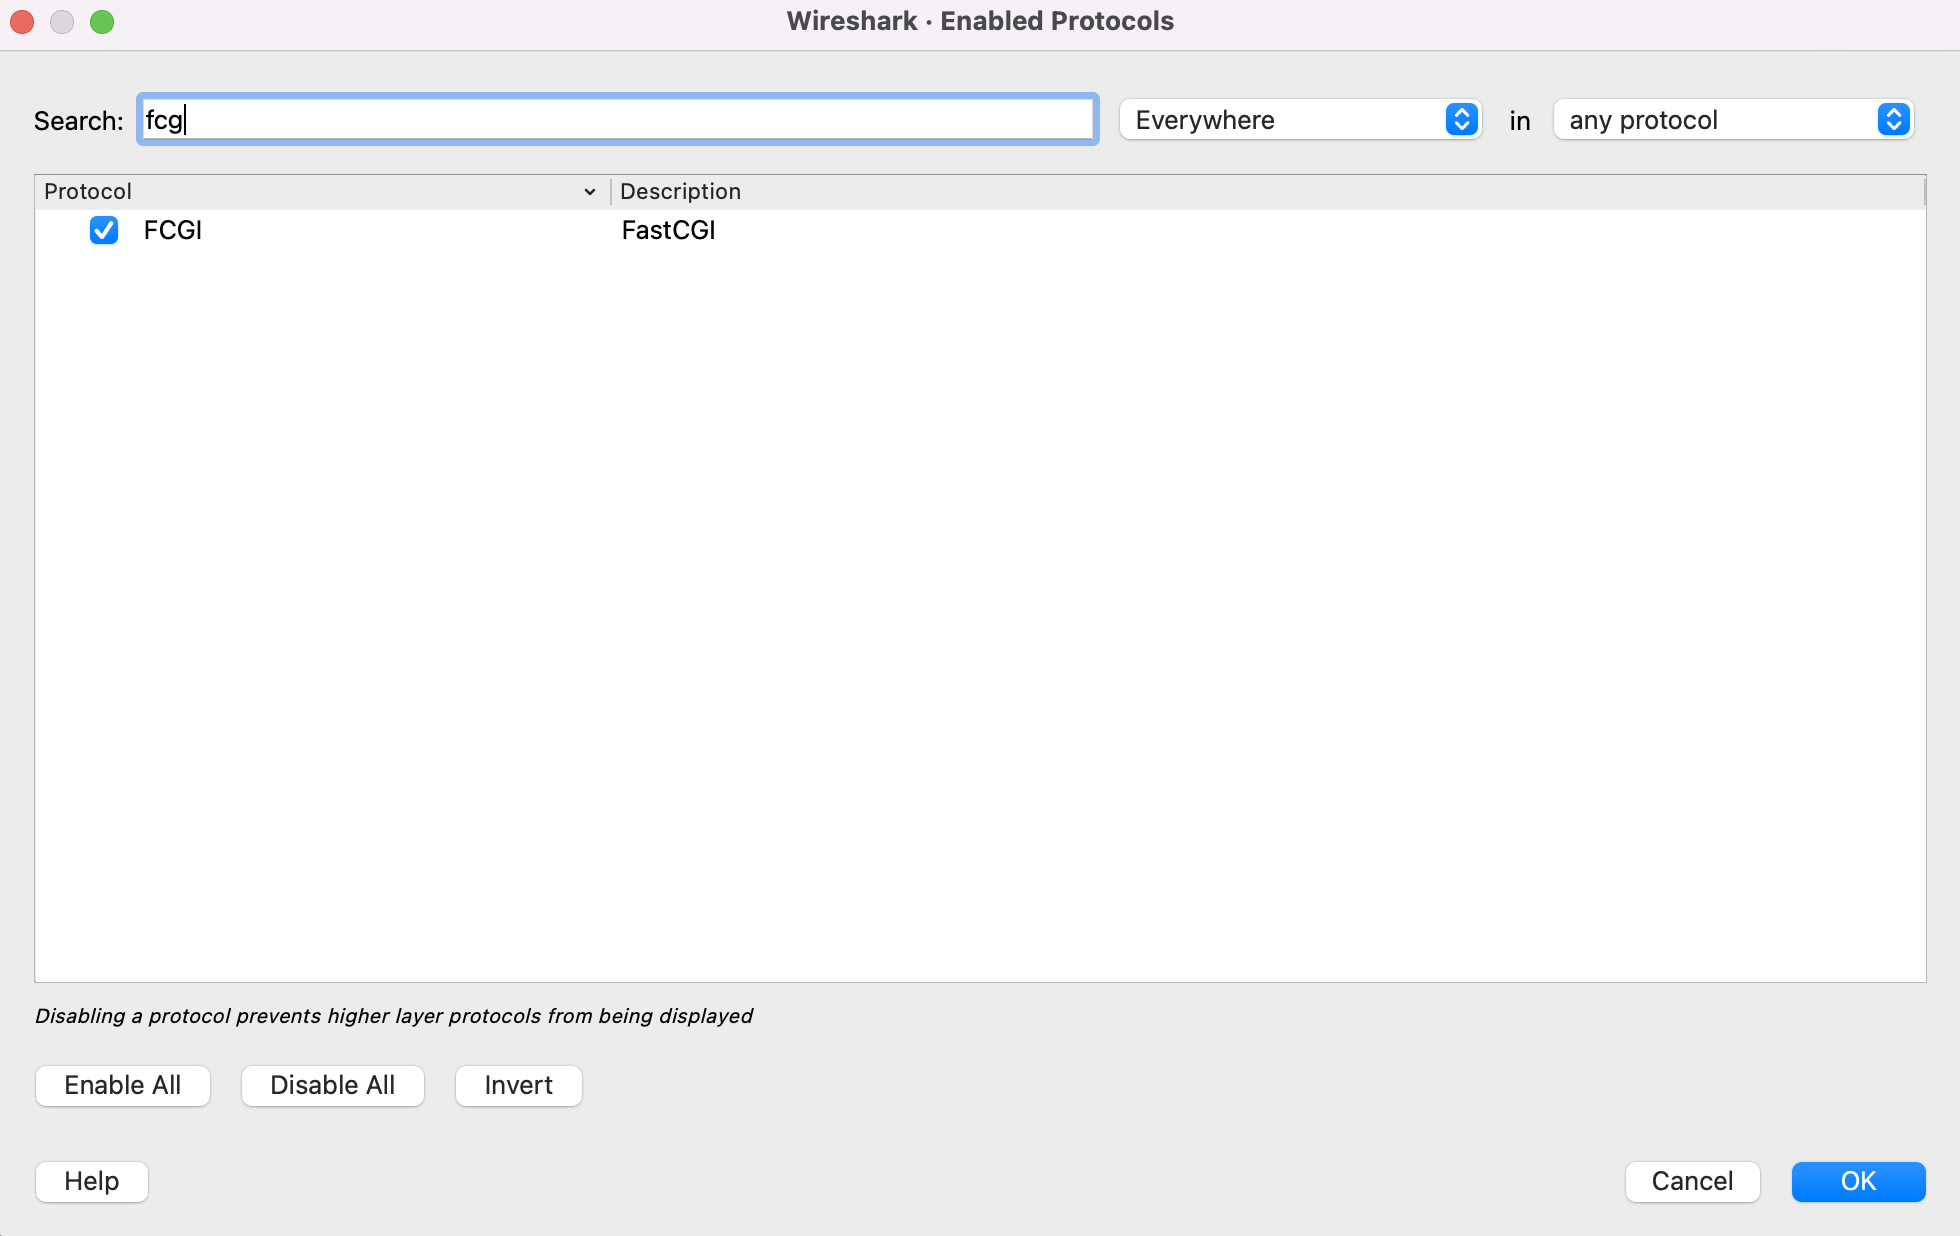
Set the port to 9876, go to "Preference" - > "Protocols" -> "FCGI", set the port to 9876:
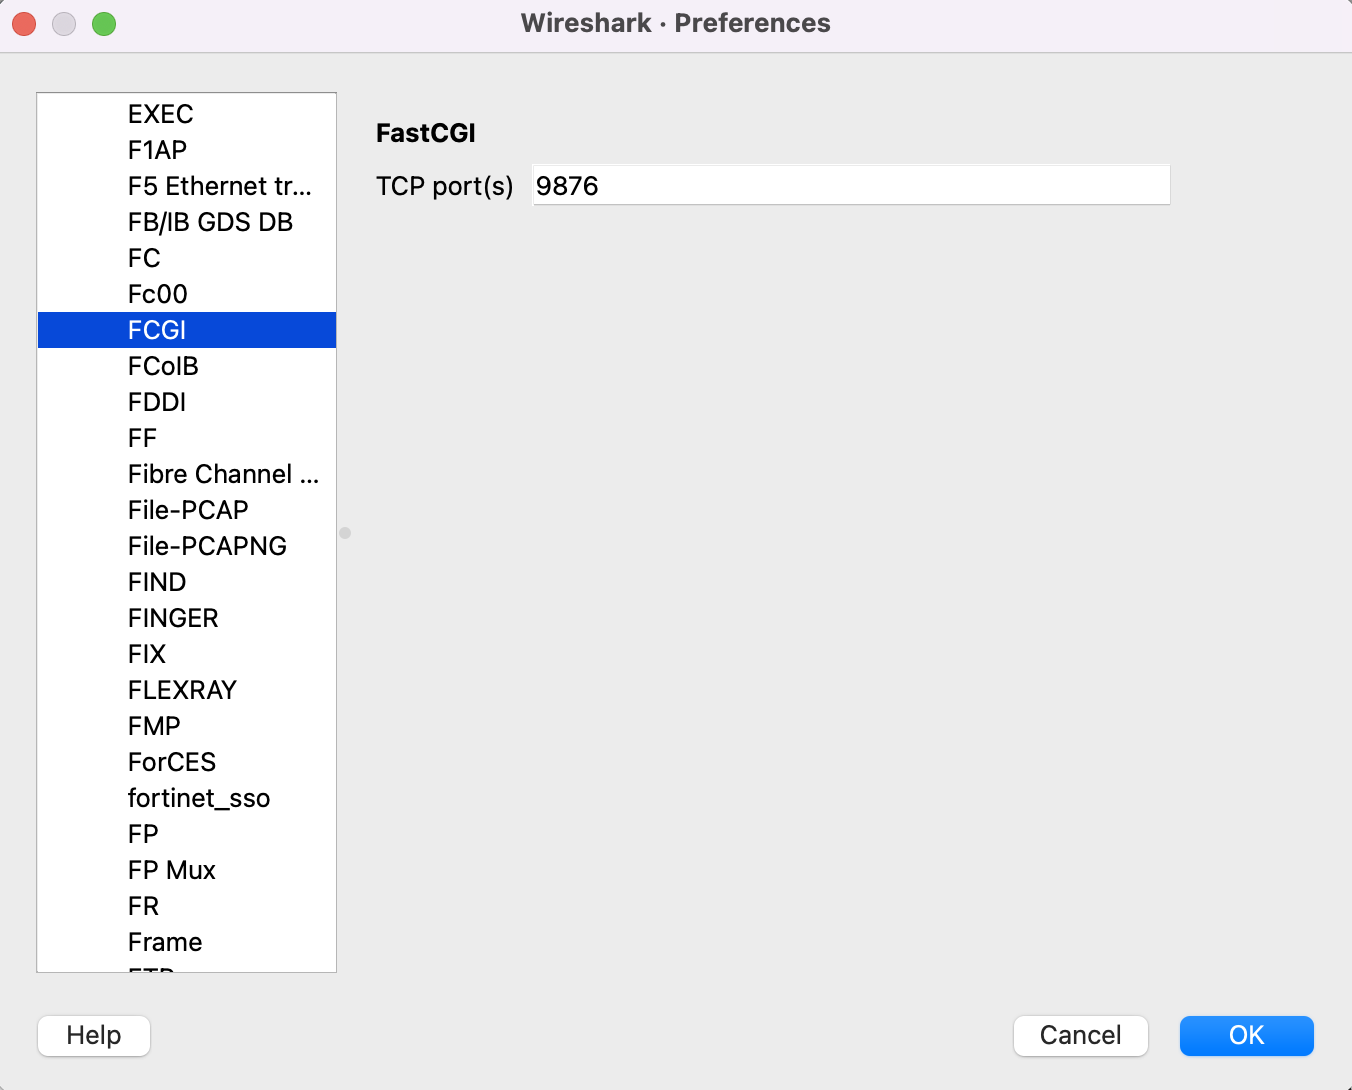
Then filter the protocol by "fcgi", you can see the captured packet matched with our code
 We failed to apply ESS from ITF
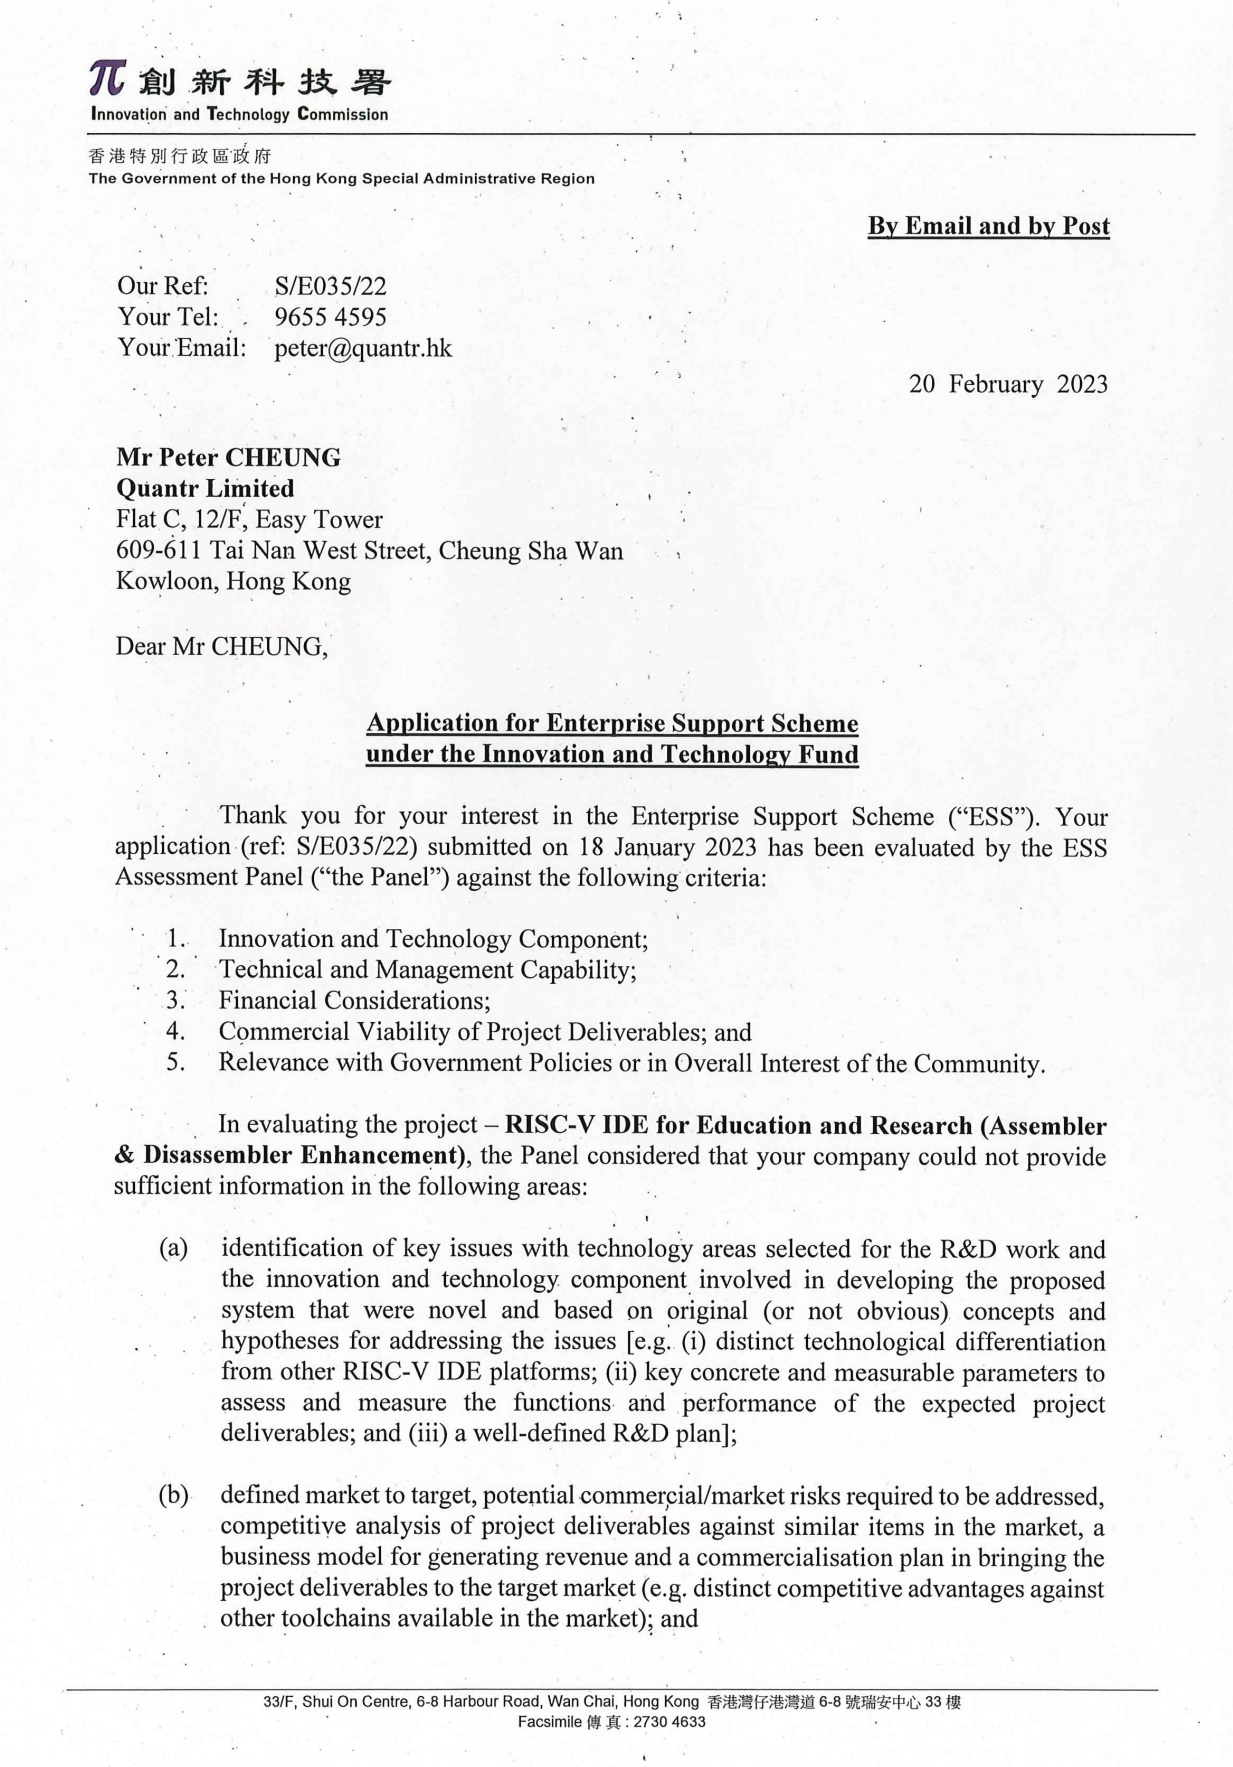
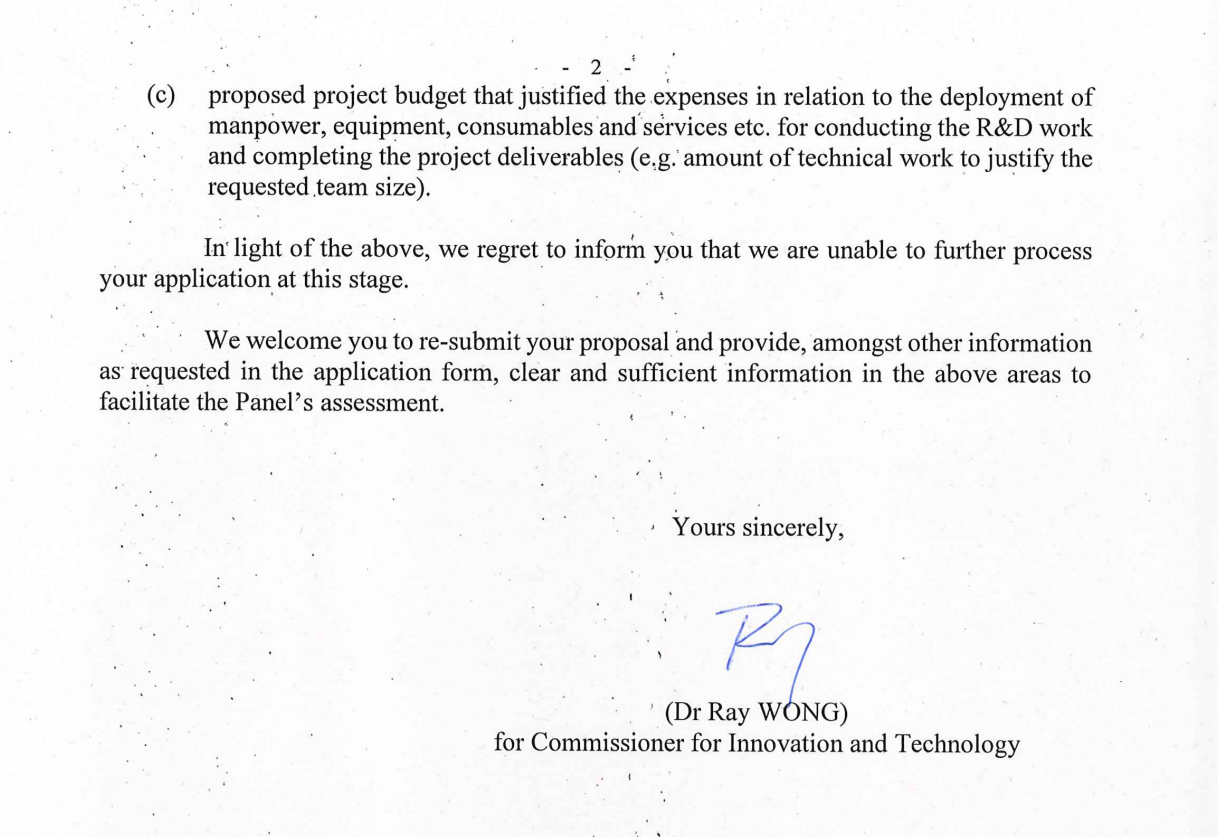
We failed to apply ESS from ITF for 1.6M HKD funding. We face the truth, hong kong is not the place to develop foundation open-source software & hardware. We close the team in hk today and move to another country. 2023-02-21 10:26:03
We failed to apply ESS from ITF for 1.6M HKD funding. We face the truth, hong kong is not the place to develop foundation open-source software & hardware. We close the team in hk today and move to another country.
 [Dev Plan] Logic Synthesizer
Our rough development plan for the logic synthesizer. Erica will be the programmer. The study plan is solid but the dev plan is draft Goal Study these Software stack Stage 2023-02-01 13:22:22

Our rough development plan for the logic synthesizer. Erica will be the programmer. The study plan is solid but the dev plan is draft
Goal
- Building the logic synthesizer is the final goal
- Our ultimate goal is to output bitstream directly for ecp5 / gowin, then we know the complete process of logic synthesis
Study these
- Logic synthesis book https://peter.quantr.hk/2023/01/good-book-on-logic-synthesis
- HDL synthesis book https://peter.quantr.hk/2023/02/good-hdl-synthesis-book
- IEEE Verilog specification 1364 https://www.eg.bucknell.edu/~csci320/2016-fall/wp-content/uploads/2015/08/verilog-std-1364-2005.pdf
- IEEE Standard for Verilog Register Transfer Level Synthesis https://standards.ieee.org/ieee/1364.1/2053/
Software stack
- Antlr as the parser and lexer
- Verilog grammar using https://github.com/antlr/grammars-v4/tree/master/verilog
- Java + Netbeans IDE
- Maven as build system
Stage
- Test the Verilog Antlr grammar is strong enough to parse big Verilog file (done)
- Define the IR data structure to store converted logic gate information
- Create parse to read HDL and convert into IR data structure
 Cityu Mentorship - Teach teens coding
CityU Apps Lab – This project aims at creating a University-wide Open Collaborative Learning Laboratory (CityU Apps Lab) for enabling our CityU students to develop their own mobile software. The Apps Lab is a centralized hub that can provide fruitful resource support including essential hardware / software development tools for all the University members to […] 2023-01-29 12:13:33
CityU Apps Lab - This project aims at creating a University-wide Open Collaborative Learning Laboratory (CityU Apps Lab) for enabling our CityU students to develop their own mobile software. The Apps Lab is a centralized hub that can provide fruitful resource support including essential hardware / software development tools for all the University members to develop innovative applications. The Apps Lab would consist of two groups of members:
1) Software developers, and
2) Idea providers. For instance, a group of students from the School of Creative Media (SCM) may raise an interesting idea about developing a mobile app for field-trip data collection; another group of student developers may use the Apps Lab to interact with the SCM students.

 Porting LiteX Vex-RISCV to icesugar pro
The board can be bought in taobao. Install sbt tool Install picocom Install YOSYS Build yosys by source, don’t install yosys using apt-get Install RISC-V toolchain Install Verilator Install Linux-on-LiteX-vexriscv Install LiteX Testing the LiteX You need to extract linux_???.zip from #164 into the images folder first, then : Build the bitstream file https://github.com/litex-hub/linux-on-litex-vexriscv/blob/master/make.py View the Linux […] 2022-12-29 16:10:06
The board can be bought in taobao.
Install sbt tool
$ echo "deb https://repo.scala-sbt.org/scalasbt/debian all main" | sudo tee /etc/apt/sources.list.d/sbt.list
$ echo "deb https://repo.scala-sbt.org/scalasbt/debian /" | sudo tee /etc/apt/sources.list.d/sbt_old.list
$ curl -sL "https://keyserver.ubuntu.com/pks/lookup?op=get&search=0x2EE0EA64E40A89B84B2DF73499E82A75642AC823" | sudo apt-key add
$ sudo apt-get update
$ sudo apt-get install sbt
Install picocom
sudo apt-get install picocomInstall YOSYS
Build yosys by source, don't install yosys using apt-get
Install RISC-V toolchain
Below steps from official manual are wrong, you have to build risc-v toolchain yourself by this

$ wget https://static.dev.sifive.com/dev-tools/riscv64-unknown-elf-gcc-8.3.0-2019.08.0-x86_64-linux-ubuntu14.tar.gz
$ tar -xvf riscv64-unknown-elf-gcc-8.3.0-2019.08.0-x86_64-linux-ubuntu14.tar.gz
$ export PATH=$PWD/riscv64-unknown-elf-gcc-8.3.0-2019.08.0-x86_64-linux-ubuntu14/bin/:$PATH
Install Verilator
$ sudo apt install verilator
$ sudo apt install libevent-dev libjson-c-dev
Install Linux-on-LiteX-vexriscv
$ sudo apt install build-essential device-tree-compiler wget git python3-setuptools
$ git clone https://github.com/litex-hub/linux-on-litex-vexriscv
$ cd linux-on-litex-vexriscv
Install LiteX
$ wget https://raw.githubusercontent.com/enjoy-digital/litex/master/litex_setup.py
$ chmod +x litex_setup.py
$ ./litex_setup.py --init --install --user
Testing the LiteX
You need to extract linux_???.zip from #164 into the images folder first, then :
$ ./sim.pyBuild the bitstream file
$ ./make.py --board=icesugar_pro --buildhttps://github.com/litex-hub/linux-on-litex-vexriscv/blob/master/make.py
View the Linux on LiteX
$ sudo picocom -b 115200 /dev/ttyACM0Run LiteX on fpga board
Port the .bit file into the board
.bit file path: linux-on-litex-vexriscv/build/NameOfBoard/gateware/
Port the BOARD.bit file into the board
Now you can see:
port is : /dev/ttyACM0
flowcontrol : none
baudrate is : 115200
parity is : none
databits are : 8
stopbits are : 1
escape is : C-a
local echo is : no
noinit is : no
noreset is : no
hangup is : no
nolock is : no
send_cmd is : sz -vv
receive_cmd is : rz -vv -E
imap is :
omap is :
emap is : crcrlf,delbs,
logfile is : none
initstring : none
exit_after is : not set
exit is : no
Type [C-a] [C-h] to see available commands
Terminal ready
    __   _ __      _  __
   / /  (_) /____ | |/_/
  / /__/ / __/ -_)>  <
 /____/_/\__/\__/_/|_|
Build your hardware, easily!
(c) Copyright 2012-2022 Enjoy-Digital
(c) Copyright 2007-2015 M-Labs
BIOS CRC passed (f39409fb)
LiteX git sha1: e8322587
--=============== SoC ==================--
CPU: VexRiscv SMP-LINUX @ 50MHz
BUS: WISHBONE 32-bit @ 4GiB
CSR: 32-bit data
ROM: 64KiB
SRAM: 6KiB
L2: 2KiB
FLASH: 32768KiB
SDRAM: 32768KiB 16-bit @ 50MT/s (CL-2 CWL-2)
--========== Initialization ============--
Initializing SDRAM @0x40000000…
Switching SDRAM to software control.
Switching SDRAM to hardware control.
Memtest at 0x40000000 (2.0MiB)…
Write: 0x40000000-0x40200000 2.0MiB
Read: 0x40000000-0x40200000 2.0MiB
Memtest OK
Memspeed at 0x40000000 (Sequential, 2.0MiB)…
Write speed: 15.6MiB/s
Read speed: 20.1MiB/s
Initializing W25Q256 SPI Flash @0x02000000…
Enabling Quad mode…
SPI Flash clk configured to 25 MHz
Memspeed at 0x2000000 (Sequential, 4.0KiB)…
Read speed: 2.6MiB/s
Memspeed at 0x2000000 (Random, 4.0KiB)…
Read speed: 1.3MiB/s
--============== Boot ==================--
Booting from serial…
Press Q or ESC to abort boot completely.
sL5DdSMmkekro
Timeout
Booting from SDCard in SD-Mode…
Booting from boot.json…
Booting from boot.bin…
SDCard boot failed.
No boot medium found
--============= Console ================--
litex>
java -jar qemu-log-panel-1.0-jar-with-dependencies.jar -f qemu.log -t scp [email protected]:/home/quantr.foundation/www/qemu.log.gz . https://www.quantr.foundation/wp-content/uploads/2023/01/qemu-log-panel-1.0-jar-with-dependencies.jar https://www.quantr.foundation/wp-content/uploads/2023/01/kernel.zip gunzip qemu.log.gz mkdir -p ../xv6-riscv/kernel mv kernel ../xv6-riscv/kernel/ ./jdk-19.0.2.jdk/Contents/Home/bin/java -jar qemu-log-panel-1.0-jar-with-dependencies.jar -f qemu.log -t 2022-12-26 16:36:14
java -jar qemu-log-panel-1.0-jar-with-dependencies.jar -f qemu.log -t
scp [email protected]:/home/quantr.foundation/www/qemu.log.gz .
https://www.quantr.foundation/wp-content/uploads/2023/01/kernel.zip
gunzip qemu.log.gz
mkdir -p ../xv6-riscv/kernel
mv kernel ../xv6-riscv/kernel/
./jdk-19.0.2.jdk/Contents/Home/bin/java -jar qemu-log-panel-1.0-jar-with-dependencies.jar -f qemu.log -t
 Flashing program to NEORV32 Processor
Porting NEORV32 to iCE40UP5k Software Toolchain Setup In this tutorial, Ubuntu Linux will be used. To compile and debug executables for the NEORV32, we have to follow the procedures to build the following tools: riscv-gnu-toolchain is a RISC-V C and C++ cross-compiler that fits the architecture of NEORV32 core. arachne-pnr is a tool that implements […] 2022-12-23 02:58:44
Software Toolchain Setup
In this tutorial, Ubuntu Linux will be used. To compile and debug executables for the NEORV32, we have to follow the procedures to build the following tools:
riscv-gnu-toolchain is a RISC-V C and C++ cross-compiler that fits the architecture of NEORV32 core.
$ git clone https://github.com/riscv-collab/riscv-gnu-toolchain.git
$ cd riscv-gnu-toolchain
$ sudo apt-get install autoconf automake autotools-dev curl python3 libmpc-dev libmpfr-dev libgmp-dev gawk build-essential bison flex texinfo gperf libtool patchutils bc zlib1g-dev libexpat-dev ninja-build
$ ./configure --prefix=/opt/riscv
$ sudo make -j4 # this include install
$ echo "export /opt/riscv/bin:$PATH" > ~/.bashrc
$ source ~/.bashrc
arachne-pnr is a tool that implements the place and route step of the hardware compilation process for FPGAs.
$ sudo apt-get install build-essential clang bison flex libreadline-dev gawk tcl-dev libffi-dev git graphviz xdot pkg-config python3 libboost-system-dev libboost-python-dev libboost-filesystem-dev zlib1g-dev libqt5gui5-gles qtbase5-gles-dev libftdi*
$ git clone https://github.com/cseed/arachne-pnr.git
$ cd arachne-pnr
$ make -j
$ sudo make install
nextpnr is a vendor neutral, timing driven, FOSS FPGA place and route tool.
$ git clone https://github.com/YosysHQ/nextpnr nextpnr
$ cd nextpnr
$ sudo apt install libboost-all-dev libeigen3-dev
$ cmake -DARCH=ice40 -DCMAKE_INSTALL_PREFIX=/usr/local .
$ make -j
$ sudo make install
yosys is a framework for RTL synthesis tools.
$ git clone https://github.com/YosysHQ/yosys.git
$ cd yosys
$ make config-gcc
$ sudo make install -j
ghdl is an open-source analyzer, compiler, simulator and (experimental) synthesizer for VHDL, a Hardware Description Language (HDL).
$ git clone https://github.com/ghdl/ghdl.git
$ cd ghdl
$ sudo apt install gnat
$ ./configure
$ make -j
$ sudo make install -j
ghdl-yosys-plugin is a VHDL synthesis based on GHDL and Yosys.
$ git clone https://github.com/ghdl/ghdl-yosys-plugin.git
$ cd ghdl-yosys-plugin
$ make
$ sudo make install -j
neorv32-setup is a repository that provides community projects as well as exemplary setups for different FPGAs, platforms, boards and toolchains for the NEORV32 RISC-V Processor. Project maintainers may make pull requests against this repository to add or link their setups and projects.
$ git clone --recursive https://github.com/stnolting/neorv32-setupsgtkterm is a simple, graphical serial port terminal emulator for Linux and possibly other POSIX-compliant operating systems. Alternatives such as cutecom can be used.
$ git clone https://github.com/Jeija/gtkterm.git
$ cd gtkterm
$ sudo apt install meson libgtk-3-dev libvte-2.91-dev libgudev-1.0-dev
$ meson build
$ ninja -C build
$ sudo ninja -C build install
isugar tools
$ git clone https://github.com/wuxx/icesugar.git
$ sudo apt-get install libhidapi-dev libusb-1.0-0-dev
$ echo "export {full path to icesugar}/tools:$PATH" > ~/.bashrc
$ source ~/.bashrc
icestorm documents the bitstream format of Lattice iCE40 FPGAs and providing simple tools for analyzing and creating bitstream files.
$ git clone https://github.com/YosysHQ/icestorm.git icestorm
$ cd icestorm
$ make -j
$ sudo make install
Hardware Connection
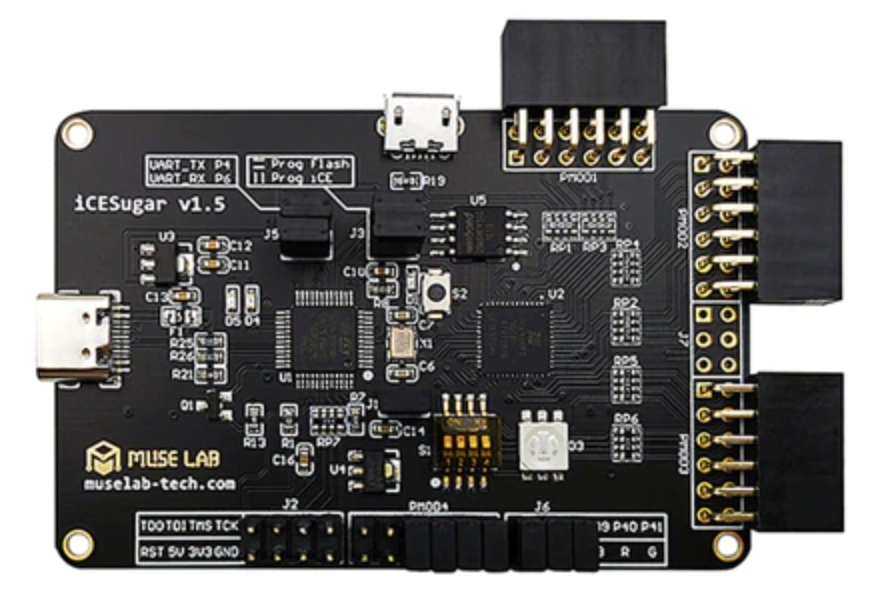
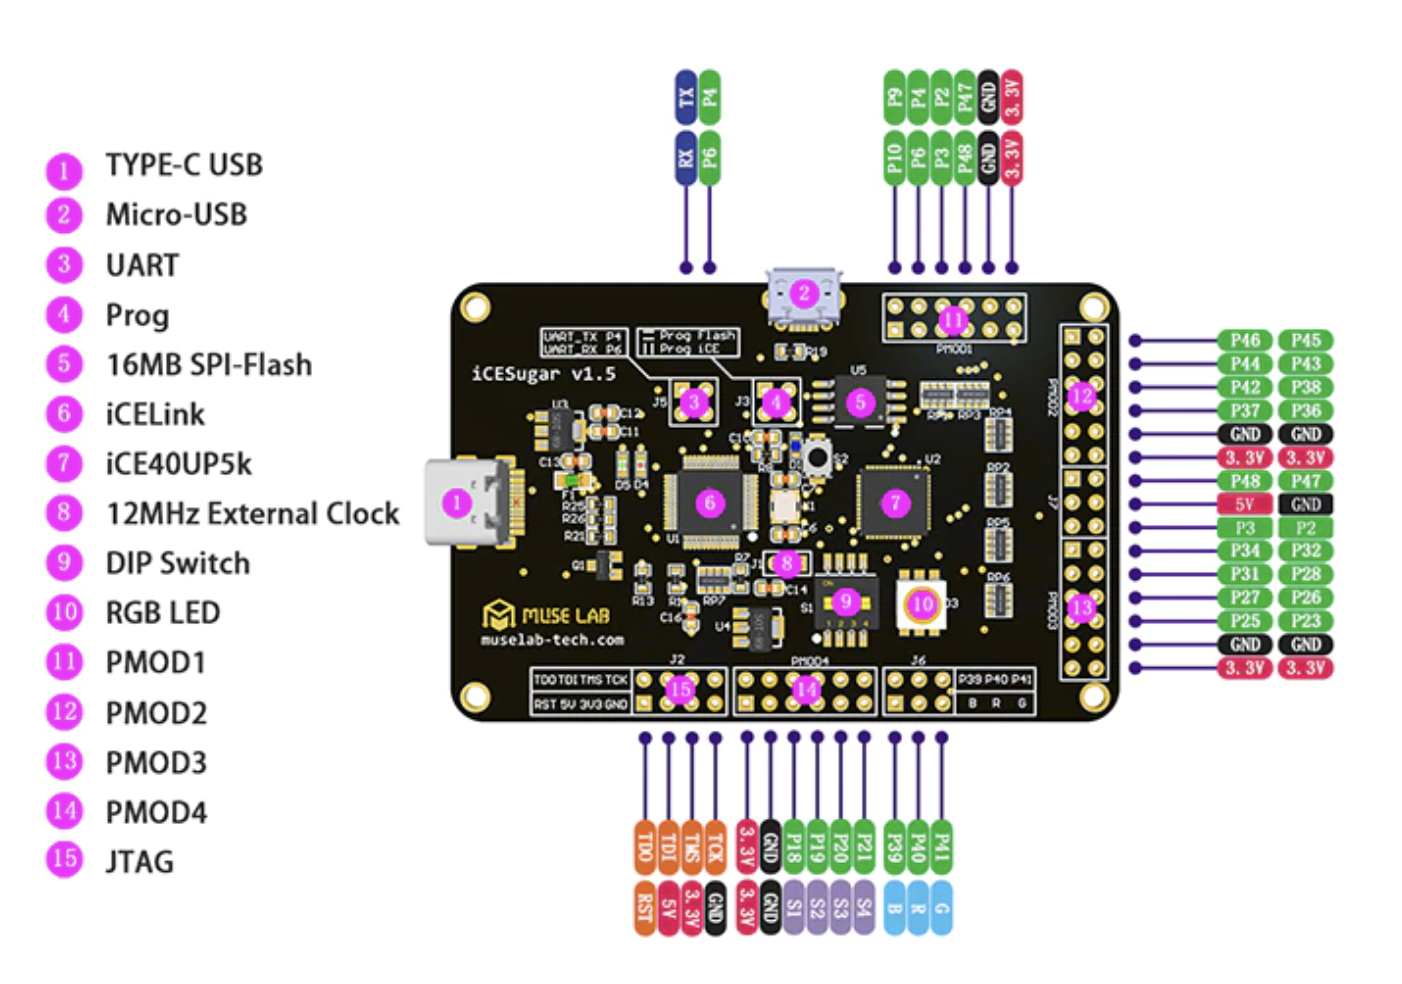
In this tutorial, iCESugar-v1.5 fpga board will be used.
1. Connect the primary UART (UART0) interface of your FPGA board to a serial port of your host computer.
If you are using wsl/wsl2, follow the procedures below:
# Run Bash:
$ sudo apt install linux-tools-5.4.0-77-generic hwdata
$ sudo update-alternatives --install /usr/local/bin/usbip usbip /usr/lib/linux-tools/5.4.0-77-generic/usbip 20

# Run Powershell in administrator mode:
$ usbipd wsl list
# Select the bus ID of the device you’d like to attach to WSL and run:
$ usbipd wsl attach --busid <busid>

# Run Bash to check if the target device is attached or not:
$ lsusb
2. Open a connection to the the serial port your UART is connected to. Configure the terminal setting according to the following parameters:
$ sudo gtkterm- 19200 Baud
- 8 data bits
- 8 data bits
- no parity bits
- no transmission/flow control protocol
- receiver (host computer) newline on
\r\n(carriage return & newline)
Generate Target Bootloader Bitstream
$ cd {path to neorv32-setups}/osflow
$ sed -i 's/-p \\/-m ghdl -p \\/g' synthesis.mk

# make target bitstrem, since iCESugar-v1.5 fpga board is used:
$ make BOARD=iCESugar-v1.5 MinimalBoot

# Details of generating other types of bootloader bitstream are mentioned in {path to neorv32-setup}/osflow/README.md

# the following 3 files are generated: neorv32_iCESugar-v1.5_Minimal.asc, neorv32_iCESugar-v1.5_Minimal.bit, neorv32_iCESugar-v1.5_Minimal.json
Flash an Executable into FPGA Board using Bootloader
$ icesprog neorv32_iCESugar-v1.5_Minimal.bitThe bootloader program is now flashed into the fpga, now press the NEORV32 reset button to restart the bootloader, and the following lines will be shown:
<< NEORV32 Bootloader >>

BLDV: Feb 16 2022
HWV:  0x01060709
CLK:  0x05f5e100
ISA:  0x40901107 + 0xc000068b
SOC:  0x7b7f402f
IMEM: 0x00008000 bytes @0x00000000
DMEM: 0x00004000 bytes @0x80000000

Autoboot in 8s. Press any key to abort.
Aborted.

Available commands:
 h: Help
 r: Restart
 u: Upload
 s: Store to flash
 l: Load from flash
 e: Execute
CMD:>
Follow the procedures below:
1. Execute the "Upload" command by typing u. Now the bootloader is waiting for a binary executable to be send.
CMD:> u
Awaiting neorv32_exe.bin...
2. Use the "send file" option of your terminal program to send a NEORV32 executable (neorv32_exe.bin) to genterate neorv32_exe.bin, using the exmaple in neorv32-setup/sw/exmaple/demo_blink_led:
$ make clean_all install
Memory utilization:
   text    data     bss     dec     hex filename
   1004       0       0    1004     3ec main.elf
Compiling ../../../sw/image_gen/image_gen
Installing application image to ../../../rtl/core/neorv32_application_image.vhd

# now main.bin have been generated
3. If everything went fine, OK will appear in your terminal:
CMD:> u
Awaiting neorv32_exe.bin... OK
4. The executable is now in the instruction memory of the processor. To execute the program right now run the "Execute" command by typing e:
CMD:> u
Awaiting neorv32_exe.bin... OK
CMD:> e
Booting...
Flash an Execuatble into FPGA Board Directly
If you do not want to use the bootloader (or the on-chip debugger) for executable upload or if your setup does not provide a serial interface for that, you can also directly install an application into embedded memory.
$ sed -i 's/MEM_INT_IMEM_EN => false/MEM_INT_IMEM_EN => true/g' {path to neorv32-setup}/neorv32/rtl/core/neorv32_top.vhd
$ sed -i 's/INT_BOOTLOADER_EN => true/INT_BOOTLOADER_EN => false/g' {path to neorv32-setup}/neorv32/rtl/core/neorv32_top.vhd
To generate an "initialization image" for the IMEM that contains the actual application, run the install target when compiling your application, using the exmaple in neorv32-setup/sw/exmaple/demo_blink_led:
$ make clean_all install
Memory utilization:
   text    data     bss     dec     hex filename
   3176       0     120    3296     ce0 main.elf
Compiling ../../../sw/image_gen/image_gen
Installing application image to ../../../rtl/core/neorv32_application_image.vhd
The install target has compiled all the application sources but instead of creating an executable (neorv32_exe.bit) that can be uploaded via the bootloader, it has created a VHDL memory initialization image core/neorv32_application_image.vhd.
This VHDL file is automatically copied to the core’s rtl folder (rtl/core) so it will be included for the next synthesis.
Then:
- Perform a new synthesis. The IMEM will be build as pre-initialized ROM (inferring embedded memories if possible).
- Upload your bitstream. Your application code now resides unchangeable in the processor’s IMEM and is directly executed after reset.
The synthesis tool / simulator will print asserts to inform about the (IMEM) memory / boot configuration:
NEORV32 PROCESSOR CONFIG NOTE: Boot configuration: Direct boot from memory (processor-internal IMEM).
NEORV32 PROCESSOR CONFIG NOTE: Implementing processor-internal IMEM as ROM (3176 bytes), pre-initialized with application. We support teens coding
Teenagers are the pillars of the future society. For the society to have strong development, especially in terms of science and technology, nurturing them is indispensable. Seeing this, the Hong Kong Millennium Lions Club launched a programming continuous training course, mainly targeting primary school students in grades three to six. They continue to develop competitions […] 2022-11-06 10:25:23
Teenagers are the pillars of the future society. For the society to have strong development, especially in terms of science and technology, nurturing them is indispensable. Seeing this, the Hong Kong Millennium Lions Club launched a programming continuous training course, mainly targeting primary school students in grades three to six. They continue to develop competitions in training, and even sponsor their competitions in Hong Kong or internationally. In order to discover more elites in programming, so that they can make a contribution to Hong Kong technology.


 Cityu Appslab RISC-V talk
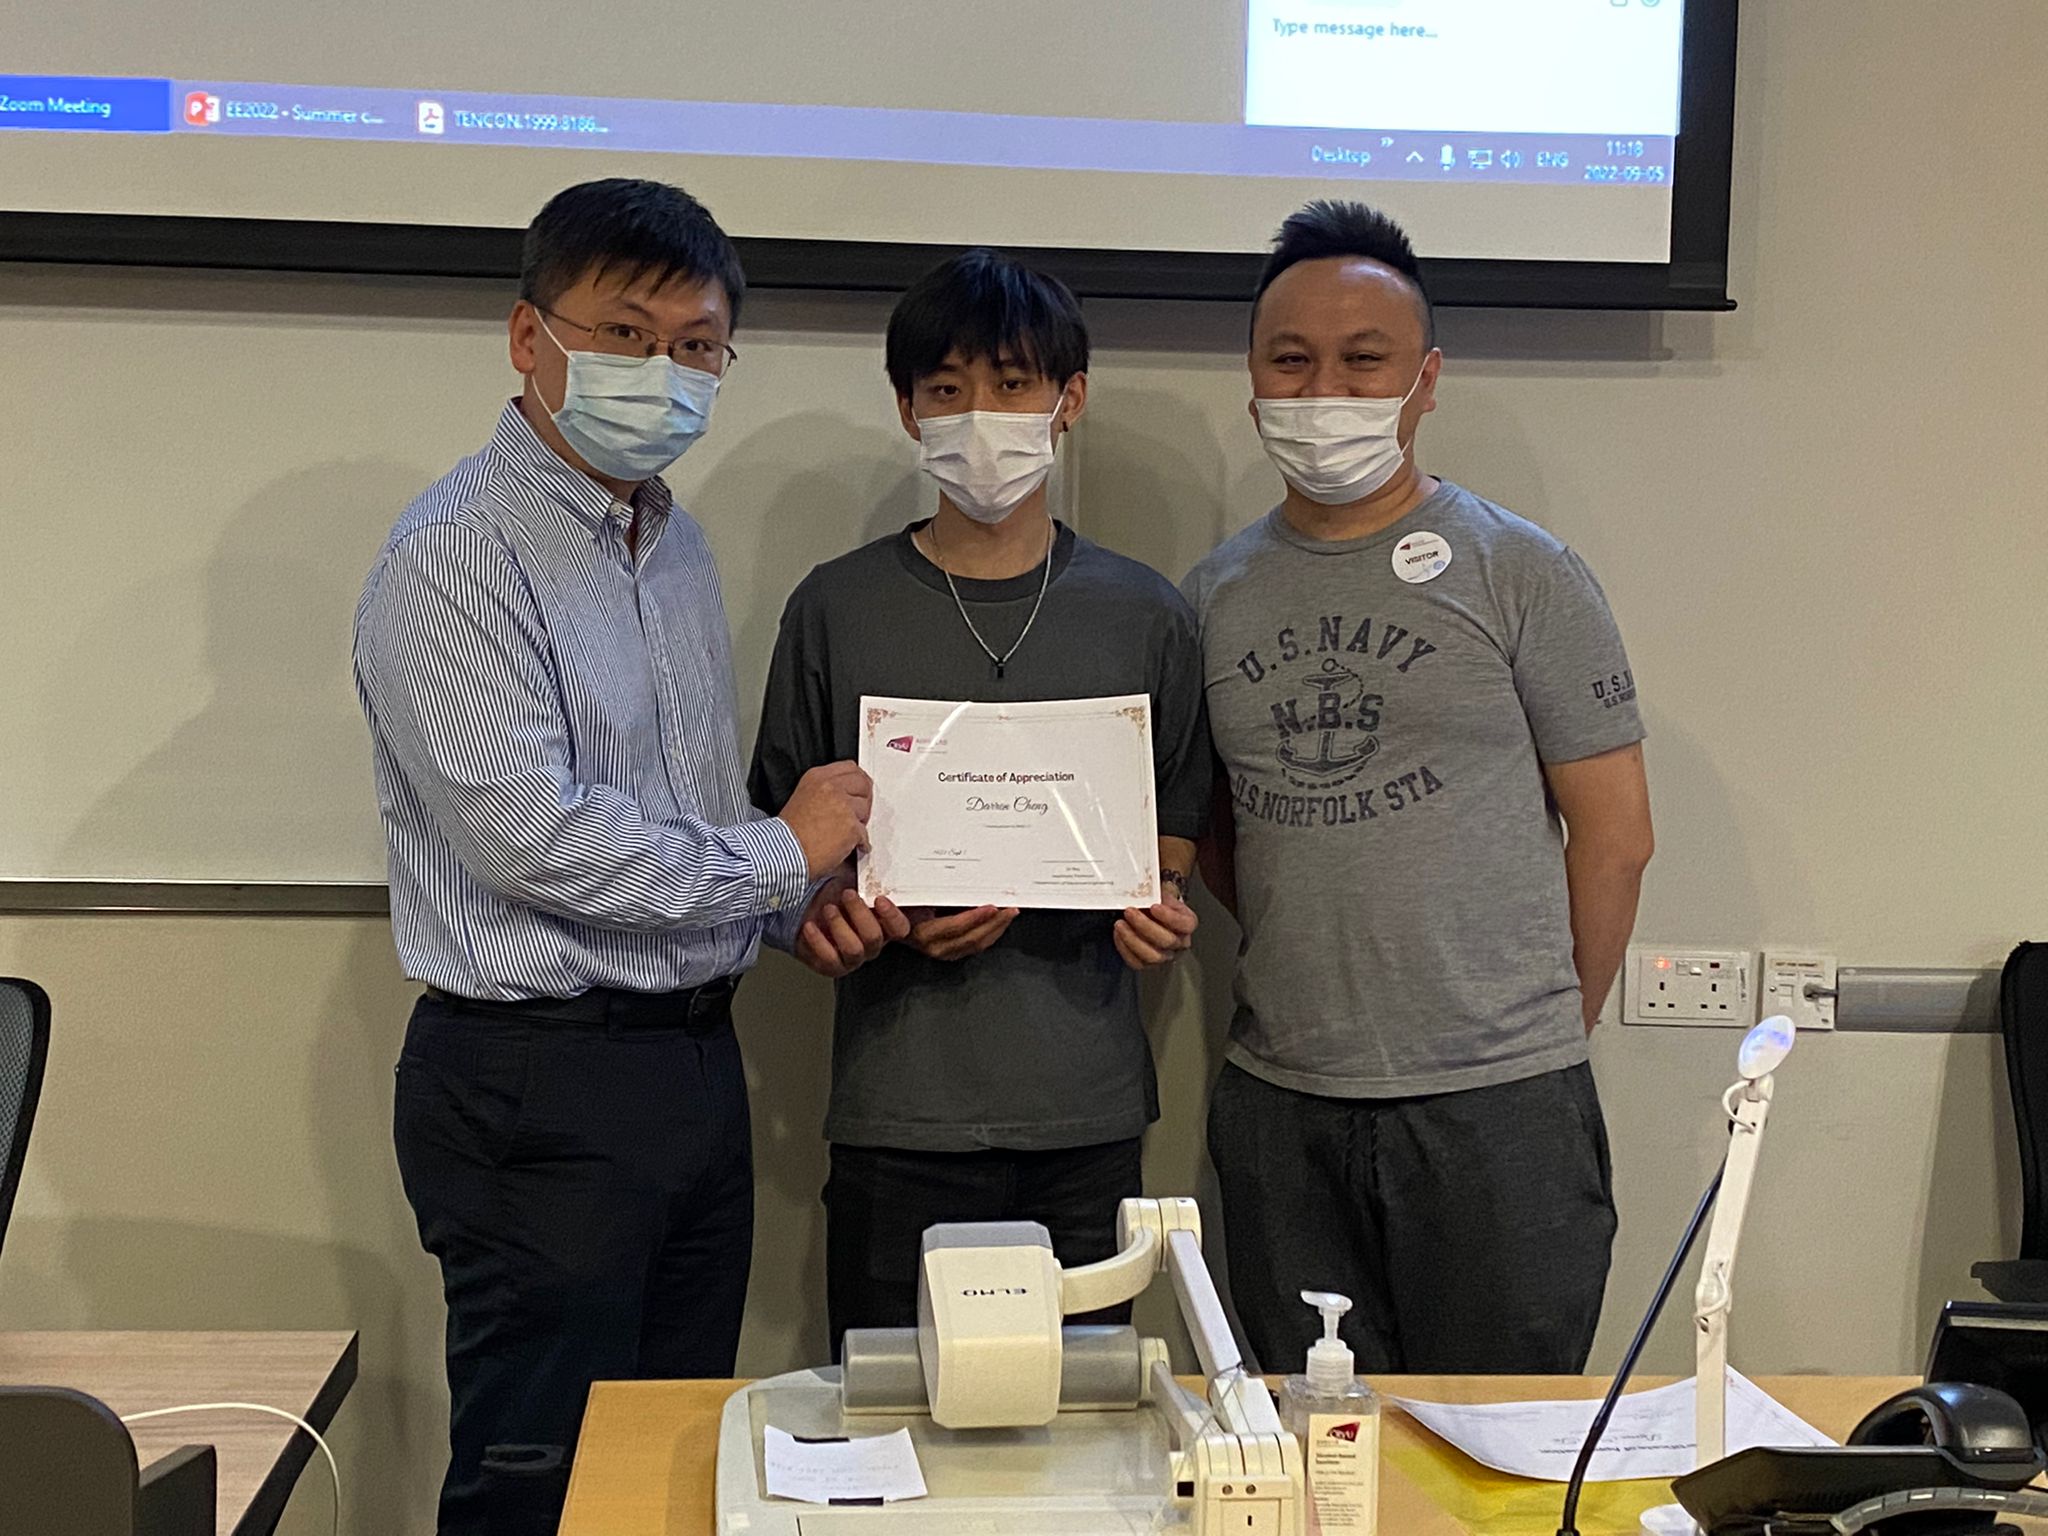
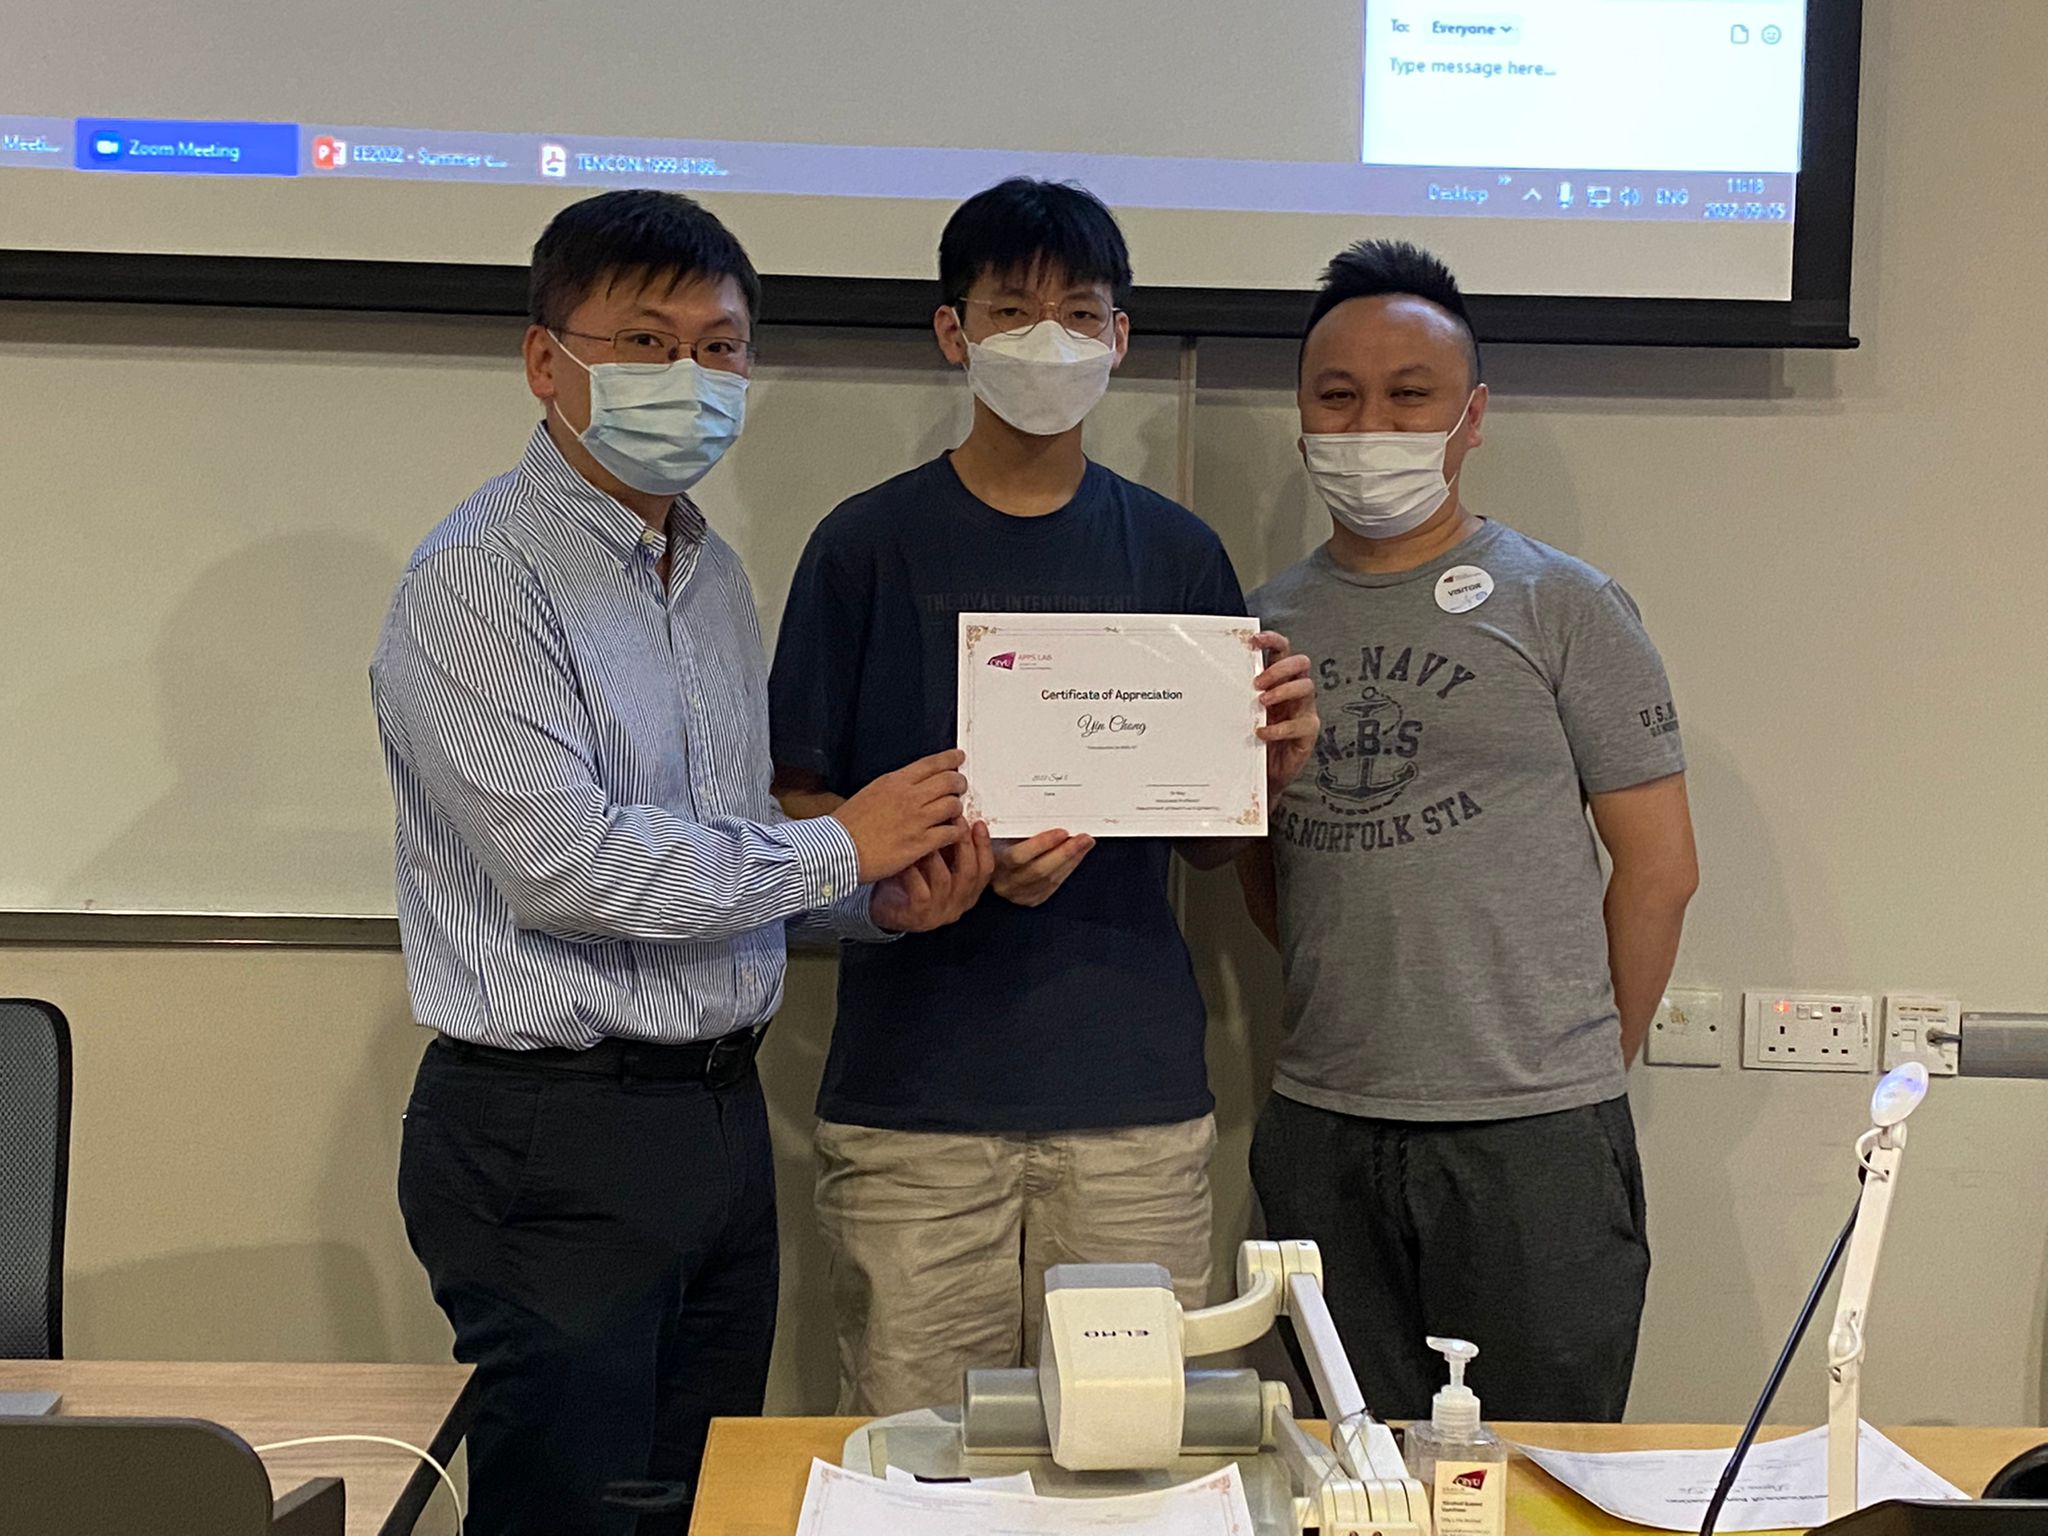
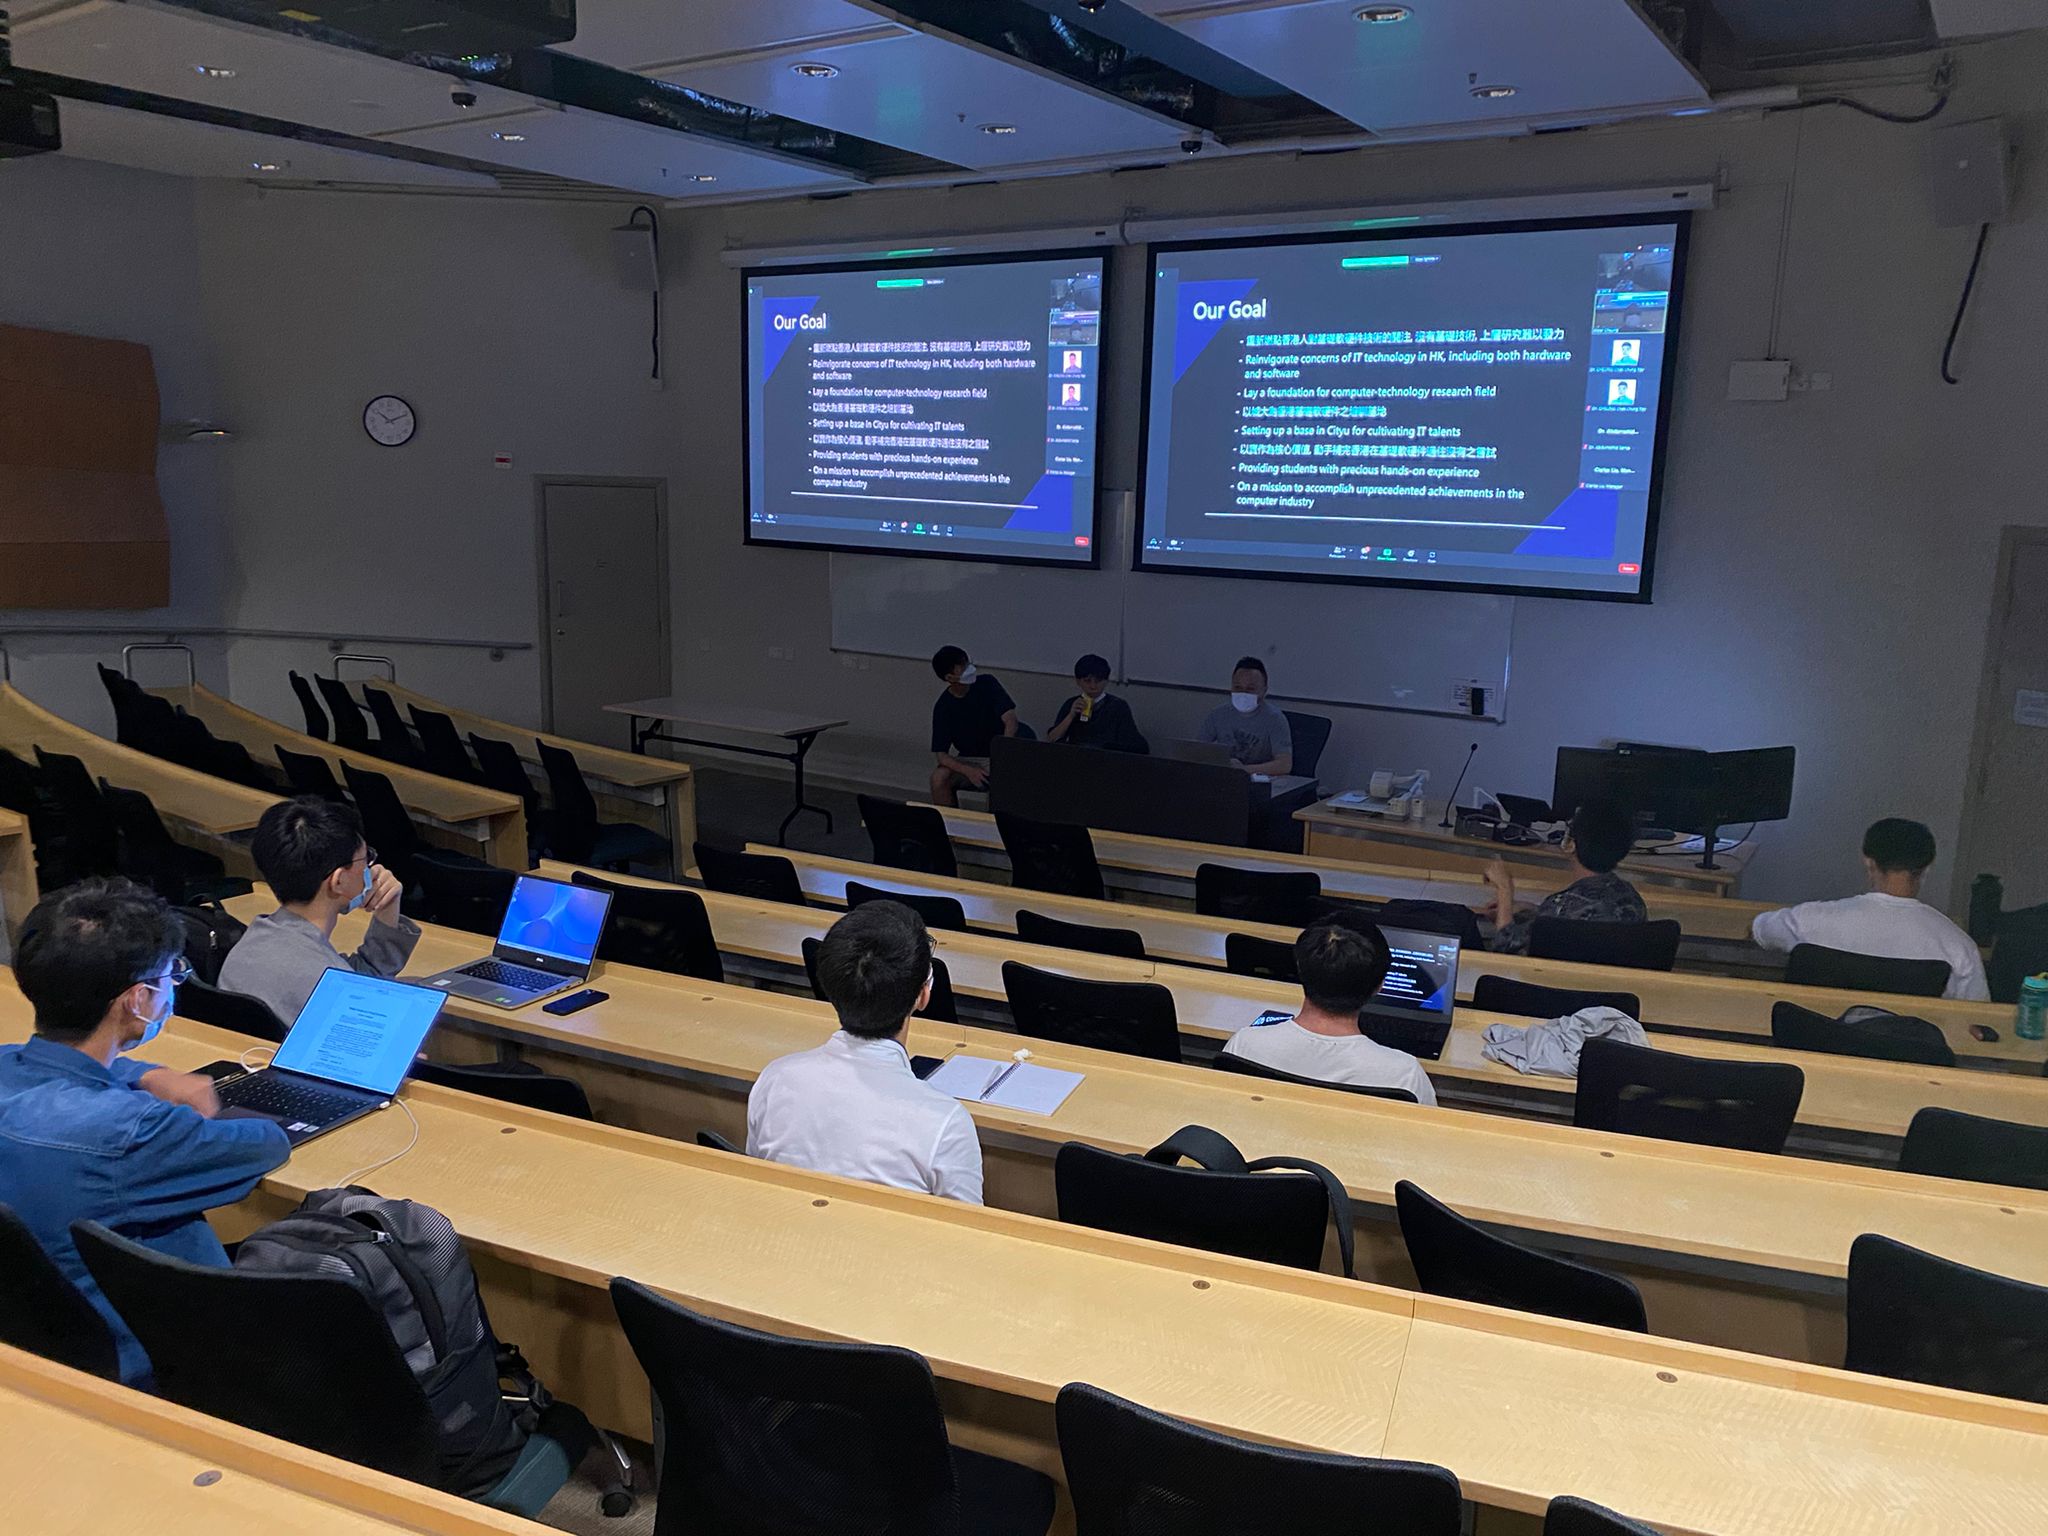
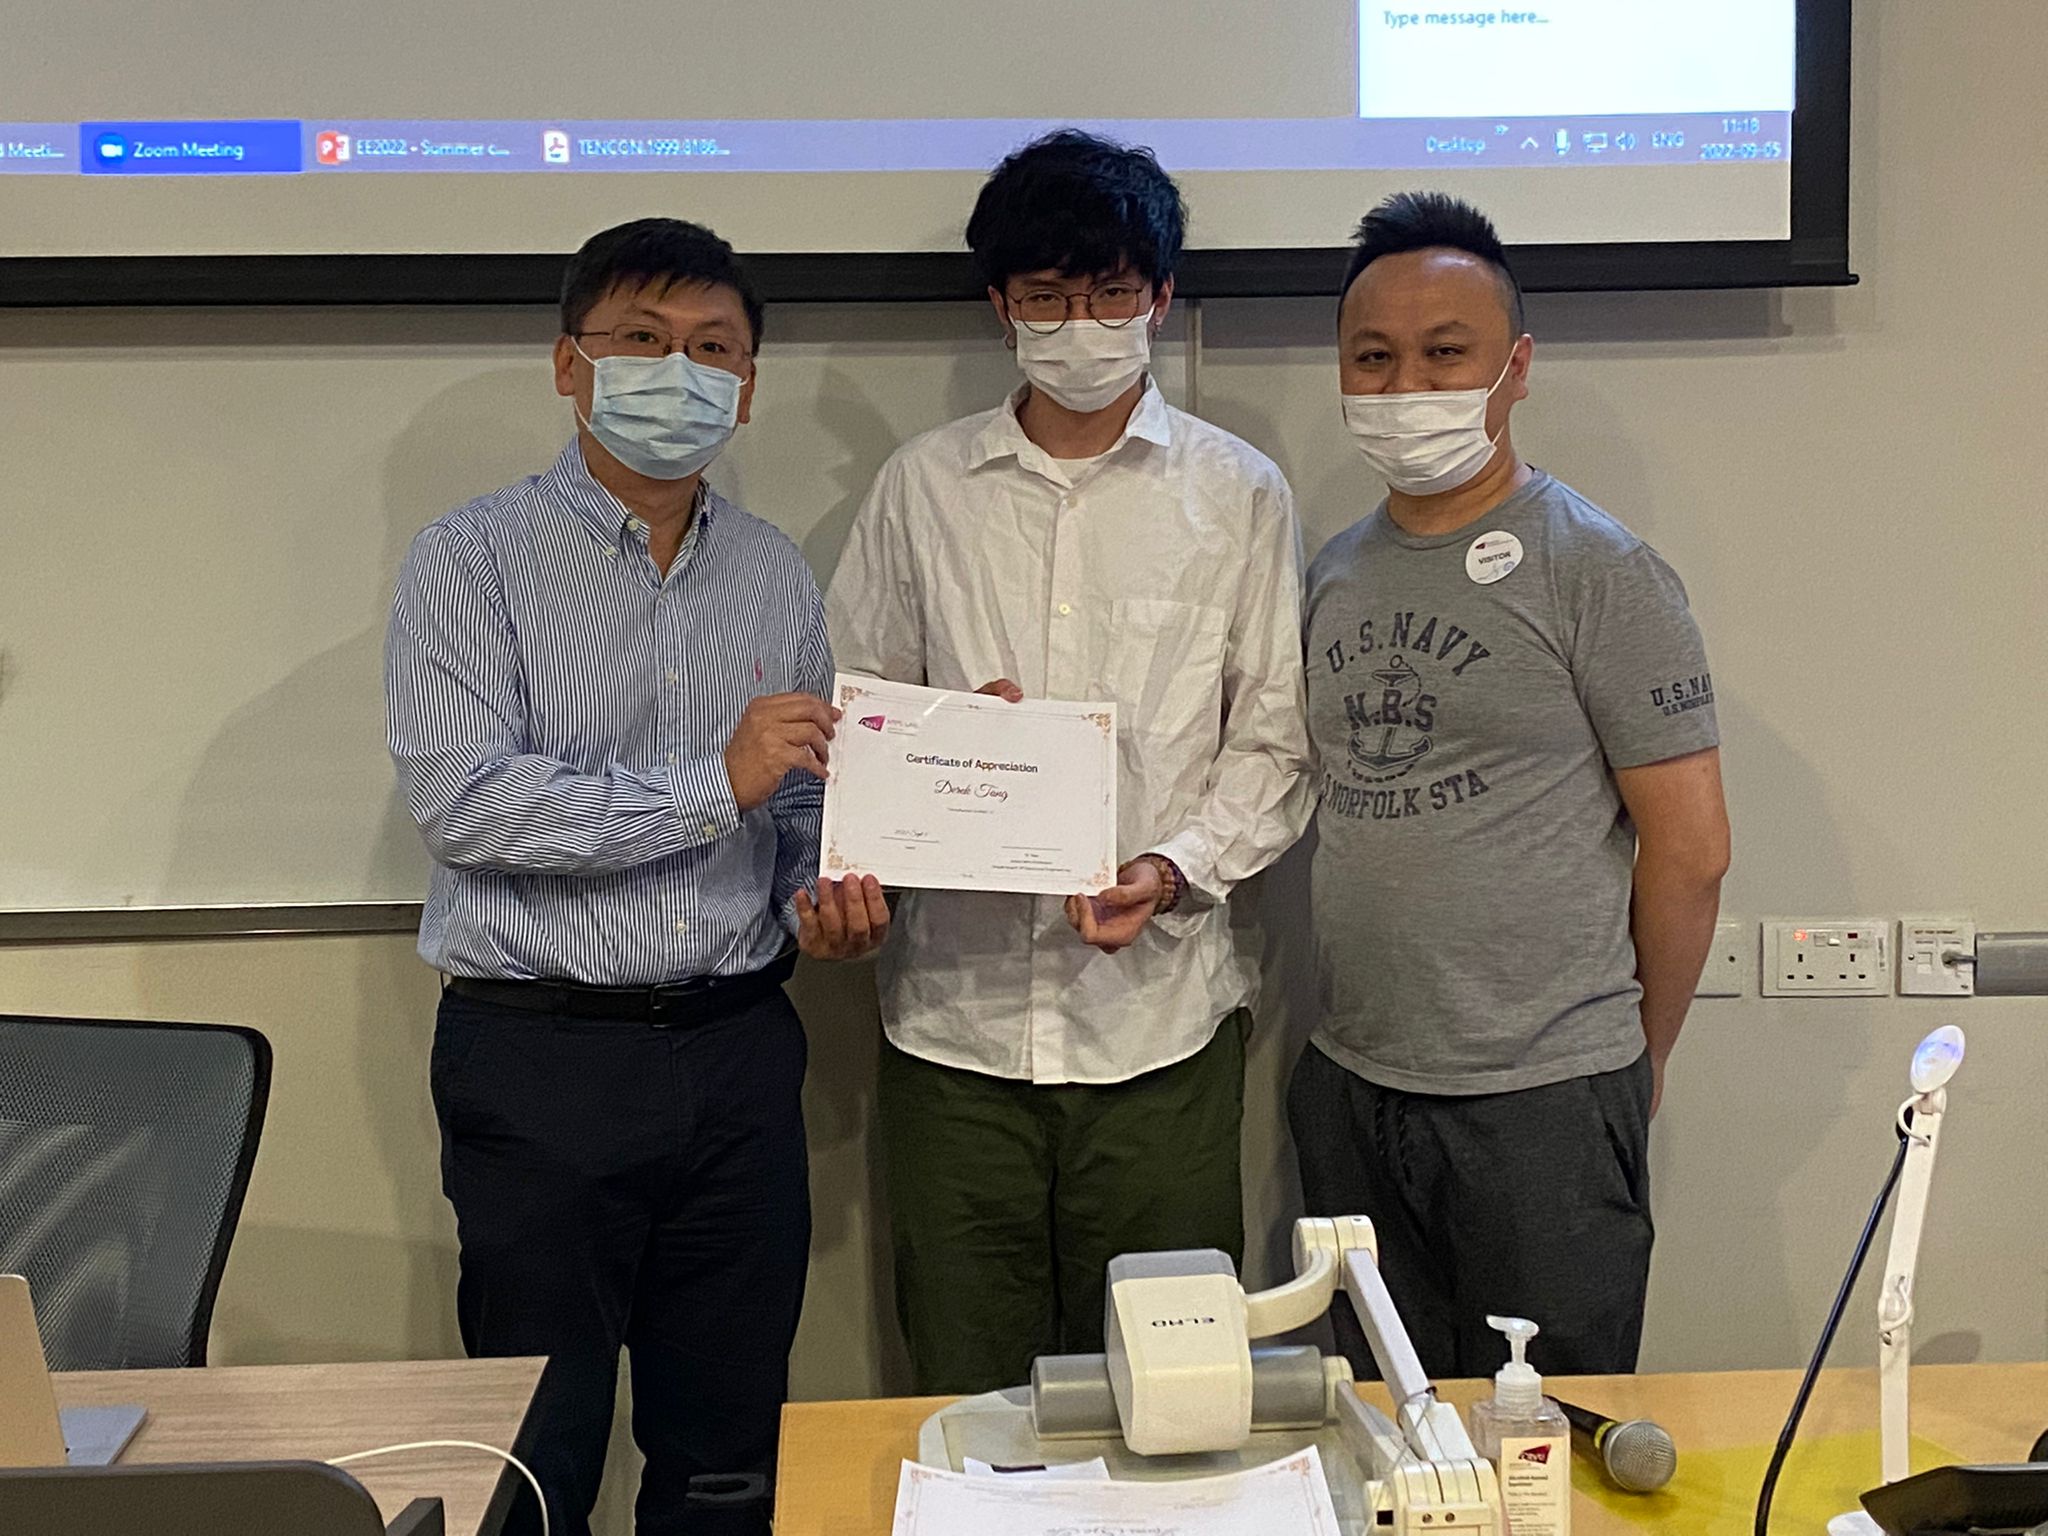
A good RISC-V talk hold in Cityu appslab. Motivate students to contribute in RISC-V development. Cityu Appslab CPU special interest group is the place to unite everyone on system coding. We hope we can use our code to have solid contribution in RISC-V. Powerpoint in here. 2022-09-05 15:38:47

 How to record qemu into our simulator workbench
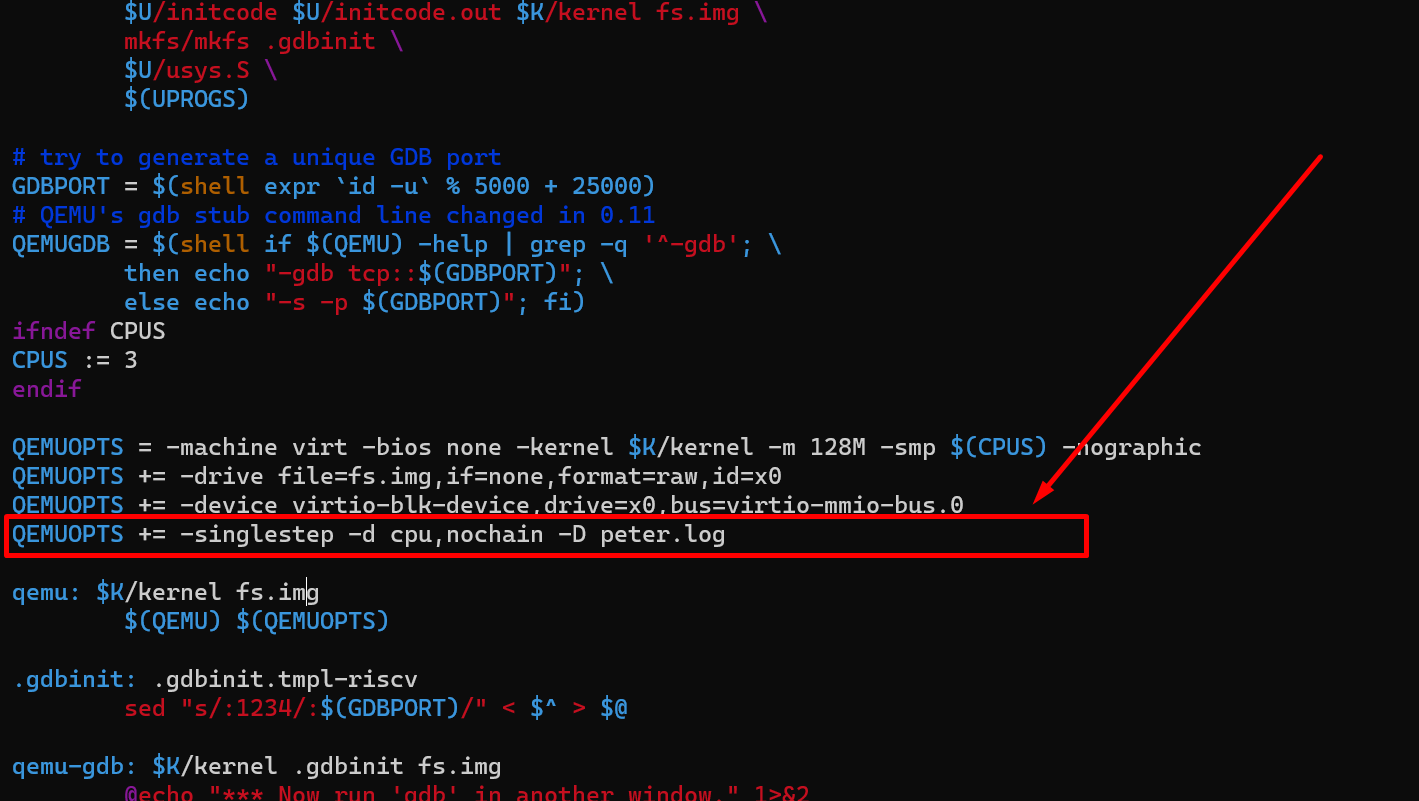
Step 1. Add “QEMUOPTS += -singlestep -d cpu,nochain -D peter.log” to XV6 Makefile Step 2. Run qemu in XV6, “make qemu”, then you will have the file “peter.log” Step 3. Clone this project https://gitlab.com/quantr/toolchain/qemu-importer Step 4. Modify these values in red, remember the GUI has to start with your user name to login to https://www.quantr.foundation/simulator-workbench/ […] 2022-08-26 12:42:42
Step 1. Add "QEMUOPTS += -singlestep -d cpu,nochain -D peter.log" to XV6 Makefile
Step 2. Run qemu in XV6, "make qemu", then you will have the file "peter.log"
Step 3. Clone this project https://gitlab.com/quantr/toolchain/qemu-importer
Step 4. Modify these values in red, remember the GUI has to start with your user name to login to https://www.quantr.foundation/simulator-workbench/
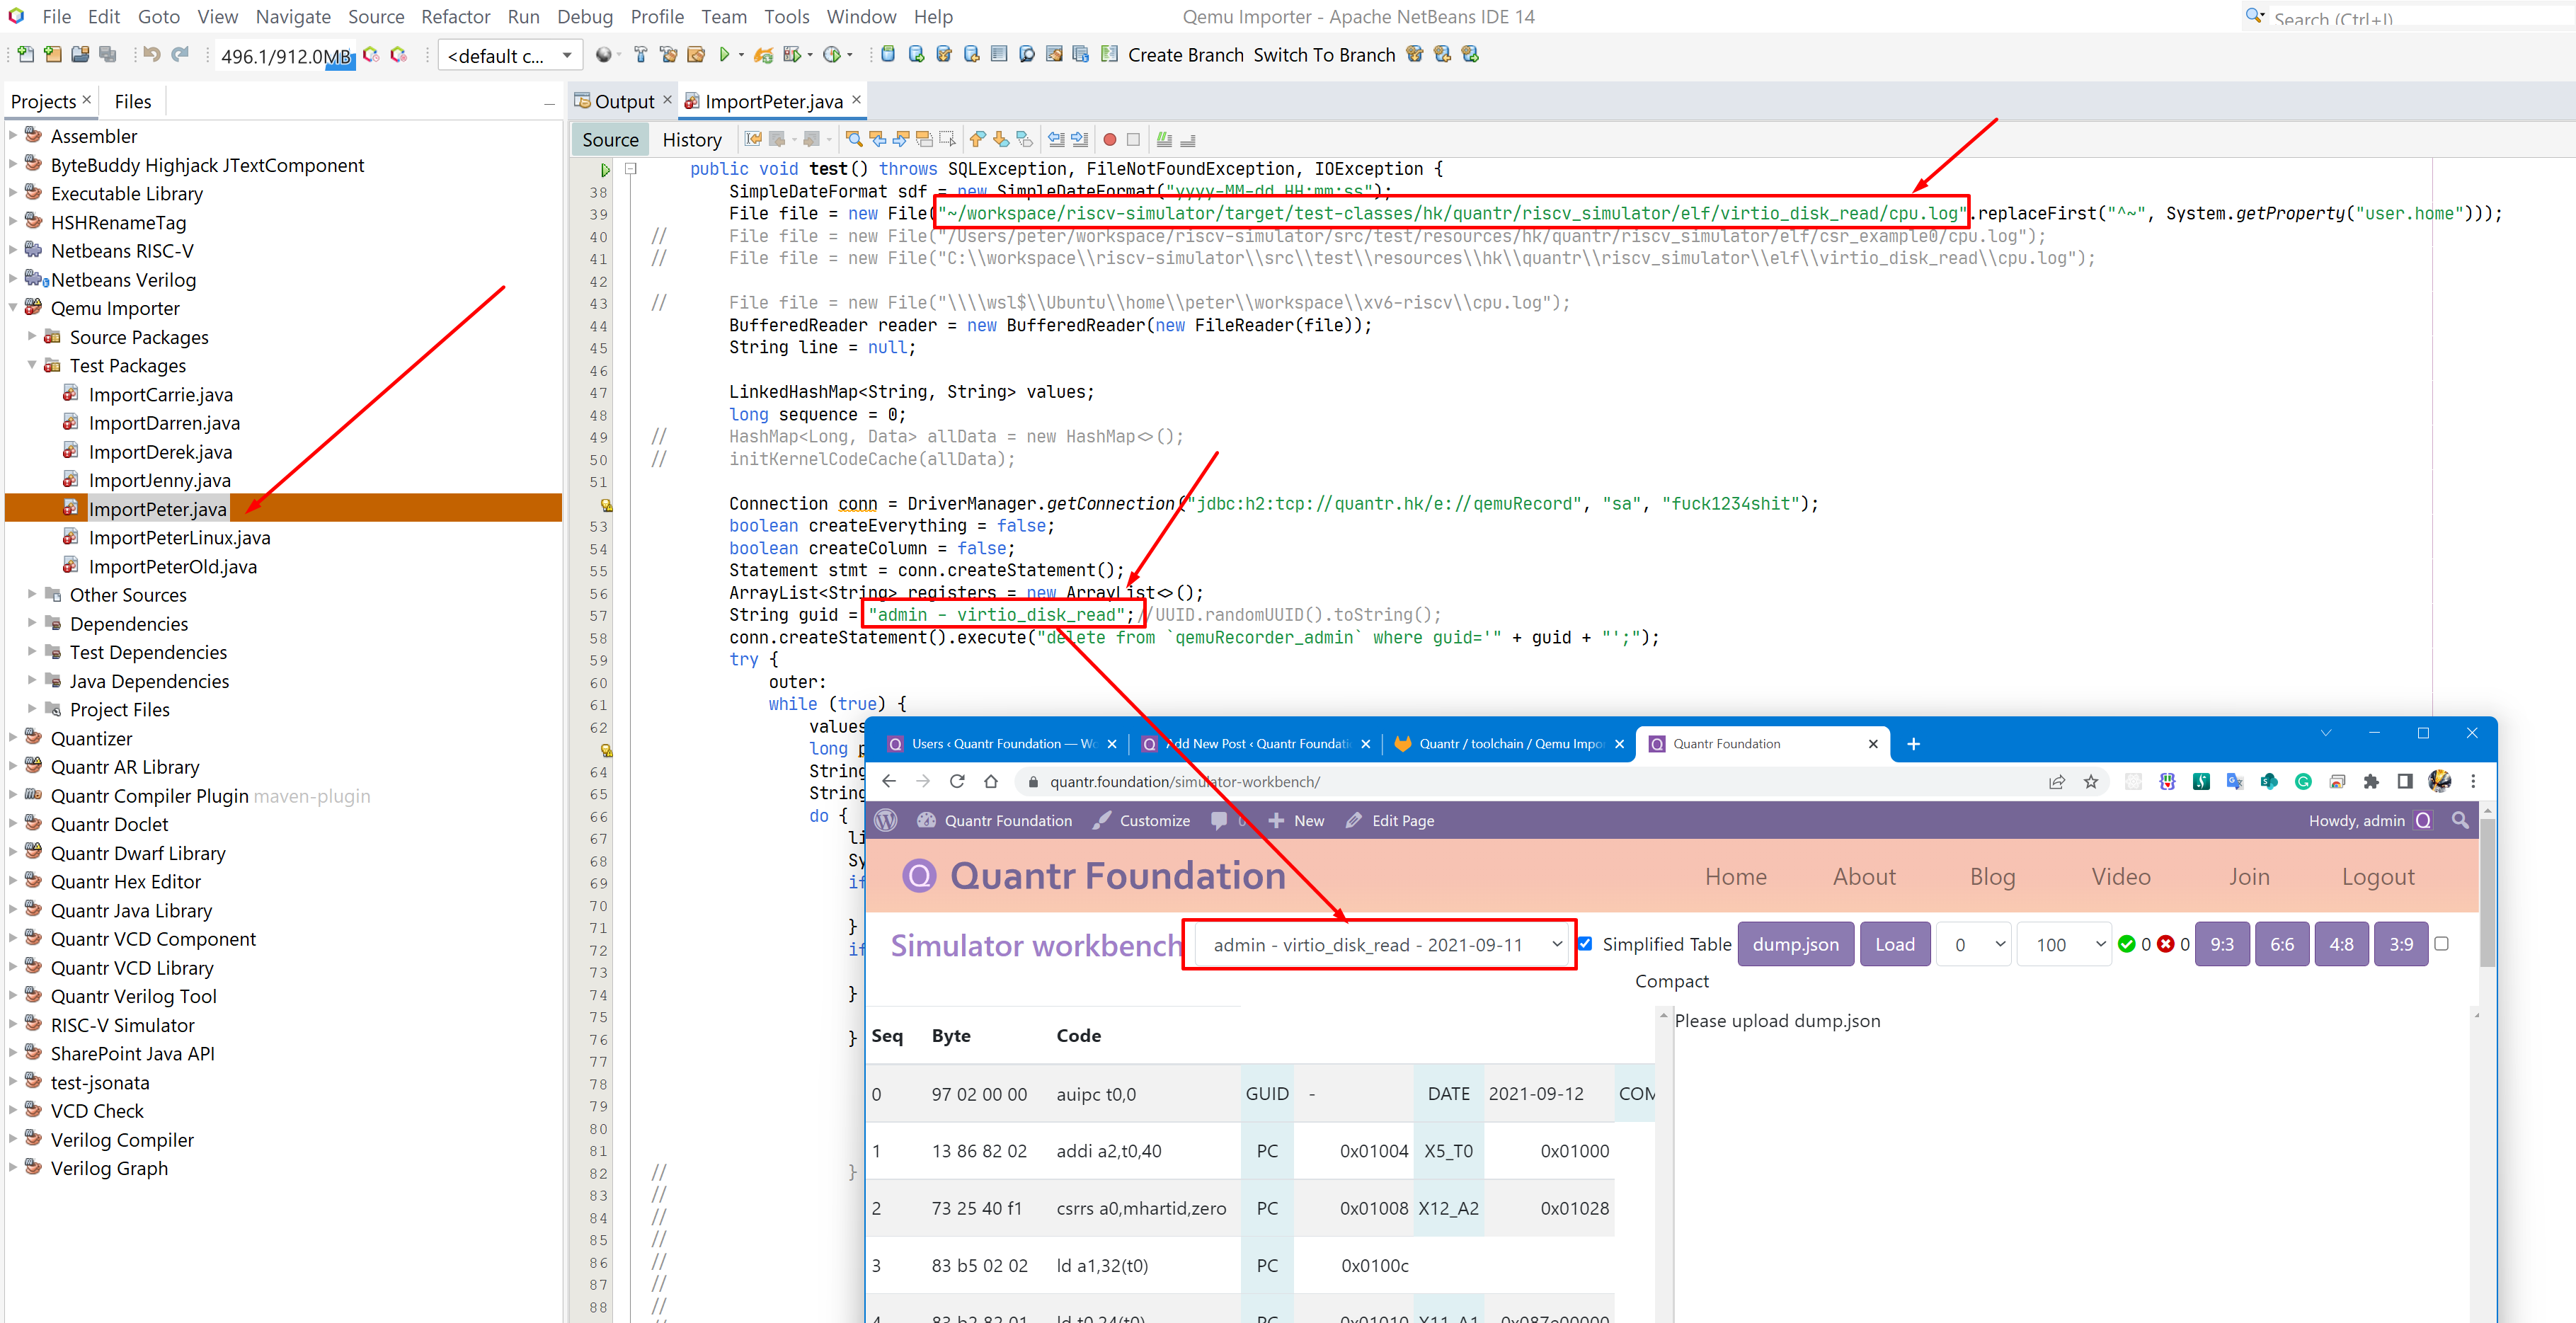
Step 5. Make sure CPUS := 1 in XV6 Makefile
Step 6. Just run the test case, refresh the workbench, your new record will appear in the drop down box
 Dr Ray's decisive contribution
We thank you Dr Ray for appointing me as a part-time staff of CityU. This is a decisive contribution and will record in our history, because of this, we can promote University and Industry collaborations, and have closer mentorship and advising to CityU students. We can sharpen our skills there and make our CPU development […] 2022-08-06 11:22:44
We thank you Dr Ray for appointing me as a part-time staff of CityU. This is a decisive contribution and will record in our history, because of this, we can promote University and Industry collaborations, and have closer mentorship and advising to CityU students. We can sharpen our skills there and make our CPU development process faster and easier. Society cannot progress without enthusiastic people, and Dr Ray just confirms this fact, and cultivate our students together.
We are implementing a brand new executable format, .QR (quantr riscv format), which is specially designed for maximizing the efficacy of RISC-V assembled files during execution. The following will be the walkthrough of our concept and design. Background We all know that the most commonly used executable file formats are PE (on Microsoft Windows), ELF […] 2022-08-01 16:26:16
We are implementing a brand new executable format, .QR (quantr riscv format), which is specially designed for maximizing the efficacy of RISC-V assembled files during execution. The following will be the walkthrough of our concept and design.
Background
We all know that the most commonly used executable file formats are PE (on Microsoft Windows), ELF (on Linux and most other versions of Unix), Mach-O (on mac OS and iOS), and MZ (on DOS). All these executable file formats have a particular time of development, and there is no doubt about their accessibility and efficiency.
However, when it comes to dealing with RISC-V assembled files, although there are no significant defects with these formats, they failed to take advantage of the CPU to compile the files.
Another notable point is that currently all executable file formats are written in binary format, and the main advantage of this format is that the data can be read and written more efficiently. However, due to the rapid development of CPU technologies, the speed of CPU has been increasing a lot, and the benefits gained from binary format are fainting. Meanwhile, there are two critical defects of it:
- Hard to perform partial data transformation.
- Hard for human to read and understand, making it extremely difficult to edit and extend.
As a result of all the factors combined, we decided to create our new format, .QR (quantr), which aims to solve the shortcomings of other executable file formats while taking advantage of the CPU to speed up the reading and writing process of RISC-V assembly files.
Unique Features
The following are the key features of the Quantr RISC-V executable file format:
- Support custom field: the Quantr RISC-V executable file format has no format constraints and custom fields such as security fields or performance tuning fields, can be added.
- Executable transform: allow to sections to change positions in the file.
- Executable merge: allow users to merge multiple sections into one section.
- Executable trim down: trim down redundant data to free up space, such as '0's used for alignment.
- Executable encrypt: encrypt the content in the file to enhance security.
- Dynamics PLT & GOT combination and optimization.
QR Library
We have implemented a library for processing the Java Structure of our format, QR.
Since we mainly use Java to develop our toolchain, such as our RISC-V simulator, we will also use it to build our library to reduce the program's complexity.
In our library, we used Jackson to serialize and deserialize the structure of our format and Jsonata as the JSON query language.
 Netbeans formatting
All team members has to use same formatting, otherwise we have to merge useless code Set the author 2022-05-22 01:04:09
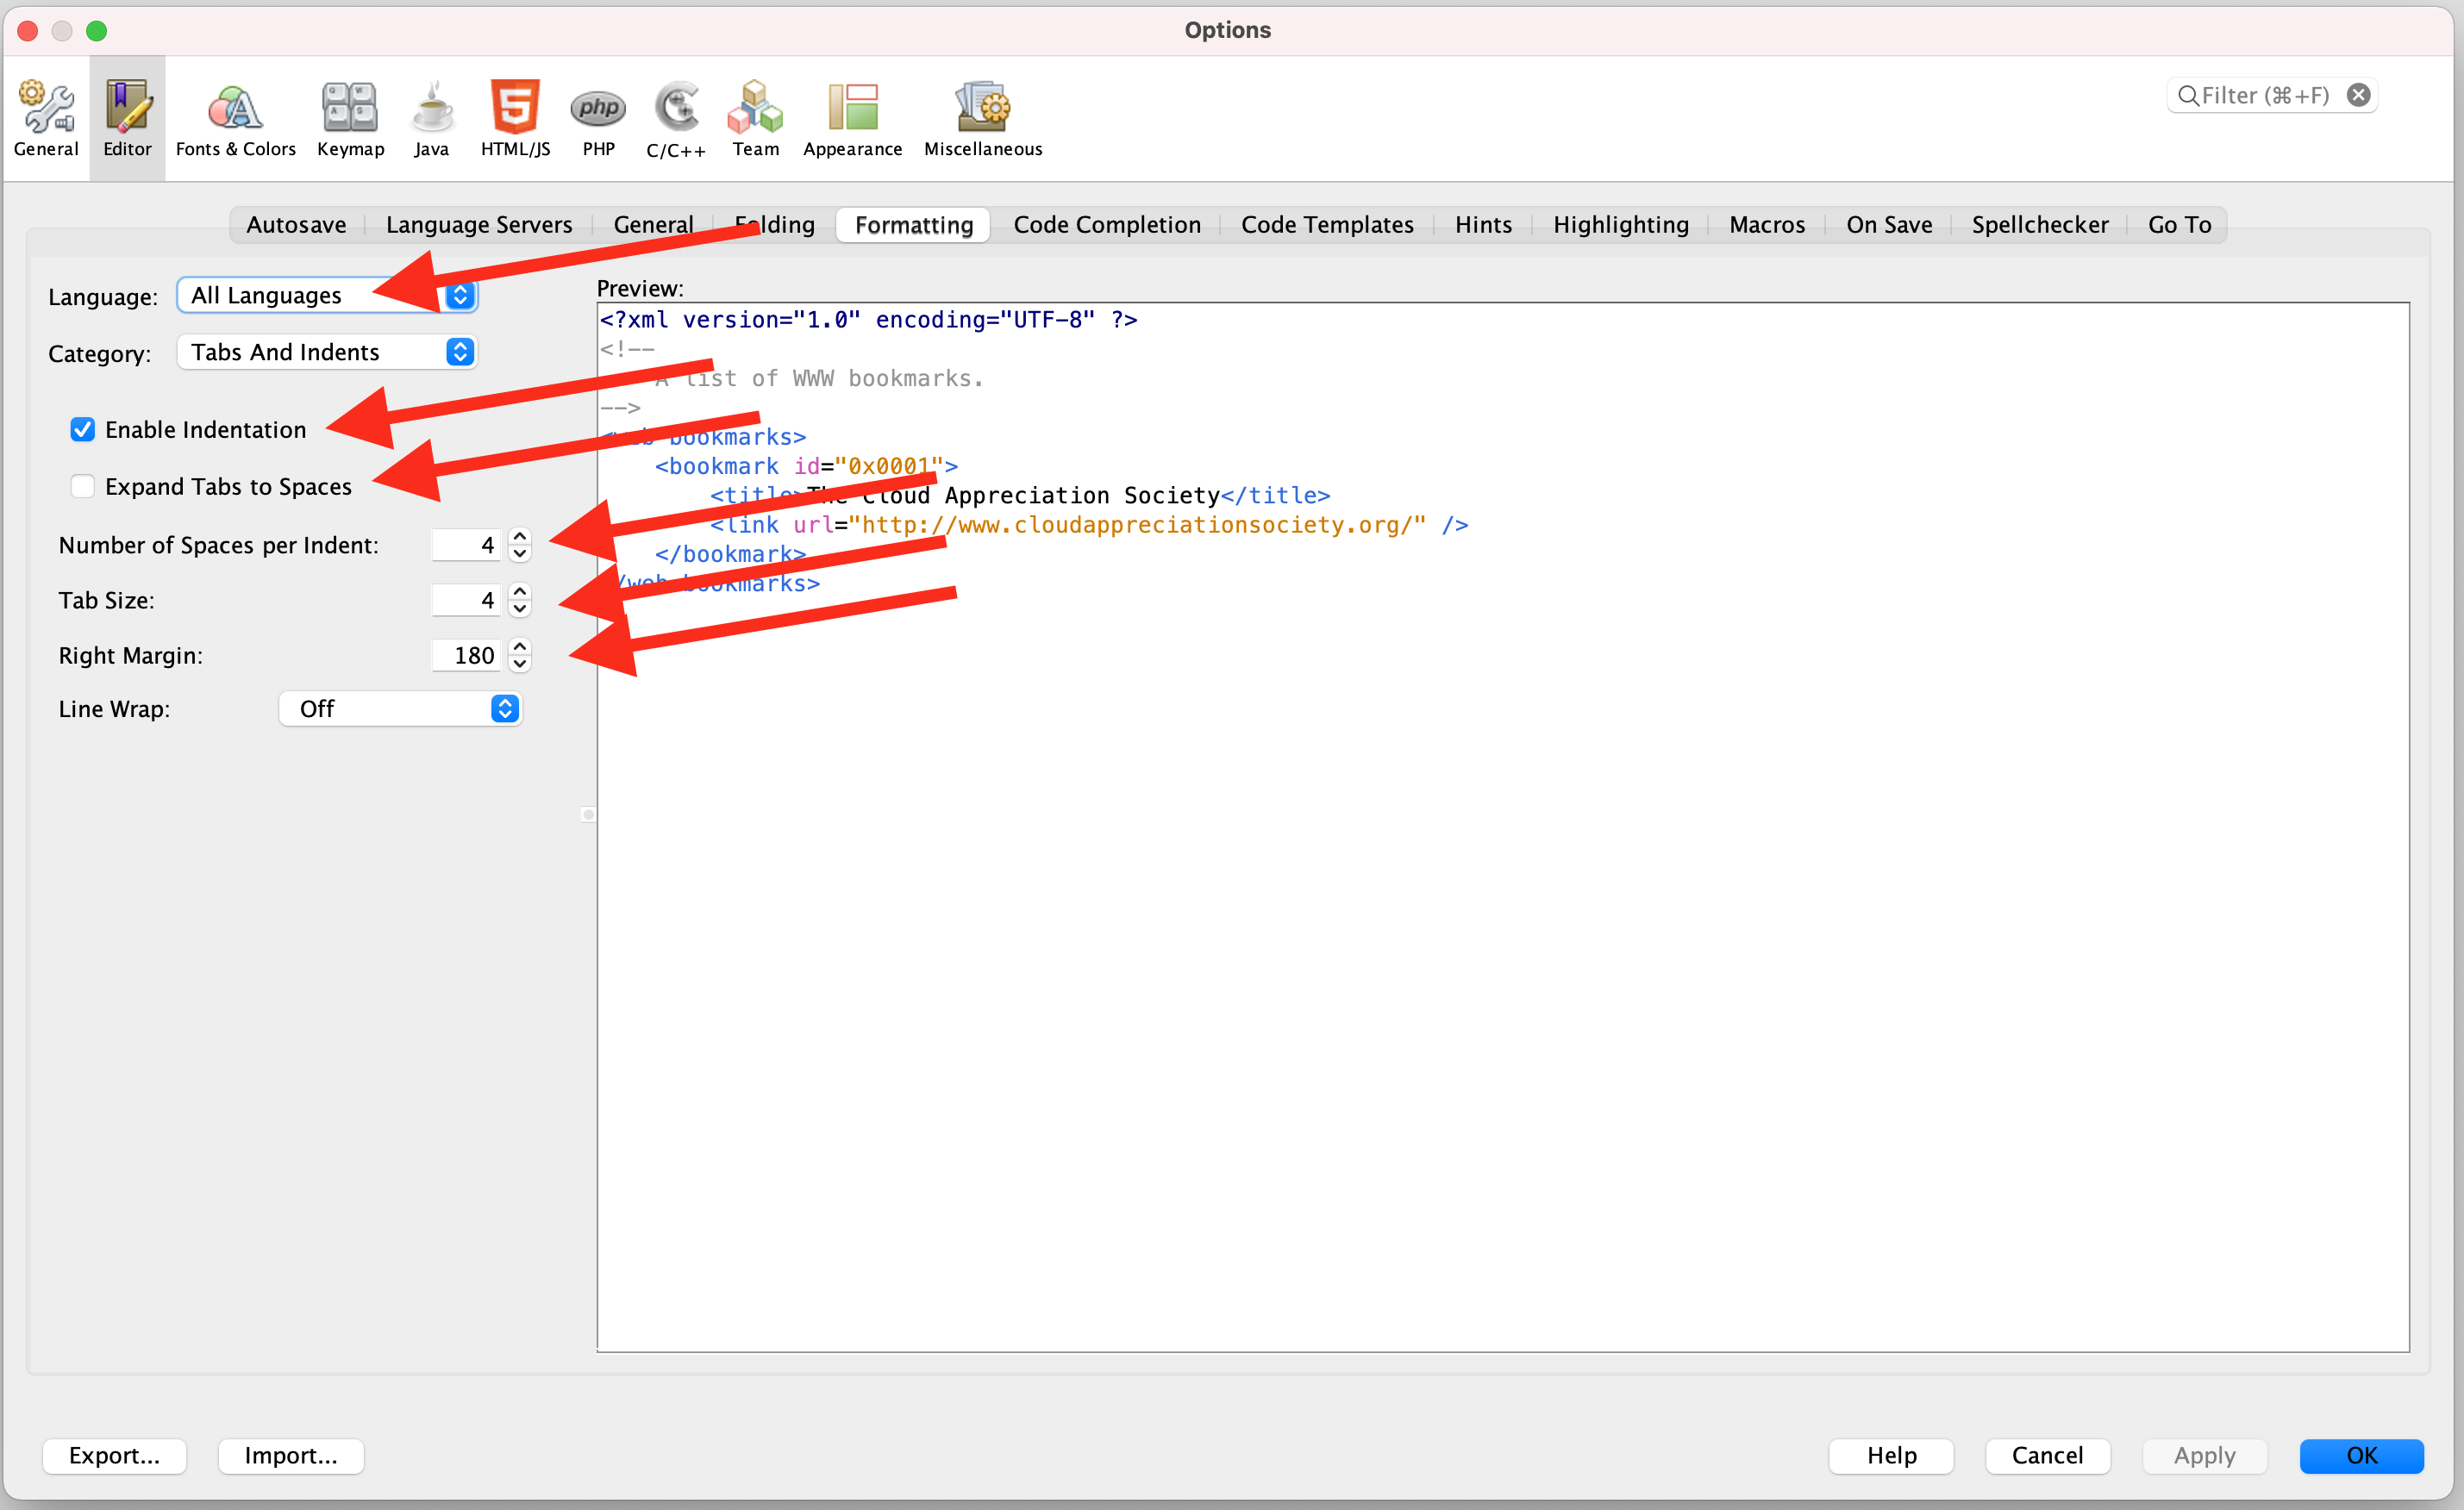
All team members has to use same formatting, otherwise we have to merge useless code
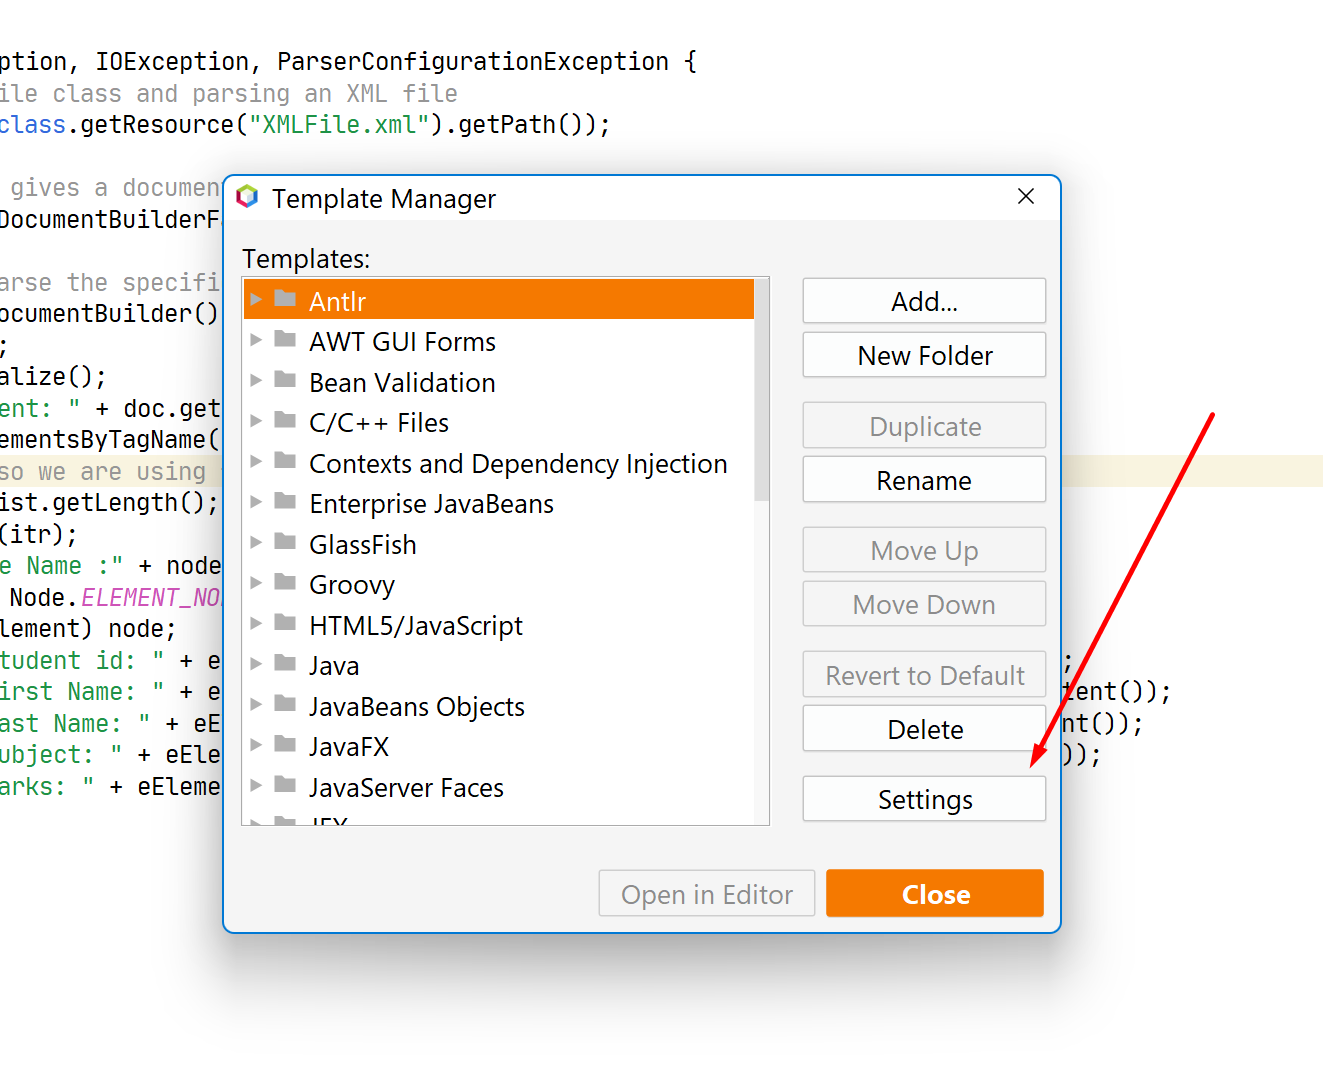
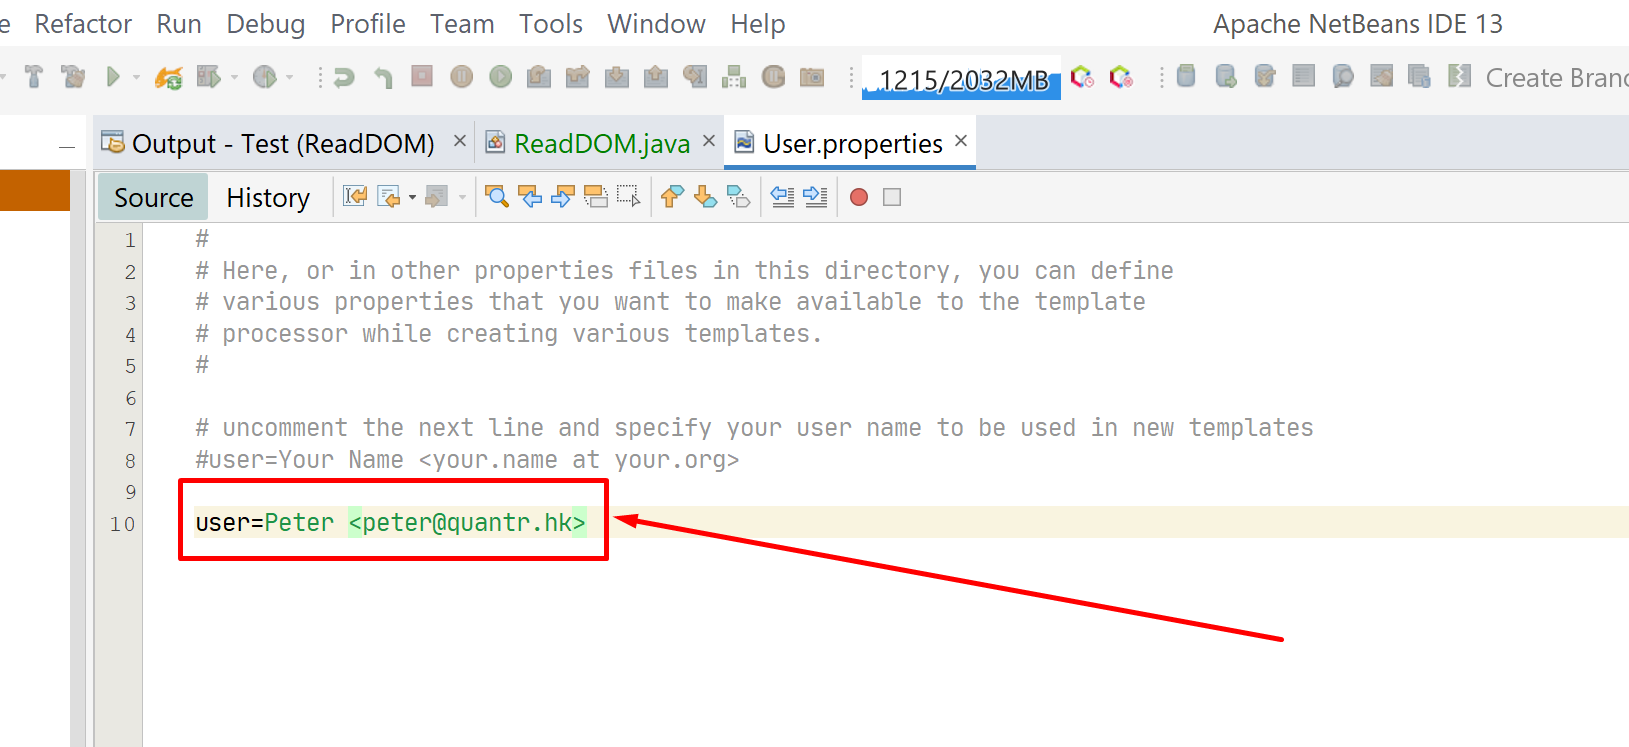
Set the author

This post will describe the skill you need to join the development, I separate it into different sections by the project. Assembler Simulator Operating System CPU 2022-04-25 18:04:27
This post will describe the skill you need to join the development, I separate it into different sections by the project.
Assembler
- Java coding skill
- Object oriented programming
- Maven https://maven.apache.org/guides/getting-started/maven-in-five-minutes.html
- How pom.xml work
- How maven.quantr.hk work
- How gitlab CI/CD publish to maven.quantr.hk
- Netbeans https://docs.oracle.com/javase/tutorial/getStarted/cupojava/netbeans.html
- Package project into an executable jar and run it by "java -jar xxx.jar"
- Learn how to use Apache Commons Library
- Common-cli https://commons.apache.org/proper/commons-cli/
- Common-io https://commons.apache.org/proper/commons-io/
- Checkout all libraries in https://gitlab.com/quantr/toolchain/Assembler/-/blob/master/pom.xml and try to understand what are they
- Git https://www.atlassian.com/git
- Know how to clone/commit/add/push
- Try to create a project in GitLab, clone it, add some files, and push them back. https://www.tutorialspoint.com/gitlab/index.htm
- If fork another project, how to get update from original repo
- Gitlab https://www.youtube.com/watch?v=mX7lKoabmDw
- Learn basic usage, such as view commit, checkout older version
- Learn how our CI/CD work
- Antlr https://www.antlr.org/ and https://pragprog.com/titles/tpantlr2/the-definitive-antlr-4-reference/
- Run the examples in the first few chapters
- Create a maven project and let it compile the grammar for you
- Learn how to use our antlr plugin https://www.quantr.hk/netbeans/ and https://peter.quantr.hk/2017/09/2475/ and https://peter.quantr.hk/2017/09/netbeans-antlr-plugin-great-enhancement/
- RISC-V computer architecture
- Understand what is it https://en.wikipedia.org/wiki/RISC-V
- Try to write some assembly code https://www.youtube.com/watch?v=XVU_RNiz09A and https://www.youtube.com/watch?v=PMzbRMsGpwU
- Build RISC-V toolchain
- Run it https://github.com/TheThirdOne/rars
- Do simple maths calculations, addition and subtraction
- Jump https://github.com/riscv-collab/riscv-gnu-toolchain , use below commands to compile program
- GCC
- GAS
- Understand RISC-V official syntax and AT&T syntax https://docs.opentitan.org/doc/rm/asm_coding_style/
- Inline assembly https://stackoverflow.com/questions/69034346/riscv-inline-assembly-in-gcc-atomic-load-store
- LD
- Learn how linker script work
- Conditional branch
- Understand stack https://ithelp.ithome.com.tw/m/articles/10267662
- Call and return, understand frame pointer https://twilco.github.io/riscv-from-scratch/2019/07/28/riscv-from-scratch-4.html , write a simple program that main() -> func1() -> func2() , tell me show RISC-V distinguish the frame area among func1() and func2()
- Load and Store, write a simple program that sum all bytes in memory
- RISC-V interrupt and exception, make sure know what registers controlling the interrupt
- RISC-V paging and memory protection https://gitlab.com/quantr/toolchain/riscv-simulator/-/tree/master/src/test/resources/hk/quantr/riscv_simulator/elf , do address translate by hand
- Floating Point
- IEEE 754, learn how to encode and decode by hand
- What RISC-V instruction can do floating point operations, write some examples
- Virtio https://juejin.cn/post/6891922292075397127
- Read the Unprivileged spec https://riscv.org/technical/specifications/
- Try to read the Privileged Spec, as an undergraduate student, you won't be able to practice it, just read as much as you can
Simulator
- Prepare all the above skillsets
- Learn how to encode and decode RISC-V instruction by hand https://www.youtube.com/watch?v=VNy-J0u7-jY
- Understand how many different types of instruction https://www.cl.cam.ac.uk/teaching/1617/ECAD+Arch/files/docs/RISCVGreenCardv8-20151013.pdf
- Handwriting encode and decode instructions
- Learn how to write Makefile https://makefiletutorial.com/
- Create a simple Makefile yourself
- Understand our Makefile https://gitlab.com/quantr/toolchain/cpu/quantr-i/-/blob/main/Makefile and https://gitlab.com/quantr/toolchain/cpu/quantr-i/-/blob/main/testcase/ex/Makefile
- Learn GCC toolchain
- GCC
- LD
- Objdump
- Readelf
- Autotools
Operating System
- Bootloader
- ABI
- Standard C library, newlib
- Linker script
- Executable Format
- Dwarf
- Interrupt
- File System
- Kernel Structure
- Paging
- Task state structure
- Memory protection
- I/O
CPU
- Verilog
- Pipeline design
We need to make these changes to qemu, to make our simulator workbench to capture all data we need, including all instruction disassemble lines and memory access records1. git clone https://github.com/qemu/qemu.git2. since latest qemu not work with xv6, so switch to v5.2.0 by git checkout tags/v5.2.03. modify accel/tcg/translate-all.c, infunction tb_gen_code, change this To 4. Edit […] 2021-07-17 18:10:21
We need to make these changes to qemu, to make our simulator workbench to capture all data we need, including all instruction disassemble lines and memory access records
1. git clone https://github.com/qemu/qemu.git
2. since latest qemu not work with xv6, so switch to v5.2.0 by git checkout tags/v5.2.0
3. modify accel/tcg/translate-all.c, infunction tb_gen_code, change this
    if (phys_pc == -1) {
        /* Generate a temporary TB with 1 insn in it */
        cflags &= ~CF_COUNT_MASK;
        cflags |= CF_NOCACHE | 1;
    }
To
    if (phys_pc == -1 || true) {
        /* Generate a temporary TB with 1 insn in it */
        cflags &= ~CF_COUNT_MASK;
        cflags |= CF_NOCACHE | 1;
    }
4. Edit target/riscv/cpu.c, add "tlb_flush(cs);" at the end of function "riscv_cpu_dump_state", to let use capture all memory r/w operations, we have to keep flushing the tlb, since TLB operations are not record in trace.
5. Compile Qemu
./configure --target-list=riscv64-softmmu --enable-plugins
make -j8
sudo make install OUHK students finished their fyp about RISC-V with us
These are the OUHK FYP projects, student co-work with us on RISC-V topics. One of the project listed on OUHK website https://www.hkmu.edu.hk/st/engsc/fyp/2021-22/risc-v-simd-simulation/ 2021-07-01 00:10:17
These are the OUHK FYP projects, student co-work with us on RISC-V topics. One of the project listed on OUHK website https://www.hkmu.edu.hk/st/engsc/fyp/2021-22/risc-v-simd-simulation/